tf2的学习(一)

现在的ROS提倡使用tf2

tf2经过重新设计,只提供tf的关键功能,不涉及转换等函数。

tf_conversions.transformations.quaternion_from_euler(roll, pitch, yaw)

每个listener都有一个buffer储存所有tf广播发出的transforms,当广播发出transform时,需要花点时间(毫秒级)才会进入buffer,所以请求now的transform时,会有一小段时间差。

使用tf2_ros::BufferlookupTransform()函数可以获得tf树的指定时间的转换。常用的指定时间是ros::Time(0)ros::Time::now,前者是缓冲区中最新可用的转换,后者就是当前的时间。对于now,由于时间差,可能出现报警

有时会出现报警: Lookup would require extrapolation into the past

对于这个报警,我们有四种解决方法:

  1. 完善lookupTransform的参数,增加ros::Duration(sec),sec大于报警中的时间差即可
  2. 使用tf2_ros::Buffer的canTransform函数,有可用的变换了再获得
  3. 使用tf message filter
  4. 忽视这个报警,未成功获取的新transform会放弃

一个比较优雅的程序是这样的:

1
2
3
4
5
6
7
8
9
10
11
12
13
14
15
16
17
18
19
20
21
22
23
24
25
26
27
28
29
30
31
// #include <ros/ros.h>
// #include <tf2_ros/transform_listener.h>
// #include <geometry_msgs/TransformStamped.h>

ros::init(argc, argv, "tf_node");
ros::NodeHandle nh;
tf2_ros::Buffer buff;
tf2_ros::TransformListener listener(buff);
ros::Publisher pub = nh.advertise<geometry_msgs::TransformStamped>("transform",10);
ros::Rate rate(400);
while(nh.ok())
{
geometry_msgs::TransformStamped trans;
try {
ros::Time now = ros::Time::now();
// if(buff.canTransform("base_footprint","imu",now,
// ros::Duration(0.03),NULL)
// 30毫秒应该足够了
trans = buff.lookupTransform("base_footprint",
"imu", now,
ros::Duration(0.03) );
// else
// ROS_WARN("no transform in buffer");
} catch (tf2::TransformException & ex) {
ROS_WARN("%s", ex.what());
ros::Duration(1.0).sleep();
continue;
}
pub.publish(trans);
rate.sleep();
}

创建listener后,会接受tf2 transformations,对其缓存10秒。TransformListener对象应当是persist,否则cache不能填充。常见方法是让TransformListener对象作为类的成员变量。

lookupTransform获取的是TransformStamped消息,最后发布出来。因为加了Duration,try catch可以去掉。

由于实际上加了Duration,所以得到的不是当前的,而是上一个“当前”。换句话说,想得到当前最新的transform其实是没有意义的,一般都用ros::Time(0),Wiki上也是这么说的

怎么才知道我们修改后的程序有效了?一个是看程序运行后是否报警,还有就是echo transform话题,结果可以看到头部

只看seq和时间,如果增长一直很流畅,那就是修改生效了。如果修改还有问题,比如Duration时间太短,seq在增长一会后会有停顿,然后继续增长,这就是buffer里面空了,tf数据还没有插入到里面

已知点在子坐标系中的坐标和父子坐标系的变换,求点在父坐标系的坐标

用tf::transformPose更方便
1
2
3
4
5
6
7
8
9
10
geometry_msgs::PointStamped point_in, point_out;
point_in.header.frame_id = "child";
point_in.header.seq = 0;
point_in.header.stamp = ros::Time(0);
point_in.point.x = 2;
point_in.point.y = 1;
point_in.point.z = 4;

// buff跟上面的使用一样, 返回的point_out是point_in在 parent坐标系 的坐标
point_out = buff.transform(point_in, point_out, "parent", ros::Duration(1));

使用这段程序前,必须在find_package里添加 tf2-geometry-msgs,否则编译不成功。如果没有,需要先安装这两个包:

1
2
3
# 依赖库,  即使目前有,也要安装,可能需要更新
sudo apt-get install ros-kinetic-orocos-kdl
sudo apt-get install ros-kinetic-tf2-geometry-msgs

手动实现 tf2_ros::Buffer::transform函数

也就是用程序实现上面的转换

1
2
3
4
5
6
7
8
9
10
11
12
13
14
15
16
17
18
19
20
21
22
23
24
25
26
27
28
29
30
31
32
33
34
35
36
37
38
39
40
41
42
43
44
45
46
47
48
49
50
51
52
53
54
55
56
57
58
ros::init(argc, argv, "test_tf");
ros::NodeHandle nh;

tf2_ros::Buffer buff;
tf2_ros::TransformListener listener(buff);
geometry_msgs::TransformStamped transform =
buff.lookupTransform("parent","child",ros::Time(0),ros::Duration(1));

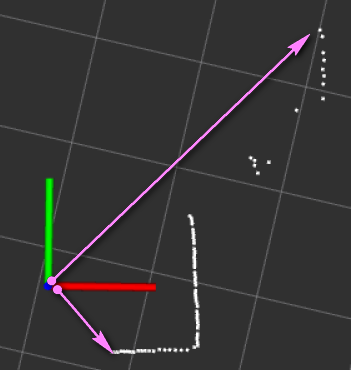
ROS_INFO("transform from parent to child x: %f",transform.transform.translation.x);
ROS_INFO("transform from parent to child y: %f",transform.transform.translation.y);
ROS_INFO("transform from parent to child z: %f\n",transform.transform.translation.z);

geometry_msgs::PointStamped point_in, point_out;
point_in.header.frame_id = "child";
point_in.header.seq = 0;
point_in.header.stamp = ros::Time(0);
// 在 child 坐标系中的点
point_in.point.x = 2;
point_in.point.y = 1;
point_in.point.z = 4;

ROS_INFO("point in child: 2, 1, 4\n");
point_out = buff.transform(point_in, point_out, "parent", ros::Duration(1));

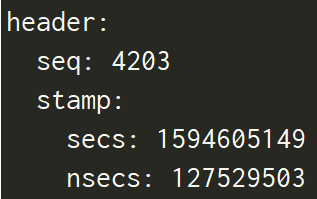
ROS_INFO("point int parent, x: %f",point_out.point.x);
ROS_INFO("point int parent, y: %f",point_out.point.y);
ROS_INFO("point int parent, z: %f\n",point_out.point.z);
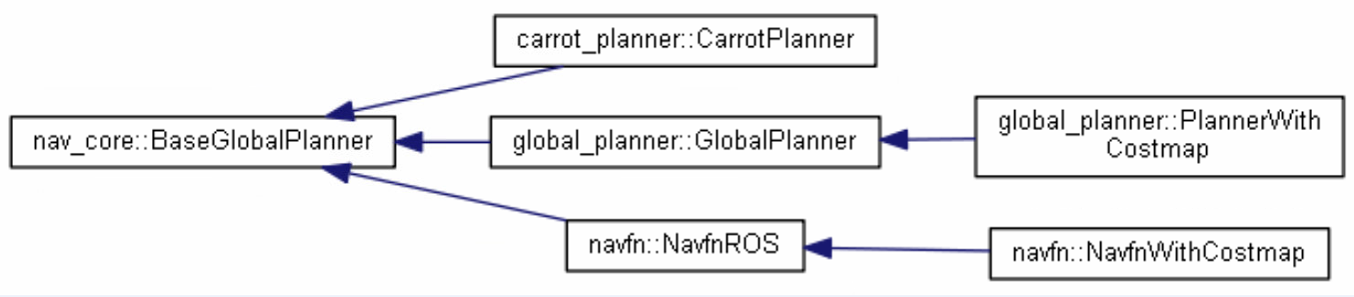
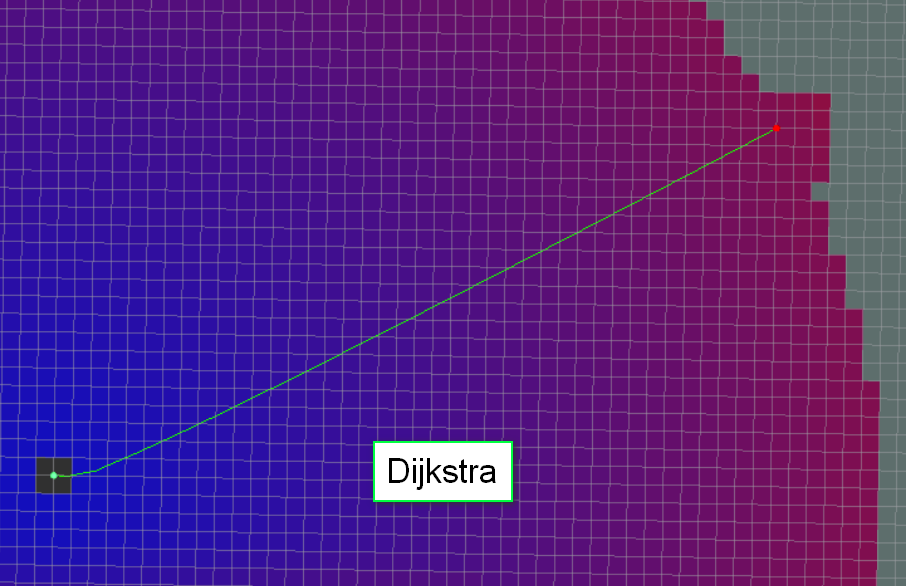
cout<<fixed<<setprecision(2);

Eigen::Quaterniond quaternion(transform.transform.rotation.w,
transform.transform.rotation.x,
transform.transform.rotation.y,
transform.transform.rotation.z
);
Eigen::Matrix3d rotation = quaternion.matrix();
cout << "rotation matrix: " <<endl<< rotation <<endl<<endl;

Eigen::Matrix4d m;
m.block(0,0,3,3) = rotation;

Eigen::Vector4d Vcol, Vrow;
Vcol << transform.transform.translation.x,
transform.transform.translation.y,
transform.transform.translation.z, 1;
m.col(3) = Vcol;

Vrow << 0,0,0,1;
m.row(3) = Vrow.transpose();
cout << "transform matrix: "<<endl<< m<<endl<<endl;

Eigen::Vector4d point;
point << point_in.point.x,
point_in.point.y,
point_in.point.z, 1;

Eigen::Vector4d transformed_point = m * point;
cout << "transformed point: "<<endl<<transformed_point.head(3) << endl;

我们已知parent-child的变换,首先需要从位移和欧拉角获得齐次变换矩阵,把point_in变换为齐次坐标,然后左乘齐次矩阵,再取结果的前三个元素。 tf变换的本质就是左乘变换矩阵

常用函数

1
2
3
4
5
6
7
8
9
10
11
12
13
void tf2::Transform::setIdentity()
{
// Matrix3x3 m_basis;
m_basis.setIdentity(); // 单位矩阵
// Vector3 m_origin;
m_origin.setValue(tf2Scalar(0.0), tf2Scalar(0.0), tf2Scalar(0.0));
}

Transform::operator*(const Transform& t) const
{
return Transform(m_basis * t.m_basis,
(*this)(t.m_origin) );
}

参考:
tf2_ros::Buffer Class
tf2_ros::MessageFilter
tf2_ros::BufferInterface
using “tf2” to transform coordinates

古月学院:位置角度平移旋转,“乱七八糟”的坐标变换


配置 vnc server

SSH是不带界面的协议,之前在机器人远程机配置vnc4server,从本地连接到远程机,希望能在远程机直接运行rviz以进行观测,不知道失败了多少次,今天又试了试,这次得到如下结果:
vnc4server环境加载rviz失败.png
这是因为rviz是基于Qt和OpenGL的,但是vnc4server对OpenGL的支持有问题,所以报错

目前最好的就是x11vnc。这个程序不仅不收费,是开源的,而且还支持opengl程序,rviz之类的程序也可以正常打开了。

VNC经典BUG: 能连接成功,不能操作界面,SSH可以操作
  1. 安装x11vnc
1
sudo apt-get install -y x11vnc net-tools
  1. 设置访问密码
1
sudo x11vnc -storepasswd

按提示设置密码,密码一般放在/home/user/.vnc/passwd

  1. 创建服务文件

sudo vim /lib/systemd/system/x11vnc.service,文件内容如下:

1
2
3
4
5
6
7
8
9
10
[Unit] 
Description=Start x11vnc at startup.
After=multi-user.target

[Service]
Type=simple
ExecStart=/usr/bin/x11vnc -auth guess -forever -loop -noxdamage -repeat -rfbauth /home/USERNAME/.vnc/passwd -rfbport 5900 -shared

[Install]
WantedBy=multi-user.target

  1. 启动服务:
    1
    2
    3
    sudo systemctl daemon-reload
    sudo systemctl enable x11vnc.service
    sudo systemctl start x11vnc.service

一般来说,经过上面步骤就成功了。但是可能出现下面错误
status running.png
failed for display.png

其实上面一大堆配置都是为了开机启动,在4之前可以先手动运行,直接x11vnc即可,看输出的文本是否正常,端口有可能是5901,可以用netstat命令检查

手动启动x11vnc的结果
Linux安装x11vnc server的结果
ubuntu上的x11vnc界面,可直接打开GUI程序

成功运行VNC前后的 netstat

  1. 客户端

下载vnc viewer,输入目标IP,端口5900,之后就可以正常连接了,比如192.168.0.103:5900

如果在不插显示器使用rviz时还是报错, 插上hdmi转vga的转接头(不接显示器,只是转接头) 就可以打开正常使用了。如果此时再外接一个显示器,实际就成了双屏配置,在VNC里会出现长屏幕,对于大显示器,用着更舒服了。

但是如果只插一个HDMI线,可以显示,但拖拽终端会出现重影

可以在设置里面调整分辨率和比例,如果感觉VNC速度慢,可以禁用Compiz

有的网络下,会出现经常掉线重连的情况,此时只需把画面质量改为Medium即可,当然Low更可以。

参考:
ubuntu18.04安装x11vnc


配置vino

  1. 安装
1
2
3
4
5
6
7
8
9
sudo apt update

sudo apt install vino

sudo ln -s ../vino-server.service /usr/lib/systemd/user/graphical-session.target.wants

# 配置VNC server:
gsettings set org.gnome.Vino prompt-enabled false
gsettings set org.gnome.Vino require-encryption false

使用命令 /usr/lib/vino/vino-server开启

  1. 每连接到一个新的wifi ,都需要在设置的页面把共享的wifi打开

  2. 将网卡加入VINO服务命令

1
2
3
4
5
6
7
8
# 用于显示 NetworkManager(网络管理器)中当前配置的网络连接列表及其详细信息.
nmcli connection show

# 将指定的 UUID(Universally Unique Identifier)添加到 Vino 服务器启用的连接列表中,指定允许远程访问和控制你的计算机的特定连接.
dconf write /org/gnome/settings-daemon/plugins/sharing/vino-server/enabled-connections "['your UUID']"

# export DISPLAY作用是指定 X Window 系统的显示器,通过设置 DISPLAY 环境变量,它们可以知道要将图形显示在哪个显示器上,默认是0.
export DISPLAY=:0
  1. 设置开机自启动
1
2
3
4
5
6
7
8
9
10
11
gsettings set org.gnome.Vino enabled true
mkdir -p ~/.config/autostart
vim ~/.config/autostart/vino-server.desktop


# 将下面的内容添加到该文件中,保存并退出。
[Desktop Entry]
Type=Application
Name=Vino VNC server
Exec=/usr/lib/vino/vino-server
NoDisplay=true
  1. 安装虚拟显示器

经过以上设置,连接VNC后可能是splash screen或者说花屏,还是不正常。用虚拟显示器解决

1
sudo apt-get install  -y  xserver-xorg-core-hwe-18.04  xserver-xorg-video-dummy-hwe-18.04

sudo vim /usr/share/X11/xorg.conf.d/xorg.conf加入下面内容

1
2
3
4
5
6
7
8
9
10
11
12
13
14
15
16
17
18
19
20
21
Section "Device"
Identifier "Configured Video Device"
Driver "dummy"
EndSection

Section "Monitor"
Identifier "Configured Monitor"
HorizSync 31.5-48.5
VertRefresh 50-70
EndSection

Section "Screen"
Identifier "Default Screen"
Monitor "Configured Monitor"
Device "Configured Video Device"
DefaultDepth 24
SubSection "Display"
Depth 24
Modes "1920x1080"
EndSubSection
EndSection

重启后应该就正常了。如果连接到显示器,反而会不能正常显示,那么就把配置文件删了。

参考: vino的配置


ROS的topic_tools包

throttle

转播 (relay)话题, 限制最大发布频率或者带宽。使用格式: rosrun topic_tools throttle messages <intopic> <msgs_per_sec> [outtopic]

messages是当前使用的是throttle的messages模式,限制发布频率. intopic是指你想要改变频率的那个topic, msgs_per_sec是指你想要它发布的频率,而outtopic是指改变发布频率后的topic的名称,可以省略,如果省略则自动在原来topic的名字上后缀throttle

另外还有bytes模式, 用以限制带宽: rosrun topic_tools throttle bytes <intopic> <bytes_per_sec> <window> [outtopic]

例如,让雷达的带宽占用降至1KBps,则命令为:

1
rosrun topic_tools throttle bytes base_scan 1024 1.0

改变topic发布频率并不是说原来的topic就没了,或者直接在原来的topic上更改, 而是把其更改后的topic发布出来,原来的topic仍然存在

有三个参数,需要注意的是~lazy,如果它等于True的话,只有当你订阅到throttle发出来的消息,它才会工作,这显然是ros::publish函数的lazy模式了

最大的问题是 频率控制的精度低,我要求4Hz,实际却在3.6Hz左右,所以实际要设置的大一些

transform

订阅一个topic或topic field,并在应用给定的Python表达式后将传入的数据发布到另一个topic。它可以处理任何消息类型,主要用于简单的消息转换,例如计算向量或四元数的范数, 甚至将四元数转换为欧拉角。

transform <input> <output_topic> <output_type> [<expression>] [--import <module> [<module> ...]]

  • input:要订阅的传入topic(或topic field)
  • output_topic:要发布的输出topic
  • expression:转换输入消息的Python表达式,在变量m中给出。默认表达式是m,它将输入(可以是topic field)转发到output_topic
  • import :要在表达式中导入和使用的Python模块的列表。默认导入numpy模块
1
2
3
4
# 计算IMU给出的方向四元数的范数
rosrun topic_tools transform /imu/orientation /norm std_msgs/Float64 'numpy.linalg.norm([m.x, m.y, m.z, m.w])'
# 将方向四元数转换为Euler角度
rosrun topic_tools transform /imu/orientation /euler geometry_msgs/Vector3 'tf.transformations.euler_from_quaternion([m.x, m.y, m.z, m.w])' --import tf


  • mux: multiplex between multiple topics

  • relay: republish data on one topic to another.

  • relay_field: allow to republish data in a different message type

  • drop: relay a topic, dropping X out of every Y message.

mux

topic_tools-mux
可以用于多地图实时切换,参考MUX的使用

参考:throttle Wiki


点云滤波

地图分很多种:稀疏的,稠密的,还有半稀疏的。稀疏的地图放大了看就是一个个离散的空间点,不过我们可以把它变成连续的稠密的网格,这个过程也叫点云的网格化。点云网格化需要对点云进行一系列处理

一般下面这几种情况需要进行点云滤波处理:

  1. 点云数据密度不规则需要平滑

  2. 因为遮挡等问题造成离群点需要去除

  3. 大量数据需要降采样

  4. 噪声数据需要去除

滤波程序

package.xml中要添加:

1
2
<build_depend>libpcl-all-dev</build_depend>
<exec_depend>libpcl-all</exec_depend>

CMake按照第一篇里进行配置

1
2
3
4
5
6
7
8
9
10
11
12
13
14
15
16
17
18
19
20
21
22
23
24
25
26
27
28
29
30
31
32
33
34
35
36
37
38
39
40
41
42
#include <ros/ros.h>
#include <sensor_msgs/PointCloud2.h>
#include <pcl_conversions/pcl_conversions.h>
#include <pcl/point_cloud.h>
#include <pcl/point_types.h>
//滤波的头文件
#include <pcl/filters/voxel_grid.h>

ros::Publisher pub;

void cloud_cb (const sensor_msgs::PointCloud2ConstPtr& cloud_msg)
{
// 声明存储原始数据与滤波后的数据的点云的格式
pcl::PCLPointCloud2* cloud = new pcl::PCLPointCloud2; //原始的点云的数据格式
pcl::PCLPointCloud2ConstPtr cloudPtr(cloud);

// ROS消息转化为PCL中的点云数据格式
pcl_conversions::toPCL(*cloud_msg, *cloud);

pcl::PCLPointCloud2 cloud_filtered; //存储滤波后的数据格式
// 进行一个滤波处理
pcl::VoxelGrid<pcl::PCLPointCloud2> sor; //创建滤波对象
sor.setInputCloud (cloudPtr); //设置输入的滤波,将需要过滤的点云给滤波对象
sor.setLeafSize (0.1, 0.1, 0.1); //设置滤波时创建的体素大小为1cm立方体
sor.filter (cloud_filtered);//执行滤波处理,存储输出cloud_filtered

// 再将滤波后的点云的数据格式转换为ROS下的数据格式发布
sensor_msgs::PointCloud2 output;
pcl_conversions::moveFromPCL(cloud_filtered, output);//第一个参数是输入,后面的是输出
pub.publish (output);
}

int main (int argc, char** argv)
{
ros::init (argc, argv, "filter_cloud");//声明节点的名称
ros::NodeHandle nh;

ros::Subscriber sub = nh.subscribe<sensor_msgs::PointCloud2> ("/camera/depth/points", 1, cloud_cb);
pub = nh.advertise<sensor_msgs::PointCloud2> ("filtered_cloud", 1);

ros::spin ();
}

点云合并

把相邻的点合并成一个点,一方面可以减少图像的数据量,另一方面可以增加点云的稳定度。个人感觉贴近滤波
点云合并

直通滤波

多线雷达点云大部分的点都集中的中间区域,距离越远点云越稀疏,信息量也越小,应该筛选掉一些较远的点。这就用到了直通滤波,它是最为简单、粗暴的一种滤波方式,就是直接对点云的X、Y、Z轴的点云坐标约束来进行滤波。

1
2
3
4
5
6
7
8
9
10
11
12
13
14
15
16
17
18
19
20
21
22
23
24
25
26
27
28
29
30
31
32
33
34
35
36
37
38
39
40
#include <iostream>
#include <pcl/io/pcd_io.h>
#include <pcl/point_types.h>
#include <pcl/filters/passthrough.h>

int main(int argc, char** argv)
{

pcl::PointCloud<pcl::PointXYZ>::Ptr cloud(new pcl::PointCloud<pcl::PointXYZ>);

// Fill in the cloud data
pcl::PCDReader reader;
reader.read("16line.pcd", *cloud);

std::cerr << "Cloud before filtering: " << cloud->points.size() << std::endl;

pcl::PointCloud<pcl::PointXYZ>::Ptr cloud_filtered2(new pcl::PointCloud<pcl::PointXYZ>);
pcl::PointCloud<pcl::PointXYZ>::Ptr cloud_filtered3(new pcl::PointCloud<pcl::PointXYZ>);

// Create the filtering object 直通滤波
pcl::PassThrough<pcl::PointXYZ> pass;
pass.setInputCloud(cloud);
pass.setFilterFieldName("x"); // 设置操作的坐标轴
pass.setFilterLimits(-5.0, 5.0);
pass.filter(*cloud_filtered2);
// filter range Y-axis
// 注意多次滤波需要再次输入点云和调用filter函数
pass.setInputCloud(cloud_filtered2);
pass.setFilterFieldName("y");
pass.setFilterLimits(-5.0, 5.0);
pass.filter(*cloud_filtered3);

std::cerr << "Cloud after filtering: " << cloud_filtered3->points.size() << std::endl;

// 读取pcd点云数据进行操作,最后保存为pcd文件
pcl::PCDWriter writer;
writer.write("16line_filtered.pcd", *cloud_filtered3, false);

return 0;
}

pass.setFilterLimitsNegative(true);: 是否保存滤波的限制范围内的点云,默认为false,保存限制范围点云,true时候是相反。

条件滤波法

在某些情况下,我们也会需要去除给定区域内部的点,比如激光雷达扫描近处的点(可能就是装载雷达的车),这些点通常对建图和感知不会有作用。

设定滤波条件进行滤波,点在范围内保留,不在范围内丢弃。

getFilterLimitsNegative 可以对选定范围取反,将其设为 true 时可以进行给定只保留给定范围内的点的功能。

体素滤波

实现降采样,既减少点云的数量,并同时保持点云的形状特征。创建一个三维体素,用体素内所有点的重心近似表示体素中的其他点,这样体素内所有点就用一个重心点最终表示。

使用小程序进行体素滤波,输入input.pcd,输出output.pcd

1
pcl_voxel_grid input.pcd output.pcd -leaf 0.03,0.03,0.03

对于体素下采样接口功能函数pcl提供了两种方式 pcl::ApproximateVoxelGridpcl::VoxelGrid。两种区别主要在于第一种是用每个体素栅格的中心点来近似该体素内的点,提升了速度,但是也损失了原始点云的局部形态精细度。 ApproximateVoxelGrid是依据每一个体素的中心点来获取点云的,并不是依赖每个体素里面是否存在点云。所以会导致两种方式的处理结果又偏差,VoxelGrid的方式更加精确但是耗时相对于ApproximateVoxelGrid更高。

半径滤波

对整个输入迭代一次,对于每个点进行半径R的邻域搜索(球体),如果邻域点的个数低于某一阈值,则该点将被视为噪声点并被移除。

1
2
3
4
5
6
7
8
9
10
11
12
13
14
15
pcl::PointCloud<pcl::PointXYZ>::Ptr cloud(new pcl::PointCloud<pcl::PointXYZ>);      //待滤波点云
if (pcl::io::loadPCDFile("test.pcd", *cloud) < 0)
{
PCL_ERROR("\a点云文件不存在!\n");
system("pause");
return -1;
}

pcl::PointCloud<pcl::PointXYZ>::Ptr cloud_filtered(new pcl::PointCloud<pcl::PointXYZ>); //滤波后点云
pcl::RadiusOutlierRemoval<pcl::PointXYZ> ror; //创建滤波器对象
ror.setInputCloud(cloud); //设置待滤波点云
ror.setRadiusSearch(0.02); //设置查询点的半径邻域范围
ror.setMinNeighborsInRadius(5); //设置判断是否为离群点的阈值,即半径内至少包括的点数
//ror.setNegative(true); //默认false,保存内点;true,保存滤掉的外点
ror.filter(*cloud_filtered); //执行滤波,保存滤波结果于cloud_filtered

实现:

1
2
3
4
5
6
7
8
9
10
11
12
13
14
15
16
17
void radiusremoval(pcl::PointCloud<pcl::PointXYZ>::Ptr& cloud, pcl::PointCloud<pcl::PointXYZ>::Ptr& cloud_filtered, double radius, int min_pts)
{
pcl::KdTreeFLANN<pcl::PointXYZ> tree;
tree.setInputCloud(cloud);
vector<float> avg;
for (int i = 0; i < cloud->points.size(); ++i)
{
vector<int> id(min_pts);
vector<float> dist(min_pts);
tree.nearestKSearch(cloud->points[i], min_pts, id, dist);
// 是否是平方
if (dist[dist.size() - 1] < radius)
{
cloud_filtered->push_back(cloud->points[i]);
}
}
}

构建一个 KD 树,对每个点进行范围搜索(最近邻搜索 nearestKSearch),最后判断邻近点数(最大距离)是否满足要求即可。

统计滤波


看过源码后得知, 计算均值 时除以的是点云的点数,不是邻域的点数。 对滤波结果有影响的是标准差阈值系数k和邻域的点数。 使用的也是 nearestKSearch

缺点:对较远的激光线也筛除掉了。首先对激光雷达点云数据中的每个点而言,由于每个激光线束本身扫描频率是一致的, 显然越远的扫描线点会越稀疏,因此其平均距离会越远(即便其本身可能不一定是噪点)。因此更合理的方法可能是对每个点周围小范围内(同一条线内)的点进行高斯拟合,然后判断该点是否满足该高斯分布,但是如果需要得到比较准确的高斯分布参数,点数需要达到一定数量,否则和上述基于点云密度进行去噪差别不大。

1
2
3
4
5
6
7
8
9
10
11
12
13
14
15
16
17
18
19
20
21
22
23
24
25
26
27
28
#include <pcl/io/pcd_io.h>  //文件输入输出
#include <pcl/point_types.h> //点类型相关定义
#include <pcl/visualization/cloud_viewer.h> //点云可视化相关定义
#include <pcl/filters/statistical_outlier_removal.h> //滤波相关
#include <pcl/common/common.h>

// 1.读取点云
pcl::PointCloud<pcl::PointXYZ>::Ptr cloud(new pcl::PointCloud<pcl::PointXYZ>);
pcl::PCDReader r;
r.read<pcl::PointXYZ>("table_scene_lms400.pcd", *cloud);
cout << "there are " << cloud->points.size() << " points before filtering." << endl;

// 2.统计滤波
pcl::PointCloud<pcl::PointXYZ>::Ptr cloud_filter(new pcl::PointCloud<pcl::PointXYZ>);
pcl::StatisticalOutlierRemoval<pcl::PointXYZ> sor;
sor.setInputCloud(cloud);
sor.setMeanK(50); // K近邻搜索点个数
sor.setStddevMulThresh(1.0); // 标准差倍数
sor.setNegative(false); // 保留未滤波点(内点)
sor.filter(*cloud_filter); // 保存滤波结果到cloud_filter

// 3.滤波结果保存
pcl::PCDWriter w;
w.writeASCII<pcl::PointXYZ>("table_scene_lms400_filter.pcd", *cloud_filter);
cout << "there are " << cloud_filter->points.size() << " points after filtering." << endl;

system("pause");
return 0;

常用滤波顺序: 直通 —-> 体素 —-> 统计

参考:统计滤波的源码


静态层

静态层加载过程.png

静态层所用的参数:static map params


tf MessageFilter

tf::MessageFilter可以订阅任何的ROS消息,然后将其缓存,直到这些消息可以转换到目标坐标系,然后进行相应的处理(进入回调函数)

tf::MessageFilter的初始化需要message_filters::Subscriber,tf转换,目标坐标系,等待时间。当message_filters::Subscriber的消息能够由tf转换到目标坐标系时,调用回调函数,回调函数由tf::MessageFilter::registerCallback()进行注册。

步骤:

  1. 定义数据:TransformListener、message_filters::Subscriber、tf::MessageFilter
  2. 用话题的名称来初始化message_filters::Subscriber
  3. tf message_filters::Subscriber 目标坐标系来初始化tf::MessageFilter
  4. 给tf::MessageFilter注册callback
    ,编写callback,并在回调中完成坐标转换,至此完成消息订阅+坐标转换

全局路径规划(一) global_planner

概述

ROS 的navigation官方功能包提供了三种全局路径规划器:carrot_planner、global_planner、navfn,默认使用的是navfn。
继承关系 1.png

  • carrot_planner检查需要到达的目标是不是一个障碍物,如果是一个障碍物,它就将目标点替换成一个附近可接近的点。因此,这个模块其实并没有做任何全局规划的工作。在复杂的室内环境中,这个模块并不实用。

  • navfn使用Dijkstra算法找到最短路径。

  • global planner是navfn的升级版。它支持A*算法; 可以切换二次近似; 切换网格路径;

目前常用的是global_planner,需要先设定move_base的参数: base_global_planner: "global_planner/GlobalPlanner"global_planner根据给定的目标位置进行总体路径的规划,只处理全局代价地图中的数据。提供快速的、内插值的全局规划,目前已经取代navfn。遵循navcore::navcore 包中指定的BaseGlobalPlanner接口。它接受costmap生成的全局代价地图规划出从起始点到目标点的路径,为local_planner规划路径作出参考。

global_planner没有提供类似D*这样的动态方法,而是用了定时规划路径,ROS是启动了一个线程,在移动过程中对路径不断的重新规划。这个feature是可以去掉的,特别是当你的运算负载很高,处理器又有限的情况下。还有重新规划(当找不到路径,也就是走着走着新扫描到未知区域的障碍或者动态增加的障碍)两种办法。加上了定时规划和重新规划之后的A*D*几乎是一模一样的。

配置

move_base是通过plugin调用全局规划器的,文件bgp_plugin.xml

1
2
3
4
5
6
7
<library path="lib/libglobal_planner">
<class name="global_planner/GlobalPlanner" type="global_planner::GlobalPlanner" base_class_type="nav_core::BaseGlobalPlanner">
<description>
A implementation of a grid based planner using Dijkstras or A*
</description>
</class>
</library>
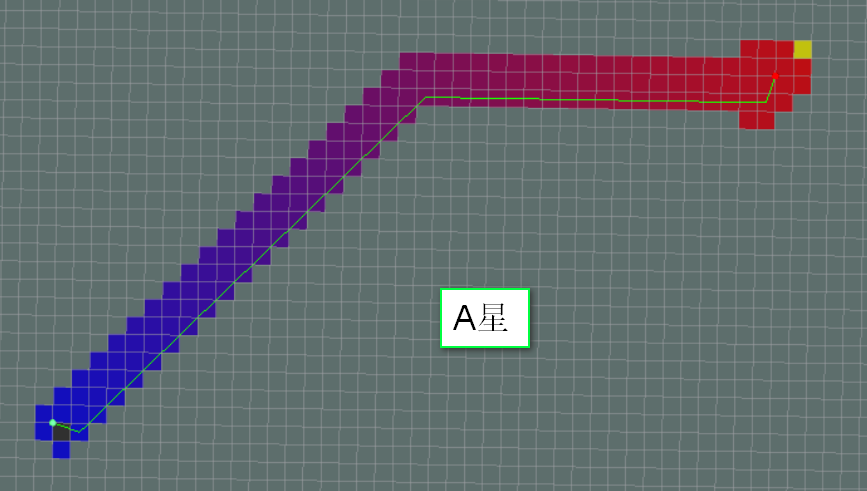
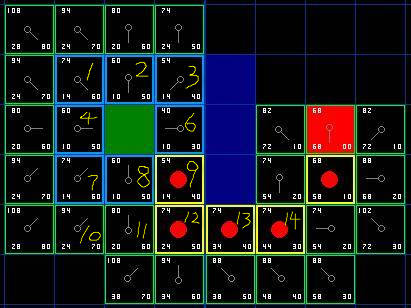
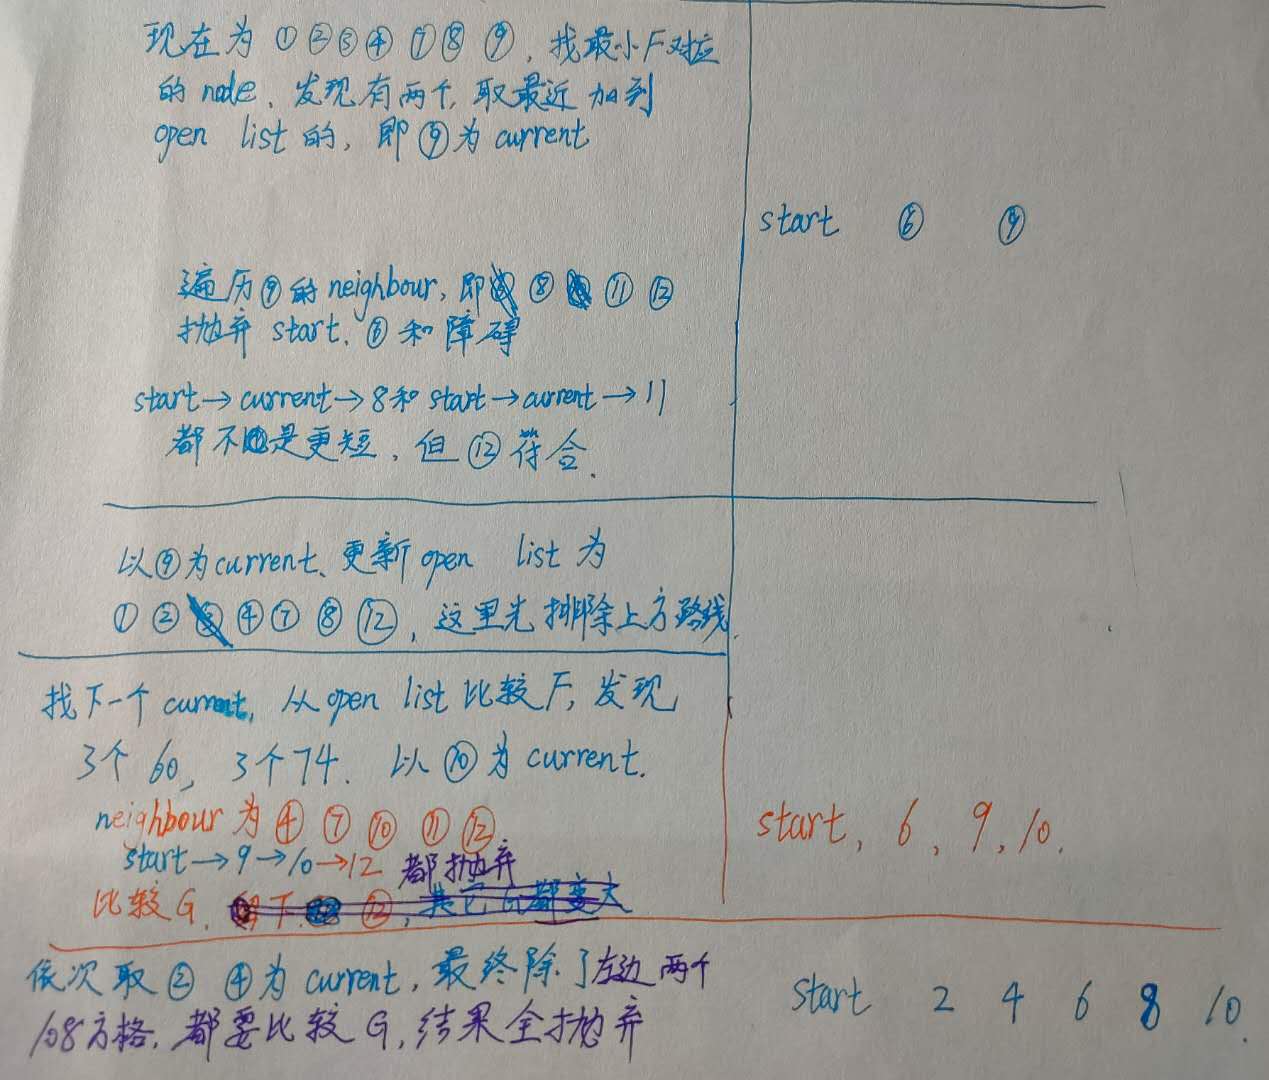
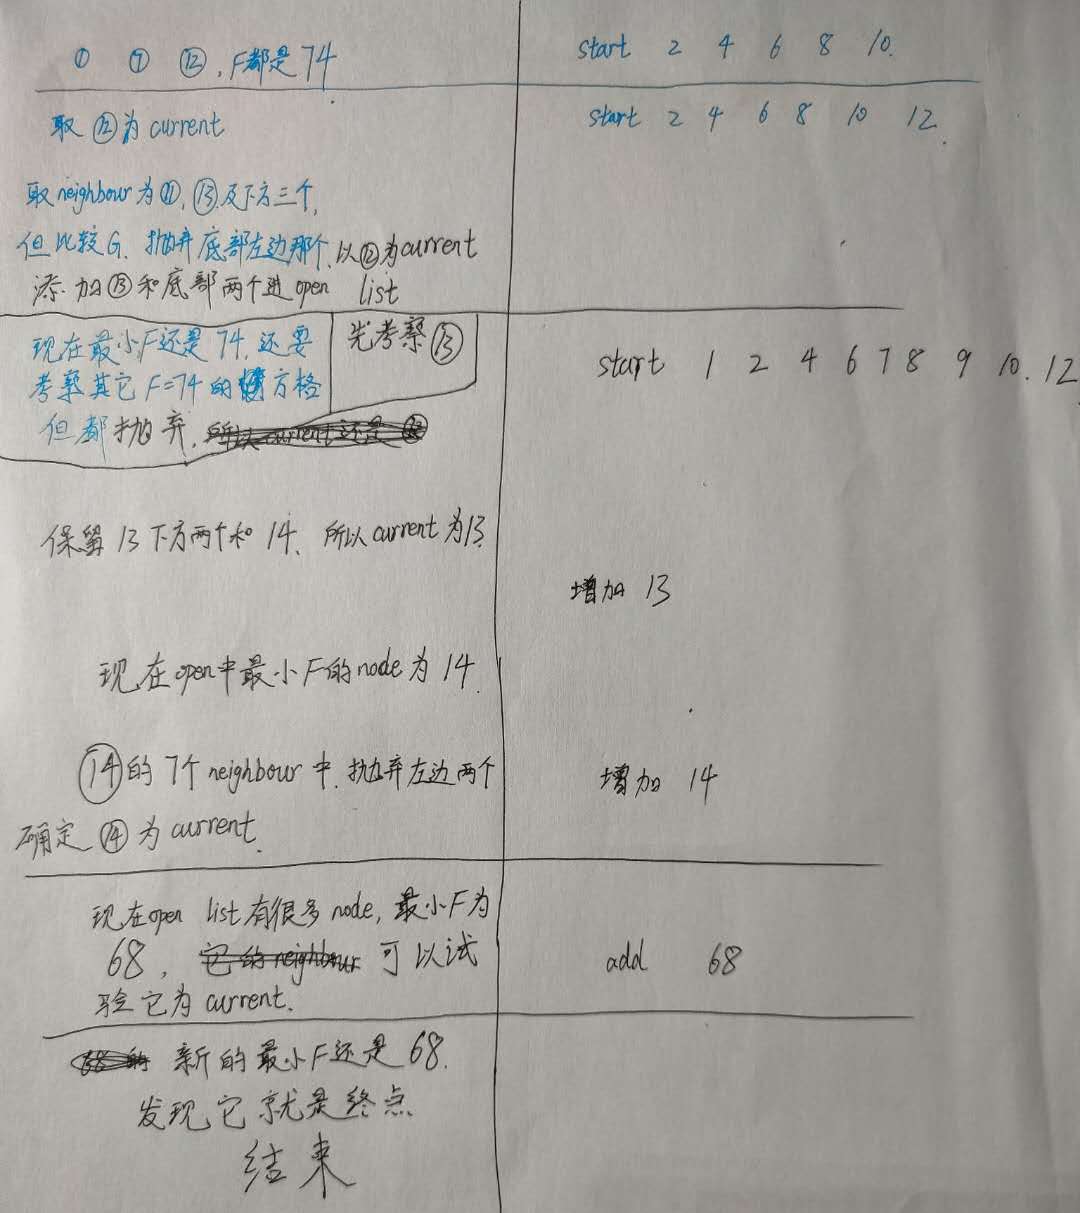
package.xml的配置中,加入如下行:
1
2
3
<export>
<nav_core plugin="${prefix}/bgp_plugin.xml" />
</export>

参数

  • allow_unknown: true    是否允许规划器规划在未知区域创建规划,只设置该参数为true还不行,还要在costmap_commons_params.yaml中设置 track_unknown_space 参数也为true才行,

  • default_tolerance: 0.0    当设置的目的地被障碍物占据时,需要以该参数为半径寻找到最近的点作为新目的地点.

  • visualize_potential: false    是否显示从PointCloud2计算得到的势区域. 这个参数可以让你看见potential array的图像,看计算出的cost是怎么样子(颜色深浅代表距离起始点的远近)

  • use_dijkstra: true    设置为true,将使用dijkstra算法, 否则使用A*算法

  • use_quadratic: true    设置为true,将使用二次函数近似函数计算potential,否则使用更加简单的计算方式,这样节省硬件资源

  • use_grid_path: false    默认使用梯度下降法,路径更为光滑,从周围八个栅格中找到下降梯度最大的点。 如果为true,使用栅格路径,从终点开始找上下或左右4个中最小的栅格直到起点,会规划一条沿着网格边界的路径,偏向于直线穿越网格

  • old_navfn_behavior: false    navfn是非常旧的ROS系统中使用的,现在已经都用global_planner代替navfn了,所以不建议设置为true.

  • lethal_cost: 253    致命代价值,默认是设置为253,可以动态来配置该参数.

  • neutral_cost: 50    中等代价值,默认设置是50,可以动态配置该参数.

  • cost_factor: 3.0    代价地图与每个代价值相乘的因子.

  • publish_potential: true    是否发布costmap的势函数.

  • orientation_mode: 0    如何设置每个点的方向(None = 0,Forward = 1,Interpolate = 2,ForwardThenInterpolate = 3,Backward = 4,Leftward = 5,Rightward = 6)(可动态重新配置)

  • orientation_window_size: 1    根据orientation_mode指定的位置积分来得到使用窗口的方向.默认值1,可以动态重新配置.

       A*和Dijkstra两种算法

两种算法的效果对比
A.png
Dijkstra.png

A*Dijkstra少计算很多,但可能不会产生相同路径。另外,在global_planner的A*里,the potentials are computed using 4-connected grid squares, while the path found by tracing the potential gradient from the goal back to the start uses the same grid in an 8-connected fashion. Thus, the actual path found may not be fully optimal in an 8-connected sense. (Also, no visited-state set is tracked while computing potentials, as in a more typical A* implementation, because such is unnecessary for 4-connected grids).

话题

发布的话题是~<name>/plan(nav_msgs/Path),即最新规划出的路径,每次规划出新路径就要发布一次,主要用于观测。

GlobalPlanner::initialize

1
2
3
4
5
6
7
8
9
10
11
12
13
14
15
16
17
18
19
20
21
22
23
24
25
26
27
28
29
30
31
32
33
34
35
36
37
38
39
40
41
42
43
44
45
46
47
48
49
50
51
52
53
54
55
56
57
58
59
60
61
62
63
64
65
66
67
68
69
70
71
72
73
74
if (!initialized_)
{
ros::NodeHandle private_nh("~/" + name);
costmap_ = costmap;
frame_id_ = frame_id; //costmap_ros->getGlobalFrameID()

unsigned int cx = costmap->getSizeInCellsX(), cy = costmap->getSizeInCellsY();
// 参数赋值, 默认false
private_nh.param("old_navfn_behavior", old_navfn_behavior_, false);
if(!old_navfn_behavior_)
convert_offset_ = 0.5;
else
convert_offset_ = 0.0;

bool use_quadratic; // 二次方的
private_nh.param("use_quadratic", use_quadratic, true);

// p_calc_声明为PotentialCalculator指针
// QuadraticCalculator是它的派生类, 唯一区别是覆盖了calculatePotential函数
if (use_quadratic) // 默认使用二次
p_calc_ = new QuadraticCalculator(cx, cy);
else
p_calc_ = new PotentialCalculator(cx, cy);

bool use_dijkstra;
private_nh.param("use_dijkstra", use_dijkstra, true);
//DijkstraExpansion 和 AStarExpansion 都继承 Expander类
if (use_dijkstra)
{
DijkstraExpansion* de = new DijkstraExpansion(p_calc_, cx, cy);
if(!old_navfn_behavior_)
de->setPreciseStart(true);
planner_ = de; // Expander* planner_;
}
else // 如果不用dijkstra,就用A星算法.
planner_ = new AStarExpansion(p_calc_, cx, cy);

bool use_grid_path;
private_nh.param("use_grid_path", use_grid_path, false);
// GradientPath 和 GridPath都继承了Traceback
if (use_grid_path)
path_maker_ = new GridPath(p_calc_);
else
path_maker_ = new GradientPath(p_calc_);

orientation_filter_ = new OrientationFilter();
// NavfnROS::initialize中也注册此话题
plan_pub_ = private_nh.advertise<nav_msgs::Path>("plan", 1);
potential_pub_ = private_nh.advertise<nav_msgs::OccupancyGrid>("potential", 1);
// 一系列参数赋值
private_nh.param("allow_unknown", allow_unknown_, true);
planner_->setHasUnknown(allow_unknown_);
private_nh.param("planner_window_x", planner_window_x_, 0.0);
private_nh.param("planner_window_y", planner_window_y_, 0.0);
private_nh.param("default_tolerance", default_tolerance_, 0.0);
private_nh.param("publish_scale", publish_scale_, 100);

double costmap_pub_freq;
private_nh.param("planner_costmap_publish_frequency", costmap_pub_freq, 0.0);

//get the tf prefix
ros::NodeHandle prefix_nh;
tf_prefix_ = tf::getPrefixParam(prefix_nh);

make_plan_srv_ = private_nh.advertiseService("make_plan", &GlobalPlanner::makePlanService, this);

dsrv_ = new dynamic_reconfigure::Server<global_planner::GlobalPlannerConfig>(ros::NodeHandle("~/" + name));
dynamic_reconfigure::Server<global_planner::GlobalPlannerConfig>::CallbackType cb = boost::bind(
&GlobalPlanner::reconfigureCB, this, _1, _2);
dsrv_->setCallback(cb);

initialized_ = true;
} else
ROS_WARN("This planner has already been initialized, you can't call it twice, doing nothing");

参考:
ROS- global_panner
global_planner历史背景和概述


Dijkstra算法

以下面的加权图举例,说明算法的过程
加权图
加权图中不可有负权边
伪代码.png
或者这样理解:

  1. 第一个核心步骤:找到当前未处理过的顶点中 最小的点 V,(由于起点到起点的消耗为0,所以算法开始时 V 必定代表起点);
  2. 第二个核心步骤:若V有邻居,则计算经过 V 的情况下起点到达各邻居的消耗 ,并选择是否更新 V 邻居的值。若没有邻居则对该点的处理结束
  3. 重复以上两个核心步骤,直到满足算法终止的条件:有向图中所有的点都被处理过。

算法每处理完一个顶点后,该顶点对应的 值就是起点到该点的最短路径长度,且在这之后不会被更改。这就是最短路径的原因
过程 1
过程 2

Dijkstra的特点是从起点开始,由近及远,层层扩展。越靠前处理的点离起点越近,最后一个处理的点离起点最远。
即使我只想找两个点之间的最短路径,Dijkstra还是需要遍历所有节点,因此时间复杂度为,所以不适合复杂路径等大规模场景。


A星算法

地图和起点,终点

算法的伪代码.png

1.jpg

2.jpg

3.jpg

公式表示为:f(n)=g(n)+h(n),其中f(n)是经过节点n从初始点到目标点的代价函数,g(n)表示从初始节点到节点n的代价,h(n)表示从节点n到目标点的启发式代价

  • Dijkstra是无目的的扩展,A星是启发式,选择离目标点最近的方向扩展,但不一定是最短路径。
  • Dijkstra算法的实质是广度优先搜索,是一种发散式的搜索,所以空间复杂度和时间复杂度都比较高。
  • 对路径上的当前点,A*算法不但记录其到源点的代价,还计算当前点到目标点的期望代价,是一种启发式算法,也可以认为是一种深度优先的算法。

laser_filters

scan_tools提供了一系列用于激光SLAM的工具,在github的分支只到indigo,所以无法从ros直接安装,但可以编译源码安装. 其中重要的有:

  • laser_scan_matcher: an incremental laser scan matcher, using Andrea Censi’s Canonical Scan Matcher implementation. It downloads and installs Andrea Censi’s Canonical Scan Matcher [1] locally.

  • scan_to_cloud_converter: converts LaserScan to PointCloud messages.

laser_filters 过滤雷达数据

过滤器的机制和代价地图是类似的,节点scan_to_scan_filter_chain相当于代价地图,每一个filter相当于地图的每一层,通过加载yaml而加载filter。

以range过滤器为例,修改range_filter.yaml如下:

1
2
3
4
5
6
7
8
9
scan_filter_chain:
- name: box_filter
type: laser_filters/LaserScanRangeFilter
params:
# use_message_range_limits: false # if not specified defaults to false
lower_threshold: 0.18 # 默认0
upper_threshold: 0.22 # 默认100000.0
lower_replacement_value: 0 # 默认 NaN
upper_replacement_value: 999 # 默认 NaN

运行launch: roslaunch laser_filters range_filter_example.launch,里面就是节点scan_to_scan_filter_chain和yaml文件

结果查看scan_filtered话题,只显示出0.18~0.22距离的数据,太小的显示为0,太大的显示为999.

又比如使用LaserScanAngularBoundsFilter,只取-45°~45°内的scan,结果如下,要把laser坐标系的x轴放到水平向右的方向观察

-45°至45°.png

参考:
scan_filtered的使用
laser_filters