全局路径不正常的规划失败

所用全局路径的参数

1
2
3
4
5
6
planner_window_x: 0.0
planner_window_y: 0.0
default_tolerance: 0.0

publish_scale: 100
planner_costmap_publish_frequency: 0.0

全局路径很奇怪.png
全局路径失败时的报错.png
全局路径规划失败

看代码GlobalPlanner::makePlan中的if (found_legal)部分,再看GlobalPlanner::getPlanFromPotential函数,继续定位到path_maker_->getPath。这里就需要看path_maker是什么东西,在文件中发现

1
2
3
4
5
6
if (use_grid_path)   // 参数
//栅格路径,从终点开始找上下或左右4个中最小的栅格直到起点
path_maker_ = new GridPath(p_calc_);
else
//梯度路径,从周围八个栅格中找到下降梯度最大的点
path_maker_ = new GradientPath(p_calc_);

use_grid_path默认是false,所以一般用GradientPath,最终看GradientPath::getPath为什么返回false

if (fabs(nx - start_x) < .5 && fabs(ny - start_y) < .5) 中的0.5改为1

查来查去,终于发现其实就是全局代价地图里,本来就处于障碍的附近,所以规划如此奇怪。只是换到了室外环境,不习惯看全局代价地图了


octomap_server

octomap_server除了将点云地图转化为基于Octree的OctoMap,还能将点云地图转化为二维地图。可以增量建3D的 OctoMaps,还提供了能保存地图的节点octomap_saver. octomap_server节点很消耗内存,增量建图的过程中内存持续上升,因为当中不存在内存释放,没有静态储存八叉树图信息

1
2
3
4
5
6
7
8
9
10
11
12
<node pkg="octomap_server" type="octomap_server_node" name="octomap_server">
<!-- resolution in meters per pixel -->
<param name="resolution" value="0.05"/>
<!-- name of the fixed frame, needs to be "/map" for SLAM -->
<param name="frame_id" type="string" value="$(arg frame_id)"/>
<param name="sensor_model/max_range" value="150.0"/>
<param name="latch" value="true"/>
<!-- 需要和 publish_pointcloud 的frame_id相同,否则会导致Octomap没有发布数据 -->
<!-- topic from where pointcloud2 messages are subscribed,改为自己的点云话题 -->
<remap from="/cloud_in" to="$(arg cloud_topic)"/>
<remap from="/projected_map" to="$(arg map_topic)"/>
</node>

也就是将点云数据发布到一个指定的 topic 上,然后调用 Octomap 在ROS下的srv组件进行实时转换,并发布到另外一个 Octomap topic 上去,最后通过rviz 进行显示Octomap。注意octomap的输入话题(topic)和数据的坐标系(frame_id)两个参数的设置, 通常octomap 没有数据输出都是由于这两个参数设置错误导致的。

Rviz配置

安装octomap-rviz-plugins后,打开rviz,这时候点开Add选项,会多一个octomap_rviz_plugins模组。 其中的OccupancyGrid是显示三维概率地图,也就是octomap地图。OccupancyMap是显示二维占据栅格地图。

打开rviz,在里面添加OccupancyGrid,OccupancyMap,Map显示选项,显示话题选择octomap_full或者octomap_binary

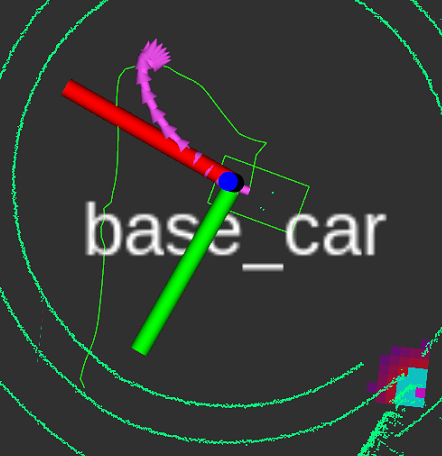
octomap topics are 3D occupancy maps, which would be used by some other 3D planning approach (e.g., move_it). They are not the same as /grid_map or /proj_map from rtabmap_ros. For 3D trajectories (having to move in Z, e.g., quadcopter), then using OctoMap with OMPL/move_it can be another approach, though not sure if there is one most popular approach for the 3D case.

参考:
Octomap在ROS环境下实时显示,但点云来源是ORB稠密点云


terminator的使用

在调试ROS程序时,经常需要运行多个节点程序,如果每个都打开一个终端然后输入指令非常繁琐,可以写一个脚本文件,每次运行这个脚本就能一次运行多个节点,方便高效。其实就是利用ubuntu的terminator

1
sudo apt-get -y install terminator

安装好以后在~/.config/terminator路径下的config是它的配置文件(例如设置窗口数量、字体、窗口大小等)。如果安装terminator后没有这个文件夹,那新建一个就可以了。下面以启动四个窗口为例说明怎么写脚本。

打开config文件,在terminal3下面,给command选项起个名字,例如command = COMMAND1。其它的terminal同理,后面的脚本会把这个名字改成运行的指令。

1
2
3
4
5
6
7
8
9
10
11
12
13
14
15
16
17
18
19
20
21
22
23
24
25
26
27
28
29
30
31
32
33
34
35
36
37
38
39
40
41
42
43
44
45
46
47
48
49
50
51
52
53
54
55
56
57
58
59
60
61
62
63
64
65
66
67
68
[global_config]
enabled_plugins = CustomCommandsMenu, ActivityWatch, LaunchpadCodeURLHandler, APTURLHandler, LaunchpadBugURLHandler
suppress_multiple_term_dialog = True
[keybindings]
[layouts]
[[default]]
[[[child0]]]
fullscreen = False
last_active_term = 6465ad81-9563-4994-a9ea-4c73e642264a
last_active_window = True
maximised = True
order = 0
parent = ""
position = 91:27
size = 1823, 861
title = q@ubuntu: ~
type = Window
[[[child1]]]
order = 0
parent = child0
position = 908
ratio = 0.499725726824
type = HPaned
[[[child2]]]
order = 0
parent = child1
position = 427
ratio = 0.499419279907
type = VPaned
[[[child5]]]
order = 1
parent = child1
position = 427
ratio = 0.499419279907
type = VPaned
[[[terminal3]]]
command = COMMAND1
order = 0
parent = child2
profile = default
type = Terminal
uuid = 6465ad81-9563-4994-a9ea-4c73e642264a
[[[terminal4]]]
command = COMMAND2
order = 1
parent = child2
profile = default
type = Terminal
uuid = 40bece0b-c0b1-4510-b0d4-555a76b0df61
[[[terminal6]]]
command = COMMAND3
order = 0
parent = child5
profile = default
type = Terminal
uuid = 54ebe730-2576-4963-a96f-bf5d63167da9
[[[terminal7]]]
command = COMMAND4
order = 1
parent = child5
profile = default
type = Terminal
uuid = 2941b7ee-3345-4062-bfc3-cd68f3a636d4
[plugins]
[profiles]
[[default]]
background_image = None
scrollback_lines = 5000

下面制作自己的脚本script.sh文件,内容如下:

1
2
3
4
5
6
7
8
9
10
11
12
13
14
15
16
#!/bin/bash

## change these to whatever you actually need
command1="cd ~/TEB;source devel/setup.bash;roslaunch teb_local_planner_tutorials robot_carlike_in_stage.launch; bash"
command2="sleep 2s;roslaunch yocs_velocity_smoother standalone.launch; bash"
command3="sleep 3s;source ~/control/devel/setup.bash; roslaunch control control.launch; bash"
command4="sleep 4s;source ~/ReedsShepp/devel/setup.bash; roslaunch steering_functions steering_functions.launch; bash"

## Modify terminator's config
sed -i.bak "s#COMMAND1#$command1#; s#COMMAND2#$command2#; s#COMMAND3#$command3#; s#COMMAND4#$command4#;" ~/.config/terminator/config

## Launch a terminator instance using the new layout
terminator -l default

## Return the original config file
mv ~/.config/terminator/config.bak ~/.config/terminator/config

其中的sleep命令是防止节点同时启动,因为如果同时启动会出错,所以延时一段时间以错开运行。执行脚本时,打开一个终端并输入./script.sh,即可看到terminator同时启动多个窗口的过程。

如果脚本启动不了terminator了,那就检查一下~/.config/terminator路径下的配置文件config,把它改回上面的代码即可。


ROS多机通信的设置

过程参考两篇博客
多机通信 1
多机通信 2
需要注意的地方

  • /etc/hosts里的是IP和计算机名,不是用户名

  • 环境变量ROS_MASTER_URI里最好用计算机名。也可以自己设置名称。不过这样如果其他人不知道,还按计算机名设置,就会失败。

  • 所有设置完成后,重启主机的ROS节点

但是我设置的多机通信失败,因为工控机有3个IP。与只有1个IP的电脑是正常通信的。


TEB的实际问题累计
abstract Welcome to my blog, enter password to read.
Read more
Eigen(二) 旋转,平移,特征值

旋转

有旋转向量、四元数和旋转矩阵三种表示方法,在Eigen里用前两种进行定义,这样参数少,可以转化为第三种。

牢记下面这张图,根据《视觉SLAM十四讲》总结:
三种方式的转换

使用的是模板类:class Eigen::AngleAxis< Scalar >,这被称为角轴表示法,顾名思义给定旋转角度和旋转轴即可。其创建方式符合Eigen的原则,传入数据类型作为模板参数。旋转角度以弧度表示,旋转轴为Vector类型的向量,注意向量必须要被归一化(vec.normalized()即可)。Eigen中也预先定义好了AngleAxisdAngleAxisf两种方便使用。

参考:基于eigen实现欧拉角(RPY), 旋转矩阵, 旋转向量, 四元数之间的变换

1
2
3
4
5
6
7
8
9
Vector3f v1 = Vector3f::UnitX();

AngleAxisf aa(45*3.1415/180, v1);
// 返回弧度制表示的旋转角度 和 旋转轴(列向量)
cout << aa.angle() <<" "<<endl<< aa.axis() <<endl;
cout << aa.toRotationMatrix()<<endl; // 转换为3 × 3的旋转矩阵

// fromRotationMatrix():从一个3×3的旋转矩阵构建AngleAxis对象。也就是提取旋转矩阵所表示的旋转角
// inverse(): 返回以AngleAxis表示的当前旋转的逆旋转

Quaternion是四元数表示法,Quaternion的构造是标准Eigen格式:数据类型作为模板参数+构造参数,而且重载了多个构造函数,因此可以方便地从角轴、旋转矩阵等数据类型进行构造。

Eigen提供了Quaternionf和Quaterniond方便使用。Quaterniond的初始化:

1
2
3
4
5
Eigen::Quaterniond q1(x, y, z, w);

Eigen::Quaterniond q2(Vector4d(x, y, z, w));

Eigen::Quaterniond q2(Matrix3d(R));

在Quaternion内部的保存中,虚部在前,实部在后

如果以第一种方式构造四元数,则实部是x,虚部是[y,z,w]。 对于第二种方式,则实部是w,虚部是[x,y,z]; 对于第三种方式,则是用3x3的旋转矩阵初始化四元数。

所以最常用是 Eigen::Quaterniond q1(w, x, y, z); ,四个数的传入顺序是w、x、y、z,对应w+xi+yj+zk

Eigen::Quaterniond 不能使用cout

  • Identity(): 返回一个表示单位旋转的四元数

  • w(): 返回四元数中的w分量。 同理 x(), y(), z()是返回相应的分量。

  • coeffs(): 返回四元数的四个数,可以对其进行索引[]获取值。 需要注意的是返回顺序是x、y、z、w,和构造函数的不同

  • toRotationMatrix() 将当前Quaternion对象转换为3×3的旋转矩阵。另外,没有fromRotationMatrix()函数,只能用构造函数传入旋转矩阵

  • slerp():对两个四元数进行球面线性插值(Spherical linear interpolation,通常简称Slerp),是四元数的一种线性插值运算,主要用于在两个表示旋转的四元数之间平滑差值。

欧拉角 —— 旋转矩阵

可以让三个AngleAxis相乘:

1
2
3
4
5
6
// 参数顺序和 static_transform_publisher 的一致
Eigen::Vector3f angle(roll, pitch, yaw);
Eigen::Matrix3d rotation;
rotation = Eigen::AngleAxisd(angle[0], Eigen::Vector3d::UnitZ()) *
Eigen::AngleAxisd(angle[1], Eigen::Vector3d::UnitY()) *
Eigen::AngleAxisd(angle[2], Eigen::Vector3d::UnitX()) ;

这样计算的结果和每个AngleAxisf转换成旋转矩阵后再相乘得到的结果是相同的

旋转矩阵转欧拉角的结果可能不是想要的,最好不使用

四元数 —— 旋转矩阵

其实这样更简单,我们可以直接从tf2_ros::Buffergeometry_msgs::TransformStamped直接获得四元数

1
2
3
4
5
6
Eigen::Quaterniond quaternion(transform.transform.rotation.w,
transform.transform.rotation.x,
transform.transform.rotation.y,
transform.transform.rotation.z
);
Eigen::Matrix3d rotation = quaternion.matrix();

平移

采用Eigen标准构造原则,构造示例如下:

1
2
3
4
Translation<float,2>(tx, ty)
Translation<float,3>(tx, ty, tz)
Translation<float,N>(s)
Translation<float,N>(vecN)

多个平移合并用乘号而不是加号,需要注意。和旋转相比,它的成员函数也相对少一些:

  • x():获取平移的x分量(可修改)

  • y():获取平移的y分量(可修改)

  • z():获取平移的z分量(可修改),注意,千万不要对一个二维的Translation获取z分量,否则直接会运行报错

  • vector()&.translation():返回当前平移的向量表示(可修改),可以索引[]获取各分量

1
2
3
4
5
Translation2d t1(1,4);
Translation2d t2(2,7);
Translation2d t3;
t3=t1*t2;
cout<<t3.translation()<<endl;

计算特征值与特征向量

构造一个EigenSolver,然后分别调用其成员函数.eigenvalues()、.eigenvectors()即可获得特征值与特征向量。

1
2
3
4
5
6
7
8
9
#include <Eigen/Eigenvalues>

A << 2,-2,0, -2,1,-2, 0,-2,0;
EigenSolver<Matrix3d> eigensolver(A);
if (eigensolver.info() == Success)
{
cout << eigensolver.eigenvalues() << endl<<endl;
cout << eigensolver.eigenvectors() << endl;
}

输出结果并不是我们平时熟悉的形式,而是

1
2
3
4
5
6
7
(4,0)
(1,0)
(-2,0)

(-0.666667,0) (-0.666667,0) (-0.333333,0)
(0.666667,0) (-0.333333,0) (-0.666667,0)
(-0.333333,0) (0.666667,0) (-0.666667,0)

实际特征值是4,1,-2. 4对应的特征向量分别为(-0.666667, -0.666667,-0.333333)

参考:
C++ Eigen库计算矩阵特征值及特征向量
Eigen函数与Matlab对应关系


彻底解决 sudo rosdep init 和 rosdep update失败问题

如果sudo rosdep initrosdep update没有执行成功,有些ROS功能会无法执行,比如rqt_tf_tree会报错:

1
2
the rosdep view is empty: call 'sudo rosdep init' and 'rosdep update'
[WARN] wait_for_service(/rqt_gui_py_node_26204/tf2_frames): failed to contact, will keep trying

这两个老大难其实都是网络的问题,sudo rosdep init的目的是为了在/etc目录下新建/ros/rosdep/sources.list.d/20-default.list文件。

小鱼基于rosdep源码制作了rosdepc,专门服务国内ROS用户,使用pip3 和 rosdepc 可以彻底消灭这个问题

1
2
3
4
5
sudo apt-get install python3-pip 
sudo pip3 install rosdepc

sudo rosdepc init
rosdepc update


rosdep update根据20-default.list文件中的网址链接去下载相应的文件,最终在/etc/ros/rosdep下放5个文件,分别是base.yaml,gentoo.yaml,osx-homebrew.yaml,python.yaml,ruby.yaml. 但又做了一些配置,所以不是下载文件能解决的。

以下步骤先从网上下载rosdistro文件夹,放到/etc/ros

执行sudo rosdep init后报错

1
2
ERROR: cannot download default sources list from:
https://raw.githubusercontent.com/ros/rosdistro/master/rosdep/sources.list.d/20-default.list Website may be down

从网上直接下载这个文件,然后放到/etc/ros/rosdep/sources.list.d,再修改如下:

1
2
3
4
5
6
7
8
9
10
11
# os-specific listings first

yaml file:///etc/ros/rosdistro/rosdep/osx-homebrew.yaml osx

# generic
yaml file:///etc/ros/rosdistro/rosdep/base.yaml
yaml file:///etc/ros/rosdistro/rosdep/python.yaml
yaml file:///etc/ros/rosdistro/rosdep/ruby.yaml
gbpdistro file:///etc/ros/rosdistro/releases/fuerte.yaml fuerte

# newer distributions (Groovy, Hydro, ...) must not be listed anymore, they are being fetched from the rosdistro index.yaml instead

rosdep update 报错

kinetic 要修改python2.7的路径, melodic和noetic要修改python3 ,当然另一种方法是从其他电脑拷贝已经生成的文件。

kinetic 的修改

1
2
reading in sources list data from /etc/ros/rosdep/sources.list.d
ERROR: unable to process source

对下面三个文件做修改
1
2
3
4
5
6
7
8
9
10
/usr/lib/python2.7/dist-packages/rosdep2/gbpdistro_support.py
修改: FUERTE_GBPDISTRO_URL = 'file:///etc/ros/rosdistro/releases/fuerte.yaml'


/usr/lib/python2.7/dist-packages/rosdep2/rep3.py
修改: REP3_TARGETS_URL = 'file:///etc/ros/rosdistro/releases/targets.yaml'


/usr/lib/python2.7/dist-packages/rosdistro/__init__.py
修改: DEFAULT_INDEX_URL = 'file:///etc/ros/rosdistro/index-v4.yaml'

启动新终端,再次执行rosdep update

melodic和noetic 的修改:clone代码仓https://github.com/ros/rosdistro到本地,并更改其文件rosdep/sources.list.d/20-default.list,将其url改成本地文件路径,内容类似如下:

1
2
3
4
5
6
7
8
# os-specific listings first
yaml file:///home/baby/rosdistro/rosdep/osx-homebrew.yaml osx

# generic
yaml file:///home/baby/rosdistro/rosdep/base.yaml
yaml file:///home/baby/rosdistro/rosdep/python.yaml
yaml file:///home/baby/rosdistro/rosdep/ruby.yaml
gbpdistro file:///home/baby/rosdistro/releases/fuerte.yaml fuerte

由于rosdep使用python3,可直接该动源码。我们需要改动三个文件:

  • /usr/lib/python3/dist-packages/rosdep2/sources_list.py,修改 DEFAULT_SOURCES_LIST_URL = 'file:///home/baby/rosdistro/rosdep/sources.list.d/20-default.list'

  • /usr/lib/python3/dist-packages/rosdep2/rep3.py,修改 REP3_TARGETS_URL = 'file:///home/baby/rosdistro/releases/targets.yaml'

  • /usr/lib/python3/dist-packages/rosdep2/gbpdistro_support.py,修改 FUERTE_GBPDISTRO_URL = 'file:///home/baby/rosdistro/releases/fuerte.yaml'

  • /usr/lib/python3/dist-packages/rosdistro/__init__.py,修改 DEFAULT_INDEX_URL = 'file:///home/baby/rosdistro/index-v4.yaml'

完成后先把/etc/ros/rosdep/sources.list.d/20-default.list删除,再执行sudo rosdep initrosdep update就可以成功了。

参考:
解决 rosdep update


ubuntu的显卡及驱动

ubuntu-drivers devices查看显卡硬件型号,也就是其中的model。 如果同意安装推荐版本,那我们只需要终端输入:sudo ubuntu-drivers autoinstall 就可以自动安装了。
当然我们也可以使用 apt 命令安装自己想要安装的版本,比如我想安装 340 这个版本号的版本,终端输入:sudo apt install nvidia-340 就自动安装了。

lshw -numeric -C display | grep product也可以查看电脑显卡的十六进制ID

驱动安装

电脑装好好,启动一直失败,报错failed to start User Manager for UID 121,连文本界面都进不去,后来才知道是ubuntu下缺少显卡驱动

先完全卸载之前安装的显卡驱动

ppa源文件卸载:sudo apt-get remove --purge nvidia*

runfile源文件卸载:sudo ./NVIDIA-Linux-x86_64-384.59.run --uninstall

ppa源驱动安装

先查询电脑最适合的显卡驱动版本,命令 ubuntu-drivers devices,这个命令不仅适用于显卡

最佳显卡驱动版本为 nvidia-driver-435, 用命令行进行安装

1
2
3
4
sudo add-apt-repository ppa:graphics-drivers/ppa
sudo apt-get update
sudo apt-get install nvidia-driver-435 #此处数字要对应上面查询到的版本号
sudo apt-get install mesa-common-dev

如果前面没有禁用secure boot,则在安装过程中会提示设置一个密码,在重启时需要输入密码验证以禁用secure boot,重启后会出现蓝屏,这时候不能直接选择continue, 而应该按下按键,选择Enroll MOK, 确认后在下一个选项中选择continue,接着输入安装驱动时设置的密码,开机。

安装完成后重启,nvidia-smi命令显示驱动信息,若出现驱动版本,就是成功

官网驱动下载

到 NVIDIA 的官网下载相应型号的驱动,官网地址
操作系统那里,一定选择Linux 64-bit

需要先安装一些 NVIDIA 显卡依赖的软件,在终端依次执行如下命令:

1
2
3
sudo dpkg --add-architecture i386
sudo apt update
sudo apt install build-essential libc6:i386

Ubuntu 系统默认安装好是使用的一个开源的驱动:nouveau,我们需要先禁用这个开源驱动,方法如下,依次执行:
1
2
sudo bash -c "echo blacklist nouveau > /etc/modprobe.d/blacklist-nvidia-nouveau.conf"
sudo bash -c "echo options nouveau modeset=0 >> /etc/modprobe.d/blacklist-nvidia-nouveau.conf"

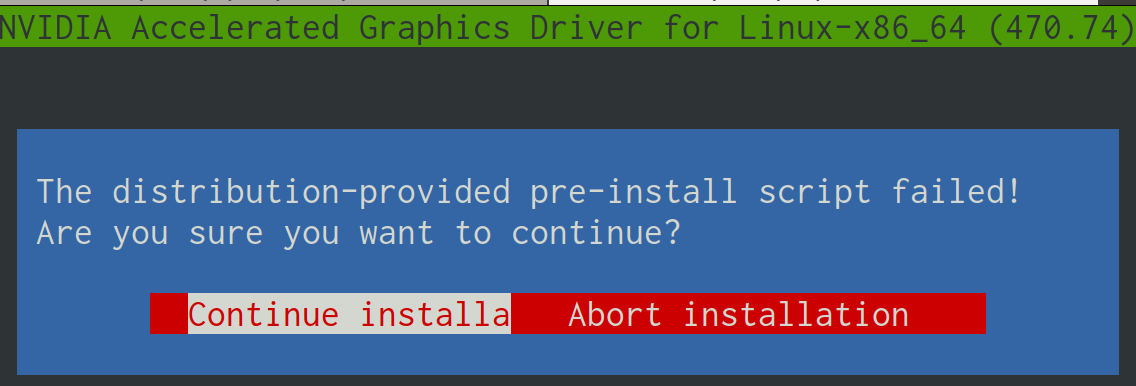
重启一下系统,运行之前下载的驱动。可能会出现下面的信息:
1
2
3
The distribution-provided pre-install script failed!
Are you sure you want to continue? -> CONTINUE INSTALLATION
Would you like to run the nvidia-xconfig utility? -> YES

安装完成后重启系统就可以点击软件列表中的 NVIDIA 的配置软件配置显卡驱动了,如果你遇到
1
WARNING: Unable to find suitable destination to install 32-bit compatibility libraries

解决办法:
1
2
3
sudo dpkg --add-architecture i386
sudo apt update
sudo apt install libc6:i386


某次从Nvidia网站下载安装了显卡对应的驱动,结果重启之后进不了系统,一直黑屏。只好进recovery模式,然后再进入Shell prompt模式卸载驱动

1
2
sudo apt-get --purge remove "*nvidia*"
sudo /usr/bin/nvidia-uninstall

打开文件/etc/gdm3/custom.conf,将 #WaylandEnable=false 前的#去掉。重启之后又进不了系统了,只好又卸载。

参考: ubuntu安装和卸载Nvidia显卡驱动


emplace 和 emplace_back

常见用法:

1
2
3
4
5
6
7
8
vector<int> v;
for(int i=0; i<4; i++)
{
v.emplace_back();
auto& num = v.back();
num = i;
qDebug()<< "size: "<<v.size() <<" v.back: "<<v.back();
}

结果

1
2
3
4
size:  1   v.back:  0
size: 2 v.back: 1
size: 3 v.back: 2
size: 4 v.back: 3

1
2
3
4
5
6
7
8
9
10
11
12
13
14
15
16
17
18
19
20
21
22
23
24
25
26
27
28
29
30
31
32
33
#include <iostream>
#include <map>
#include <string>
#include <vector>
using namespace std;

class A{
public:
A(const string& s) {cout << "A construct " <<endl;}
A(const A& a) {cout <<"A copy"<<endl; }
private:
string s;
};

int main()
{
std::map<int, string> m;
vector<A> v;
A a1("test"); // a1 构造函数
cout << "------------------" << endl;
v.push_back(a1); // a1 拷贝构造函数
v.emplace_back(a1);

//先运行构造函数,后拷贝构造函数
v.push_back(A("test") );
v.emplace_back(A("test") );

// v.push_back("test"); 报错
// 这个才是真正的用途
v.emplace_back("test"); // 隐式转换,只有拷贝构造函数
cout << "******************" << endl;
return 0;
}

对于C++ 11里vector的emplace_back函数比较失望,都说提高了效率,其实它仅对于元素做隐式转换的情况有效,此时没有产生临时对象。对其他情况,和push_back没区别。

这里用到的c++11特性完美转发:将接收下来的参数原样完美地传递给对象的构造函数,这带来另一个方便性就是即使是构造函数声明为 explicit 它还是可以正常工作,因为它不存在临时变量和隐式转换。

map::emplace

map就只有emplace,机制也是一样的。元素是直接构建的,既不复制也不移动,仅当键不存在时才插入。
但是map有个问题:emplace 方法把它接收到的所有的参数都一起转发给 pair 的构造函数。但是对于一个 pair 来说,它既需要构造它的 key 又需要构造它的 value。如果我们按照之前普通的语法使用变参模板的话,则它是无法区分哪些参数用来构造 key, 哪些用来构造 value的。 比如下面的代码

1
2
3
4
5
// 无法区分哪个参数用来构造 key 哪些用来构造 value
// 有可能是 std::string s("hello", 1), std::complex<double> cpx(2)
// 也有可能是 std::string s("hello"), std::complex<double> cpx(1, 2)
std::map<std::string, std::complex<double>> scp;
scp.emplace("hello", 1, 2);

考虑使用可以接受异构、变长参数的 tuple 来对参数进行分组。再使用 C++11 提供的一个特殊类型 piecewise_construct_t 来帮助它们找到各自正确的构造函数了。std::piecewise_construct_t 是一个空类,全局变量 std::piecewise_construct 就是该类型的一个变量。

std::piecewise_construct作为构造 pair 对象的第一个参数传递,以选择构造函数形式,通过将两个元组对象的元素转发给它们各自的构造函数来构造其成员。即第一个 tuple 作为 key,第二个 tuple 作为 value。 使用 forward_as_tuple,该函数会构造一个 tuple 并转发给 pair。

1
2
3
4
5
// 想对于 map 避免临时变量的构造的话,就需要构建两个 tuple
std::map<std::string, std::complex<double>> scp;
scp.emplace(std::piecewise_construct, // 此常量值作为构造 pair 对象的第一个参数传递,以选择构造函数形式,通过将两个元组对象的元素转发给它们各自的构造函数来构造其成员。
std::forward_as_tuple("hello"), // 该函数会构造一个 tuple 并转发给 pair 构造,并存储在 first 字段
std::forward_as_tuple(1, 2)); //该函数会构造一个 tuple 并转发给 pair 构造,存储在 second 字段

cartographer中的代码就是这样

1
2
3
4
5
6
7
8
9
// std::map<int, ::cartographer::mapping::PoseExtrapolator>  extrapolators_;
// PoseExtrapolator的构造函数有2个参数:common::Duration pose_queue_duration,
// double imu_gravity_time_constant
extrapolators_.emplace(
std::piecewise_construct,
std::forward_as_tuple(trajectory_id),
std::forward_as_tuple(
::cartographer::common::FromSeconds(kExtrapolationEstimationTimeSec),
gravity_time_constant) );

无参的emplace_back

还有一种使用无参的vector::emplace_back() 或者 deque::emplace_back(),下面是从cartographer中学来的代码,确实有一定技巧

1
2
3
4
5
6
7
8
9
10
    vector<std::unique_ptr<A> > dd;
dd.emplace_back();
// 注意这里的 size 也是1
cout <<"capacity: "<< dd.capacity() <<" size: "<< dd.size() <<endl;
// cout << dd.at(0)->getValue() <<endl; 这里运行会崩溃

auto* a1 = &dd.back(); // 这个是 unique_ptr
a1->reset(new A(5) ); // 不能再用=,unique_ptr不能复制
cout <<"capacity: "<< dd.capacity() <<" size: "<< dd.size() <<endl;
cout << dd.at(0)->getValue() <<endl;

运行结果:

1
2
3
4
capacity: 1 size: 1
A construct
capacity: 1 size: 1
5

参考:
emplace_back VS push_back


二叉树

四叉树和八叉树就是2D和3D的“二分法”,搜索过程与二叉树搜索也类似,二叉树中是将数组sort后存入二叉树中,从而在查找中实现时间复杂度为log2N;四叉树/八叉树是按平面/空间范围划分有序node,将所有points(坐标已知,但是每个点的point在vector中的index可以认为是随机的,没有规律的,所以不能直接根据index取出point(x,y))放入所属node中,实现所有points的sorted,进而在搜索时,实现时间复杂度为logN