[ WARN] [1709619594.875225471]: Control loop missed its desired rate of 300.00 Hz... the loop actually took 0.0087 seconds
// joint_state 报错,不是重点 [ WARN] [1709619595.976339929]: Moved backwards in time(probably because ROS clock was reset), re-publishing joint transforms! [ WARN] [1709619595.982125868]: Detected jump back in time of 1.05772s. Clearing TF buffer. [ WARN] [1709619595.983936734]: Detected jump back in time of 1.05592s. Clearing TF buffer. [ERROR] [1709619595.987547945]: Exception in PurePursuitPlanner::transformPose : Lookup would require extrapolation at time 1709619597.011688232, but only time 1709619596.080649853 is in the buffe, when looking up transform from frame [map] to frame [cutter_head] [ERROR] [1709619595.987830086]: transform GlobalPoseToLocal failed [ERROR] [1709619595.988800520]: Exception in PurePursuitPlanner::transformPose : Lookup would require extrapolation at time 1709619597.011688232, but only time 1709619596.080649853 is in the buffe, when looking up transform from frame [map] to frame [cutter_head] [ERROR] [1709619596.028980155]: transform GlobalPoseToLocal failed [ERROR] [1709619596.032062451]: Connectivity Error looking up robot pose: Could not find a connection between 'map' and 'base_link' because they are not part of the same tree.Tf has two or more unconnected trees. [ERROR] [1709619596.032538970]: in_pose frame is empty! [ERROR] [1709619596.032780641]: Exception in PurePursuitPlanner::transform global plan: Unable to transform robot pose into global plan's frame [ WARN] [1709619596.033289244]: Unable to get starting pose of robot, so unable to create global plan [ WARN] [1709619596.034867606]: Unable to get starting pose of robot, so unable to create global plan [ WARN] [1709619596.034939482]: move_base didn't receive global plan, mower's recoverying and will try again ...... [ WARN] [1709619596.036663888]: Clearing costmap to unstuck robot(3.000000m). [ERROR] [1709619596.036978217]: Cannot clear map because pose cannot be retrieved [ WARN] [1709619596.040011241]: Unable to get starting pose of robot, so unable to create global plan [ WARN] [1709619596.040297600]: move_base didn't receive global plan, mower's recoverying and will try again ...... [ WARN] [1709619596.045662906]: Clearing costmap to unstuck robot(0.000000m). [ERROR] [1709619596.046150987]: Cannot clear map because pose cannot be retrieved [ WARN] [1709619596.052540739]: Unable to get starting pose of robot, so unable to create global plan [ WARN] [1709619596.052682668]: move_base didn't receive global plan, mower's recoverying and will try again ...... [ WARN] [1709619596.068955672]: All recovery behaviors have failed, locking the planner and disabling it. [ WARN] [1709619596.069181666]: Your executeCallback did not set the goal to a terminal status. This is a bug in your ActionServer implementation. Fix your code! For now, the ActionServer will set this goal to aborted
user@user:~/nav$ rosrun test test_node
/opt/ros/noetic/bin/rosrun: line 150: /home/isward/isward_ii_ws/devel/lib/test/test_node: Success
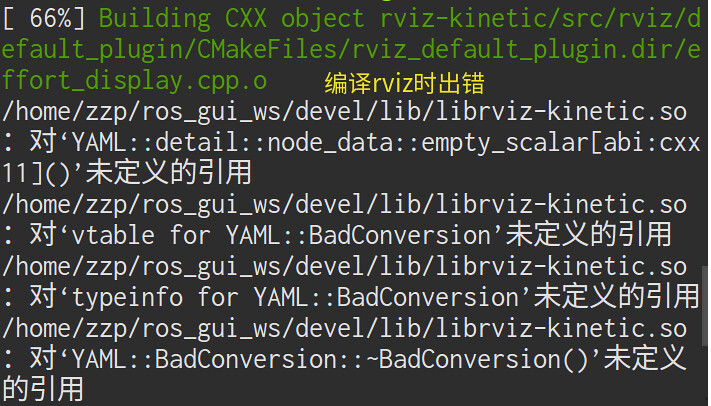
roscore报错
安装完ROS后,运行roscore报错
1
Traceback (most recent call last): File "/opt/ros/groovy/lib/python2.7/dist-packages/roslaunch/__init__.py", line 230, in main write_pid_file(options.pid_fn, options.core, options.port) File "/opt/ros/groovy/lib/python2.7/dist-packages/roslaunch/__init__.py", line 106, in write_pid_file with open(pid_fn, "w") as f: IOError: [Errno 13] Permission denied: '/home/user/.ros/roscore-11311.pid'
原因是因为ROS1支持的是Python2.7,而我之前将Ubuntu自带的Python升级到了3.8,也就是默认版本改变了,所以导致了相关的错误。 解决方法 改回来之后,有些程序可能还是需要python3.8,这时运行python3.8 file.py,可能会报错no module named rospkg 和 no module named pydot,所以需要pip install rospkg pydot
rosbash出错
source setup.bash出现的错误,发现我用的是zsh,换了之后正常
Network communication failed
执行ROS命令结果报错 Network communication failed 这可能是当前用户没有这个权限,切换到root再试试