后端 6 快速相关性匹配

如果当前的scan和所有已创建完成的submap中的某个scan的位姿在距离上足够近,那么通过某种 scan match策略就会找到该闭环。Fast Correlative scan match 就是回环检测

FastCorrelativeScanMatcher2D的构造函数

1
2
3
4
5
6
7
FastCorrelativeScanMatcher2D::FastCorrelativeScanMatcher2D(
const Grid2D& grid,
const proto::FastCorrelativeScanMatcherOptions2D& options)
: options_(options),
limits_(grid.limits()),
precomputation_grid_stack_(
absl::make_unique<PrecomputationGridStack2D>(grid, options) ) {}

再来看PrecomputationGridStack2D的构造函数,引入预算图的概念(precomputed grids)

1
2
3
4
5
6
7
8
9
10
11
12
13
14
15
16
17
18
19
20
21
22
23
24
25
26
27
28
29
// 存储同一个地图但分辨率不同,低分辨率地图value,采用对应高分辨地图中子格中最高分辨率
PrecomputationGridStack2D::PrecomputationGridStack2D(
const Grid2D& grid,
const proto::FastCorrelativeScanMatcherOptions2D& options)
{
CHECK_GE(options.branch_and_bound_depth(), 1);
// 确定最粗的分辨率,也就是64个栅格合成一个格子
// 注意不是7次方,而是2的6次方,64
const int max_width = 1 << (options.branch_and_bound_depth() - 1);

// vector<PrecomputationGrid2D> precomputation_grids_;
precomputation_grids_.reserve(options.branch_and_bound_depth());
std::vector<float> reusable_intermediate_grid;
const CellLimits limits = grid.limits().cell_limits();
// vector 大小为,应该是每层存储的的grid,空间开辟意义不大,每层都会再次resize
reusable_intermediate_grid.reserve((limits.num_x_cells + max_width - 1) *
limits.num_y_cells);
for (int i = 0; i != options.branch_and_bound_depth(); ++i)
{
/* precomputation_grids_插入的仍然是7个
从 2^0(0.05) 到 2^6
队列中最前的为分辨率最高的地图,需要对原图进行扩展,而width是扩展和偏移量
emplace_back会生成一个临时的变量,会调用PrecomputationGrid2D的构造函数
*/
const int width = 1 << i;
precomputation_grids_.emplace_back(grid, limits, width,
&reusable_intermediate_grid);
}
}

传入地图grid为原分辨率地图,即为最高分辨地图。预处理地图堆栈则保存了n张不同分辨率的栅格地图,存储压缩2,4,8,16倍等等地图。首先是原分辨率地图,最后存储最粗分辨率的地图。不同层的地图,目的是后续相关匹配在不同分辨率地图下匹配,即为分支定界中的层。为保证上边界正确性,高层中的评分一定高于其底层节点的评分。压缩的地图并非直接从原图固定间隔采样,而是将固定间隔中所有坐标概率值最大值作为低分辨率地图,以此类推完成整个地图栈预处理。

在低分率下的地图匹配其相关性一定较高,如果分辨率继续降低,则极限为概率为1。

原始地图一直是不变的,例如每一层的分辨率都是在原始地图上生成的。即4 * origin_resolution分辨率地图是在origin_resolution分辨率地图上生成,而不是在2 * origin_resolution分辨率地图上生成的.

Match函数

1
2
3
4
5
6
7
8
9
10
11
12
13
14
15
16
17
18
19
20
21
22
23
24
/*
input:
当前帧估计位置(里程计等提供的初始位置)
当前帧点云(即以激光雷达为坐标系的点云)
最小置信度
(grid在构造函数已经传递)

output:
置信度清单
匹配后输出位置
*/
bool FastCorrelativeScanMatcher2D::Match(
const transform::Rigid2d& initial_pose_estimate,
const sensor::PointCloud& point_cloud, const float min_score, float* score,
transform::Rigid2d* pose_estimate) const
{
// 还是前端的相关性匹配那个搜索参数
const SearchParameters search_parameters(options_.linear_search_window(),
options_.angular_search_window(),
point_cloud, limits_.resolution());
return MatchWithSearchParameters(search_parameters, initial_pose_estimate,
point_cloud, min_score, score,
pose_estimate);
}

MatchWithSearchParameters

开始部分同前端的相关性匹配相同

1
2
3
4
5
6
7
8
9
10
11
12
13
14
15
16
17
18
19
20
21
22
23
24
bool FastCorrelativeScanMatcher2D::MatchWithSearchParameters(
SearchParameters search_parameters,
const transform::Rigid2d& initial_pose_estimate,
const sensor::PointCloud& point_cloud, float min_score, float* score,
transform::Rigid2d* pose_estimate) const
{
CHECK(score != nullptr);
CHECK(pose_estimate != nullptr);

const Eigen::Rotation2Dd initial_rotation = initial_pose_estimate.rotation();
// 将点云旋转至初始位置(即估计位置)航向方向上
const sensor::PointCloud rotated_point_cloud = sensor::TransformPointCloud(
point_cloud,
transform::Rigid3f::Rotation(Eigen::AngleAxisf(
initial_rotation.cast<float>().angle(), Eigen::Vector3f::UnitZ())));
// 根据将角度窗口按照一定分辨率划分,并根据每一个旋转角度将点云旋转,生成N个点云
const std::vector<sensor::PointCloud> rotated_scans =
GenerateRotatedScans(rotated_point_cloud, search_parameters);

// 将所有点云转换到初始位置上
const std::vector<DiscreteScan2D> discrete_scans = DiscretizeScans(
limits_, rotated_scans,
Eigen::Translation2f(initial_pose_estimate.translation().x(),
initial_pose_estimate.translation().y()));


中间部分其实还是和前端那里类似

1
2
3
4
5
// 修复下所有点云的大小在空间的大小,即边界
search_parameters.ShrinkToFit(discrete_scans, limits_.cell_limits());
//获取低分辨率的量化列表(和标准相关方法对比),并且计算匹配评分结果,并进行了排序
const std::vector<Candidate2D> lowest_resolution_candidates =
ComputeLowestResolutionCandidates(discrete_scans, search_parameters);
1
2
3
4
5
6
7
8
9
10
11
12
std::vector<Candidate2D>
FastCorrelativeScanMatcher2D::ComputeLowestResolutionCandidates(
const std::vector<DiscreteScan2D>& discrete_scans,
const SearchParameters& search_parameters) const
{
std::vector<Candidate2D> lowest_resolution_candidates =
GenerateLowestResolutionCandidates(search_parameters);
ScoreCandidates(
precomputation_grid_stack_->Get(precomputation_grid_stack_->max_depth()),
discrete_scans, search_parameters, &lowest_resolution_candidates);
return lowest_resolution_candidates;
}

GenerateLowestResolutionCandidates生成候选的最粗分辨率像素偏移集,,要注意的是

1
2
3
4
5
6
7
// 注意不是7次方,而是2的6次方,64
const int linear_step_size = 1 << precomputation_grid_stack_->max_depth();
......
const int num_lowest_resolution_linear_x_candidates =
(search_parameters.linear_bounds[scan_index].max_x -
search_parameters.linear_bounds[scan_index].min_x + linear_step_size) /
linear_step_size;

这里和前端的处理稍微不同,是为了处理最低分辨率的地图,搜索空间也与最低分辨率一致,最后所有位置及其对应评分放入集合中。

ScoreCandidates函数计算评分,并按照评分从高到低排序,最后返回分数从大到小排列的像素偏移集.

剩下的就是分支定界,然后把最佳候选的得分和最小得分比较,获得位姿

1
2
3
4
5
6
7
8
9
10
11
12
13
14
15
16
17
18
// 分支边界搜索最佳匹配
const Candidate2D best_candidate = BranchAndBound(
discrete_scans, search_parameters,
lowest_resolution_candidates,
precomputation_grid_stack_->max_depth(),
min_score);

if (best_candidate.score > min_score)
{
*score = best_candidate.score;
*pose_estimate = transform::Rigid2d(
{initial_pose_estimate.translation().x() + best_candidate.x,
initial_pose_estimate.translation().y() + best_candidate.y},
initial_rotation * Eigen::Rotation2Dd(best_candidate.orientation));
return true;
}
return false;
}


降低CPU占用的配置
abstract Welcome to my blog, enter password to read.
Read more
后端 2 AppendNode

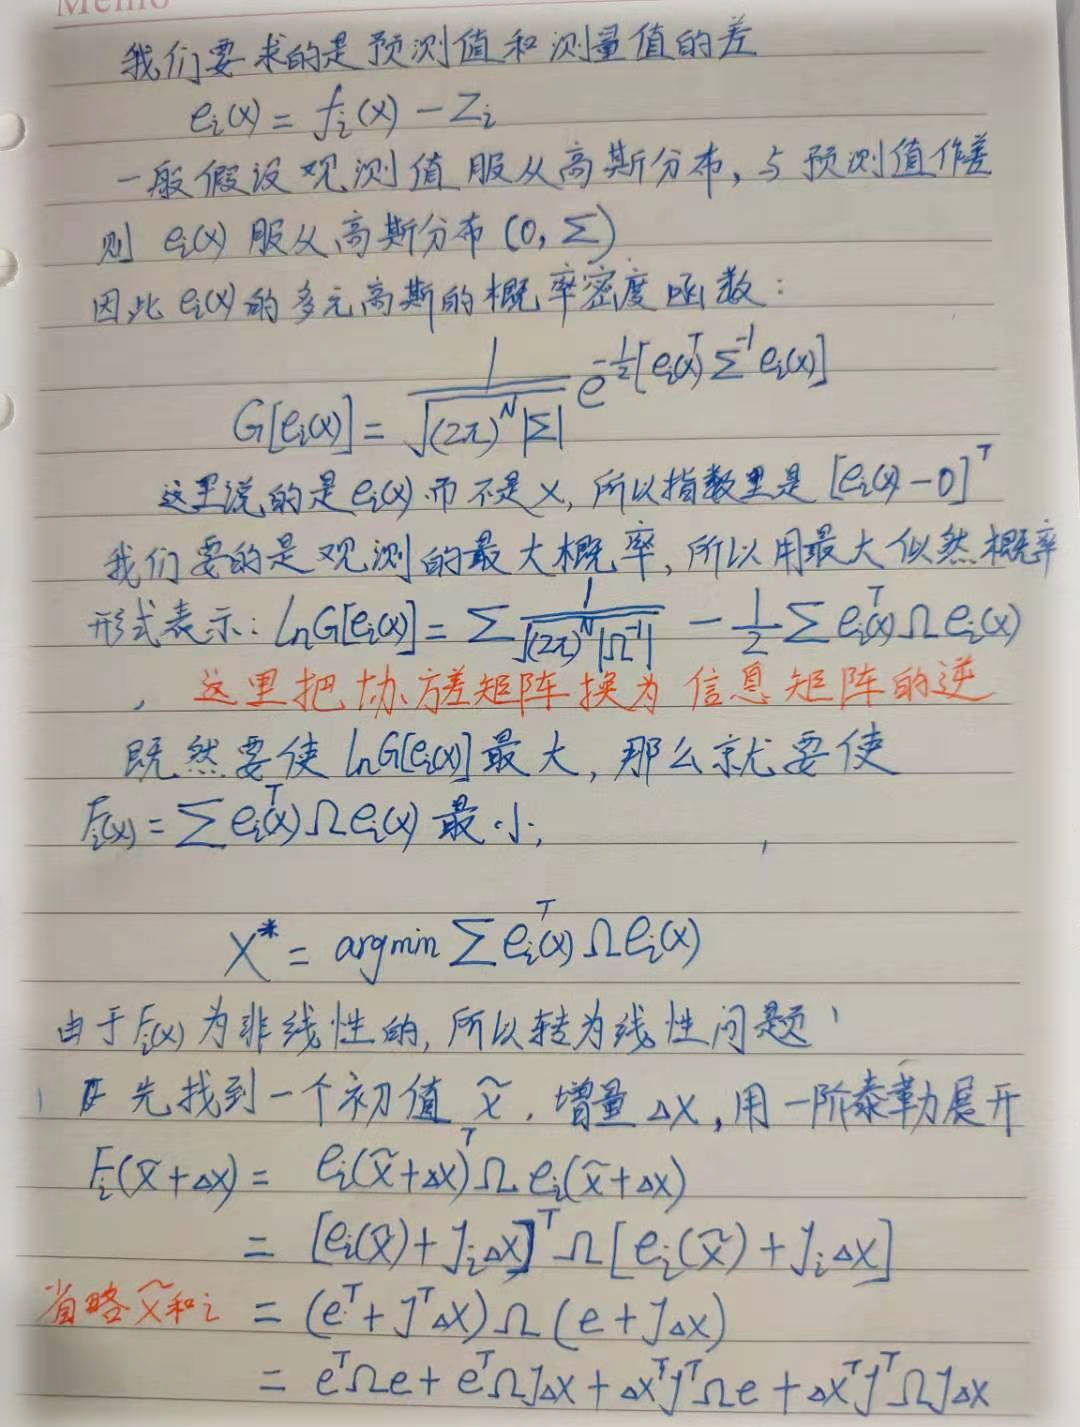
闭合优化问题也是一个非线性最小二乘问题

全局地图是由很多个子图拼接而成的,那么每一个子图在世界坐标系下都有一个位姿,它们的位姿可以用下面的集合表示

前端每完成一次子图更新,会把一帧激光扫描数据插入其维护的子图当中。这个插入结果将被Cartographer看做是构成一条轨迹的节点,并以此时的机器人位姿作为节点的位姿,将其看做是一次激光扫描的参考位姿,所有位姿的集合如下表示

这些被优化的submap位姿和Scan位姿给出了一些constraint(约束)。constraint的表现形式就是位姿 和协方差矩阵 。 位姿 代表 j 帧Scan在子图 i 下的位姿,描述scan和哪个submap匹配

(1)式中的残差E计算公式是

损失函数ρ(例如Huber损失),可以用于减少异常值的影响,而 异常值可能会出现在局部对称的环境(包含隔间的办公室)中

1
2
3
4
5
6
7
8
9
10
11
12
13
14
15
NodeId PoseGraph2D::AppendNode(
std::shared_ptr<const TrajectoryNode::Data> constant_data,
const int trajectory_id,
const std::vector<std::shared_ptr<const Submap2D>>& insertion_submaps,
const transform::Rigid3d& optimized_pose )
{
absl::MutexLock locker(&mutex_);
// 判断对轨迹进行的操作,包括增加,删除或者轨迹之间的关系操作
// 仍然假设仅有一个轨迹
AddTrajectoryIfNeeded(trajectory_id);
// 此 trajectory id 的轨迹是否存在或更改,只是判断
if (!CanAddWorkItemModifying(trajectory_id))
{
LOG(WARNING) << "AddNode was called for finished or deleted trajectory";
}

这些对于一条轨迹的情况都不重要,先不深入分析

1
2
3
4
5
// 添加scan的node_id,返回 trajectory id 和对应的 scan idex
const NodeId node_id = data_.trajectory_nodes.Append(
trajectory_id, TrajectoryNode{constant_data, optimized_pose} );
// 记录轨迹节点个数 +1
++data_.num_trajectory_nodes;

data_PoseGraphData data_ GUARDED_BY(mutex_);

trajectory_nodes的类型是MapById<NodeId, TrajectoryNode>,对于Append函数,不必关心细节。里面的TrajectoryNode类型是

1
2
3
4
5
6
7
8
9
10
11
12
13
14
15
16
17
18
19
20
21
22
struct TrajectoryNode
{
// 记录了前端传来的 点云、重力方向、局部位姿等数据
struct Data {
// 扫描数据被插入子图的时刻
common::Time time;
// Transform to approximately gravity align the tracking frame as
// determined by local SLAM.
Eigen::Quaterniond gravity_alignment;
// Used for loop closure in 2D: voxel filtered returns in the
// 'gravity_alignment' frame.
sensor::PointCloud filtered_gravity_aligned_point_cloud;
// 省略用于3D建图时闭环检测的字段

// The node pose in the local SLAM frame.
transform::Rigid3d local_pose;
};
common::Time time() const { return constant_data->time; }
// 实际只有这两个成员
std::shared_ptr<const Data> constant_data;
// The node pose in the global SLAM frame.
transform::Rigid3d global_pose;

最重要的是global_pose,节点在世界坐标系下的位姿,论文里的
返回去查,发现是GetLocalToGlobalTransform返回的

1
2
3
4
5
6
7
8
9
10
11
12
13
14
15
16
17
18
19
// Test if the 'insertion_submap.back()' is one we never saw before.
// 前端最新的子图与当前 data_ 最后一个子图不一致时,才会增加
if ( data_.submap_data.SizeOfTrajectoryOrZero(trajectory_id) == 0 ||
std::prev(data_.submap_data.EndOfTrajectory(trajectory_id) )
->data.submap != insertion_submaps.back() )
{
// 在全局数据data_中添加submap信息,添加时只考虑新增加的submap
// InternalSubmapData() 在这里的意思是无参的构造函数,什么都未处理
const SubmapId submap_id =
data_.submap_data.Append(trajectory_id, InternalSubmapData() );
// 闭环中submap节点,采用最新的子图
// submap_data 是 MapById<SubmapId, InternalSubmapData>
// 成员submap是个智能指针
data_.submap_data.at(submap_id).submap = insertion_submaps.back();
LOG(INFO) << "Inserted submap " << submap_id << ".";
kActiveSubmapsMetric->Increment();
}
return node_id;
}

增加了该节点在 global map坐标系的全局位姿,也是后期需要优化的位姿。把node加入到trajectory_nodes列表。 最后返回的位姿图ID为data_存储的轨迹节点ID。

前端最新的子图与当前 data_ 最后一个子图不一致时,给该子图分配id并将其加入其中(其实就是把前端最新子图加入到后端)。注意,这时候的子图 还没有计算global pose,也就是 。 所以,后面要初始化submap的global pose,也就是InitializeGlobalSubmapPoses


处理子图 4. 结束子图

void Submap2D::Finish()

1
2
3
4
CHECK(grid_);
CHECK(!insertion_finished());
grid_ = grid_->ComputeCroppedGrid();
set_insertion_finished(true);

这里的set_insertion_finished(true);就是子图结束建图了,可以添加函数isFinished判断,其实就是判断insertion_finished_是否true。 子图建完才会进入后端

1
2
3
4
5
6
7
8
9
10
11
12
13
14
15
16
17
18
19
20
std::unique_ptr<Grid2D> ProbabilityGrid::ComputeCroppedGrid() const
{
Eigen::Array2i offset;
CellLimits cell_limits;
ComputeCroppedLimits(&offset, &cell_limits);
const double resolution = limits().resolution();
const Eigen::Vector2d max =
limits().max() - resolution * Eigen::Vector2d(offset.y(), offset.x());
// conversion_tables_ 是两个表
std::unique_ptr<ProbabilityGrid> cropped_grid =
absl::make_unique<ProbabilityGrid>(
MapLimits(resolution, max, cell_limits), conversion_tables_);
// 对应的cell设置概率,在SetProbability里又转成了空闲概率
for (const Eigen::Array2i& xy_index : XYIndexRangeIterator(cell_limits))
{
if (!IsKnown(xy_index + offset)) continue;
cropped_grid->SetProbability(xy_index, GetProbability(xy_index + offset) );
}
return std::unique_ptr<Grid2D>(cropped_grid.release());
}
1
2
3
4
void set_insertion_finished(bool insertion_finished)
{
insertion_finished_ = insertion_finished;
}

处理子图 3. CastRays和更新栅格概率

  • ros的地图坐标系: 左下角为原点, 向右为x正方向, 向上为y正方向, 角度以x轴正向为0度, 逆时针为正

  • cartographer的地图坐标系: 坐标系右下角为原点, 向上为x正方向, 向左为y正方向角度正方向以x轴正向为0度, 逆时针为正。左上角为坐标的最大值

  • cartographer的像素坐标系: 左上角为原点, 向右为x正方向, 向下为y正方向

Cartographer中,Eigen::Array2i指像素坐标, Eigen::Vector2f指地图坐标.

在函数MapLimits::GetCellIndexGetCellCenter可以看到cartographer的地图坐标系和像素坐标系的转换

MapLimits的几个重要成员函数

1
2
3
4
5
6
7
8
9
10
11
12
13
14
15
16
17
18
19
20
21
22
23
24
25
26
// 计算物理坐标点的像素索引
// 返回的这个点是栅格的中心点,因此,栅格点(grid_point)是一个格子的中心
Eigen::Array2i GetCellIndex(const Eigen::Vector2f& point) const
{
// Index values are row major and the top left has Eigen::Array2i::Zero()
// and contains (centered_max_x, centered_max_y). We need to flip and
// rotate.
return Eigen::Array2i(
common::RoundToInt((max_.y() - point.y()) / resolution_ - 0.5),
common::RoundToInt((max_.x() - point.x()) / resolution_ - 0.5));
}

// 根据像素索引计算物理坐标
Eigen::Vector2f GetCellCenter(const Eigen::Array2i cell_index) const
{
return {max_.x() - resolution() * (cell_index[1] + 0.5),
max_.y() - resolution() * (cell_index[0] + 0.5)};
}
// 判断像素索引是否在栅格地图内
bool Contains(const Eigen::Array2i& cell_index) const
{
return (Eigen::Array2i(0, 0) <= cell_index).all() &&
(cell_index <
Eigen::Array2i(cell_limits_.num_x_cells, cell_limits_.num_y_cells))
.all();
}

Insert函数

1
2
3
4
5
6
7
8
9
10
11
void ProbabilityGridRangeDataInserter2D::Insert(
const sensor::RangeData& range_data, GridInterface* const grid) const
{
ProbabilityGrid* const probability_grid = static_cast<ProbabilityGrid*>(grid);
CHECK(probability_grid != nullptr);
// By not finishing the update after hits are inserted, we give hits priority
// (i.e. no hits will be ignored because of a miss in the same cell).
CastRays(range_data, hit_table_, miss_table_,
options_.insert_free_space(), probability_grid);
probability_grid->FinishUpdate();
}

输入的range_dataLocalTrajectoryBuilder2D::AddRangeData的最后部分,已经计算了misses和returns(注意不是 hit) 先看传感器数据类型RangeData的定义:

1
2
3
4
5
6
7
8
9
struct RangeData {
Eigen::Vector3f origin; // 当次扫描测量时激光雷达的位置
// PointCloud就是 vector<Eigen::Vector3f>
// 扫描到的hit点与miss点
PointCloud returns;
PointCloud misses;
};
// 对 2D SLAM, 第三个元素为0
// typedef std::vector<Eigen::Vector3f> PointCloud;

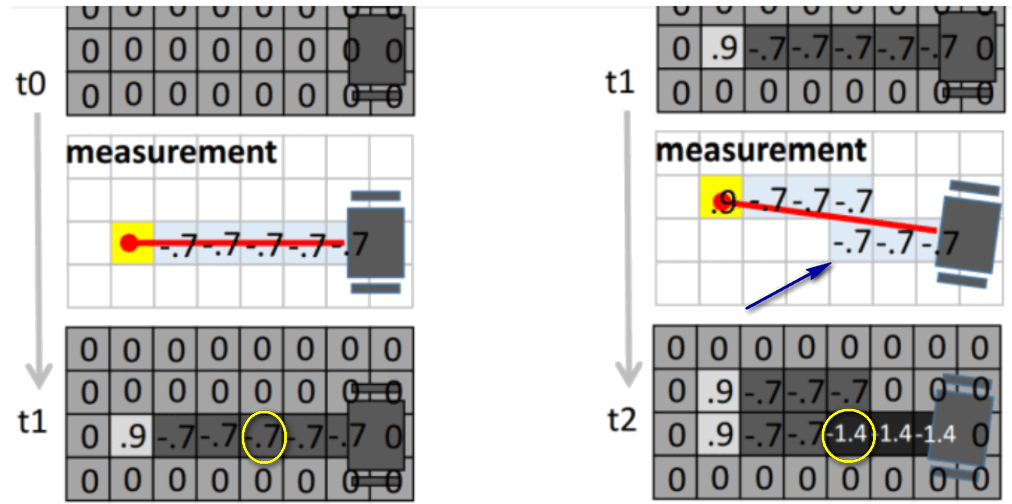
所谓的hit点是指在该点上扫描到了障碍物,该点所在的栅格单元就发生了一次hit事件。miss点所在的位置上并没有检测到障碍物,只是以传感器的最远有效距离记录下坐标而已。

之前获得的带有时间戳的点云类型TimedPointCloud并没有区分hit点和miss点 ,该数据类型只是将原始数据中的距离和扫描角度信息转换为空间点的坐标。


看到这里,参数grid的来源已经记不清了,往回查会发现,它的根源是ActiveSubmaps2D::AddSubmap的添加子图里,也就是Submap2D的构造函数,最终是CreateGrid函数

CastRays

从扫描得到的距离信息转换为栅格的hit或者miss事件的过程称为RayCasting,函数原型

1
2
3
4
void CastRays(const sensor::RangeData& range_data,
const std::vector<uint16>& hit_table,
const std::vector<uint16>& miss_table,
const bool insert_free_space, ProbabilityGrid* probability_grid)

分成三部分来分析

1
2
3
4
5
6
7
8
9
10
11
12
13
14
// 不必关注细节,实现当前grid map边界的扩展,让它能够覆盖雷达的所有扫描数据
// 根据return, misses调整,因为新的scan加入,可能会导致地图变大
GrowAsNeeded(range_data, probability_grid);

// 这部分和 ActiveSubmaps2D::CreateGrid 对比阅读
const MapLimits& limits = probability_grid->limits();
// 构建一个分辨率更好的 Maplimits,分辨率除以1000,提高RayCasting的精度
const double superscaled_resolution = limits.resolution() / kSubpixelScale;
const MapLimits superscaled_limits(
// 地图的x和y方向上的最大值max和原来的一样
superscaled_resolution, limits.max(),
// 地图格数扩展为原来的1000倍
CellLimits(limits.cell_limits().num_x_cells * kSubpixelScale,
limits.cell_limits().num_y_cells * kSubpixelScale) );

1
2
3
4
5
6
7
8
9
10
11
12
13
14
15
16
17
18
// 获取激光射线的起点在精细栅格中的索引,记录在begin对象
const Eigen::Array2i begin =
superscaled_limits.GetCellIndex(range_data.origin.head<2>());
// Compute and add the end points
std::vector<Eigen::Array2i> ends;
ends.reserve(range_data.returns.size());
// 遍历所有hit点,用容器ends记录下 所有hit点在精细栅格中的索引
for (const sensor::RangefinderPoint& hit : range_data.returns)
{
ends.push_back(superscaled_limits.GetCellIndex(hit.position.head<2>()));
// 查hit_table表,更新hit点 栅格概率
// 第一个参数将精细栅格下hit点索引,重新转换成原始栅格分辨率下的索引
// 第二个参数是待查的hit表
// 如当前为p 则新的 p = hit_table[p]
probability_grid->ApplyLookupTable(ends.back() / kSubpixelScale, hit_table);
}
// 如果参数 insert_free_space 为false(默认是true),则不需要处理miss事件
if (!insert_free_space) return;

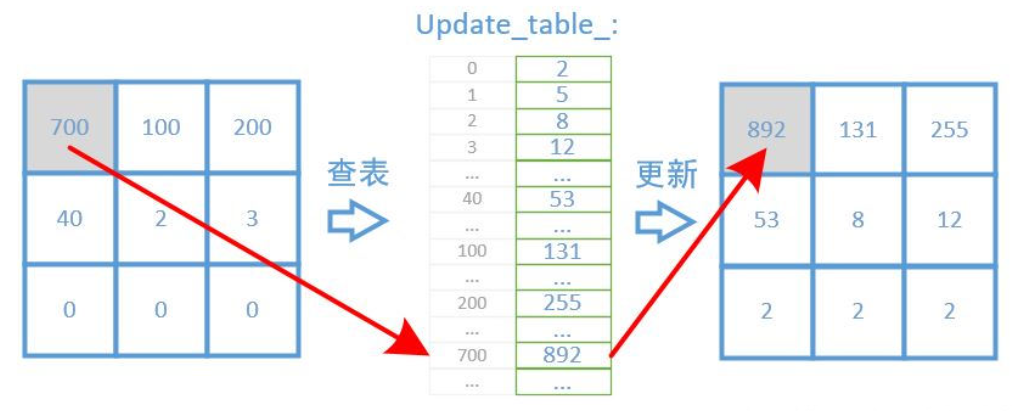
更新时,仅需查表可获得更新后的结果,而无需临时进行乘法运算

处理misses,它有两部分: origin和hit之间的栅格;激光超出max_range的栅格

1
2
3
4
5
6
7
8
9
10
11
12
13
14
15
16
17
18
19
// 处理射线起点到hit点之间的栅格,来源还是上面的 range_data.returns
// 查找miss_table更新占用概率。这里的begin和end都是精细栅格下的索引
for (const Eigen::Array2i& end : ends)
{
std::vector<Eigen::Array2i> ray =
RayToPixelMask(begin, end, kSubpixelScale);
for (const Eigen::Array2i& cell_index : ray)
probability_grid->ApplyLookupTable(cell_index, miss_table);
}
// 处理超出max_range的miss点,来源是 range_data.misses
// 同样认为射线起点到miss点之间的栅格发生的都是miss事件
for (const sensor::RangefinderPoint& missing_echo : range_data.misses)
{
std::vector<Eigen::Array2i> ray = RayToPixelMask(
begin, superscaled_limits.GetCellIndex(missing_echo.position.head<2>()),
kSubpixelScale);
for (const Eigen::Array2i& cell_index : ray)
probability_grid->ApplyLookupTable(cell_index, miss_table);
}

RayToPixelMask函数实在太复杂了,知道原理即可: 使用 Bresenham 画线的方法,获取激光原点到点云之间直线的所有点坐标,前面的精细化分辨率是为了这里的画线更精确

一条射线穿过很多cell,有的cell从对角穿过,有的只穿过一个小角落,虽然它们都是穿过,但是穿过的观测量不同,从对角穿过对这个cell的空闲概率的提升显然作用更大,而只穿过一个小角落显然贡献很小。

对于从对角穿过的cell,就有很多小的sub-cell落在原来的cell中,sub-cell数(记为n)越多,贡献就越大(其实就是对cell这个栅格的概率重复算了n次),而对于从小角落穿过的cell,sub-cell数就很少了.

ApplyLookupTable

查表来更新栅格单元的占用概率

1
2
3
4
5
6
7
8
9
10
11
12
13
14
15
16
17
18
19
20
21
22
23
24
// Multiple updates of the same cell will be ignored until
// FinishUpdate() is called. Returns true if the cell was updated.

// cell_index是将要更新的栅格单元索引,table是更新过程中将要查的表。
bool ProbabilityGrid::ApplyLookupTable(const Eigen::Array2i& cell_index,
const std::vector<uint16>& table)
{
DCHECK_EQ(table.size(), kUpdateMarker);
// 然后通过 cell_index 计算栅格单元的存储索引,获取对应的空闲概率存储值
// 并确保该值不会超出查找表的数组边界。
const int flat_index = ToFlatIndex(cell_index);
// 其实是 Grid2D类的成员: vector<uint16> correspondence_cost_cells_;
uint16* cell = &(*mutable_correspondence_cost_cells())[flat_index];
if (*cell >= kUpdateMarker)
return false;
// 通过父类的接口记录下当前更新的栅格单元的存储索引flat_index
mutable_update_indices()->push_back(flat_index);
// 通过查表更新栅格单元
*cell = table[*cell];
DCHECK_GE(*cell, kUpdateMarker);
// 通过父类标记cell_index所对应的栅格的占用概率已知
mutable_known_cells_box()->extend(cell_index.matrix());
return true;
}


CastRays结束,最后的是FinishUpdate()

1
2
3
4
5
6
7
8
9
10
11
// 主要就是减去 kUpdateMarker
void Grid2D::FinishUpdate() {
while (!update_indices_.empty())
{
DCHECK_GE(correspondence_cost_cells_[update_indices_.back()],
kUpdateMarker);
// ComputeLookupTableToApplyCorrespondenceCostOdds 加上了kUpdateMarker做更新标志,这里再减去
correspondence_cost_cells_[update_indices_.back()] -= kUpdateMarker;
update_indices_.pop_back();
}
}

双线性插值 双三次插值

插值指在离散数据的基础上补插连续函数,使得连续曲线 通过全部给定的离散数据点。 插值的本质 —— 利用已知数据估计未知位置数值。插值和拟合的不同之处在于:对于给定的函数,插值 要求离散点“坐落在”函数曲线上从而满足约束;而 拟合 则希望离散点尽可能地 “逼近” 函数曲线。

双线性插值 Bilinear Interpolation

一次线性插值.png
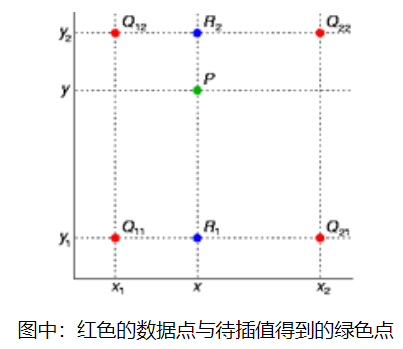
普通的线性插值我们都很熟悉。 双线性插值是有两个变量的插值函数的线性插值扩展,其核心思想是在两个方向分别进行一次线性插值。
示意图.png
二次线性插值的公式.png
这个推导

双线性插值在三维空间的延伸是三线性插值。

双三次插值 Bicubic interpolation

二维空间中最常用的插值方法。在这种方法中,函数f在点(x , y)的值可以通过矩形网格中最近的十六个采样点的加权平均得到,在这里需要使用两个多项式插值三次函数,每个方向使用一个。

双三次插值通过下式进行计算

计算系数的过程依赖于插值数据的特性。如果已知插值函数的导数,常用的方法就是使用四个顶点的高度以及每个顶点的三个导数。一阶导数与表示x与y方向的表面斜率,二阶相互导数表示同时在x与y方向的斜率。这些值可以通过分别连续对x与y向量取微分得到。对于网格单元的每个顶点,将局部坐标(0,0), (1,0), (0,1)和(1,1)带入这些方程,再解这16个方程


矩阵的分解

choskey分解

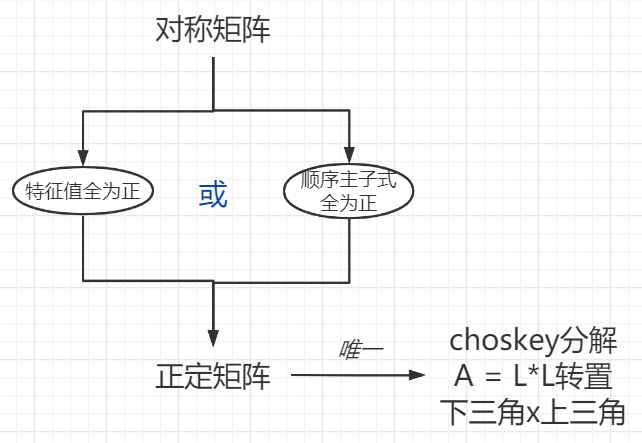
Cholesky分解一个重要的应用就是解方程组 Ax = B,其中A是一个正定矩阵。因为A是一个正定矩阵,所以有A =LLT,其中L是一个下三角矩阵。原方程组可以写成 LLTx = B。如果令 y = LTx ,则有Ly = B。注意到L是一个下三角矩阵,所以从下向上求解y是非常容易的. 求解出y之后,在按照类似的方法求解y = LTx 中的 x,而其中LT是一个上三角矩阵,所以最终求出 x 也是非常容易的

cholesky分解又称为平方根法,是A为实对称正定矩阵时,LU分解的变形。

协方差矩阵是实对称半正定的,如果对角线元素全为正,则可进行cholesky分解,

计算样本中两个特征向量的距离,可以用马氏距离表示

直接对协方差求逆比较复杂,使用cholesky分解

LDLT

LDLT分解法实际上是Cholesky分解法的改进, 优先使用LDLT而不是LLT方法。 Cholesky分解法虽然不需要选主元,但其运算过程中涉及到开方问题,而LDLT分解法则避免了这一问题。 若对称矩阵A的各阶顺序主子式不为零时,则A可以唯一分解为 。 其中 L 为下三角单位矩阵 (即主对角线元素皆为 1,下三角其他元素不为0),D为对角矩阵, 为L的转置矩阵。

LDLT则可以应对半正定和负半定问题,精度较LLT更高

QR分解

对于任意的实数矩阵 $A\in C^{n\times n}$,存在 n阶正交矩阵 Q 和 n阶上三角矩阵 R,使得 $A=Q*R$。注意:矩阵A可以是非方阵。 正交矩阵: $Q^{-1}=Q^T$

如果A是非奇异的,且限定R的对角线元素为正,则这个分解是唯一的。

实际计算有Givens旋转、Householder变换,以及Gram-Schmidt正交化等。Eigen常用的是 Householder变换

用于求线性方程组

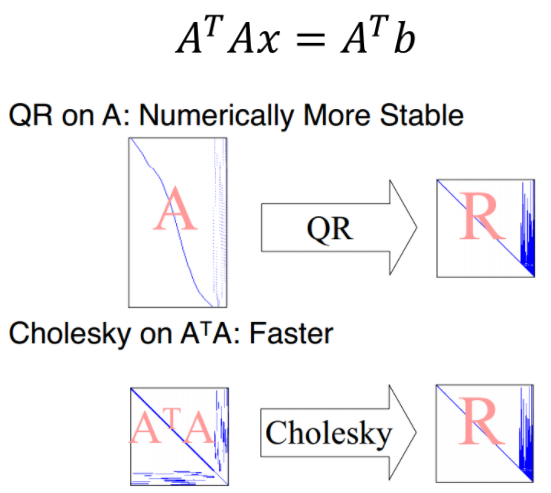
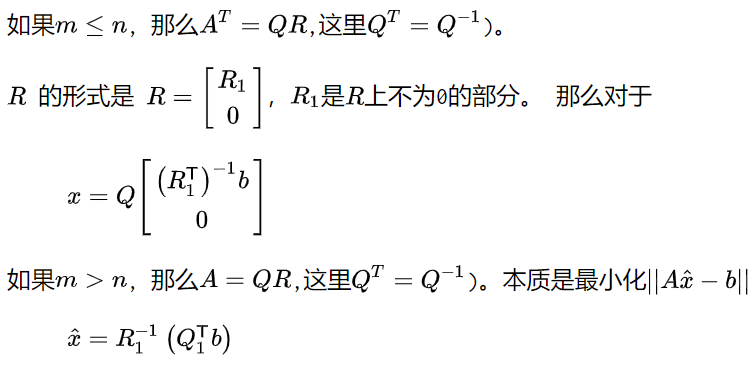
对于直接求解线性方程组的逆,用QR分解的方法求解会更具有数据的稳定性。 对于求解一个线性系统Ax = b, 这里A的维度是 m x n。


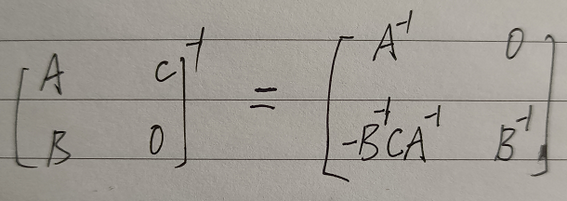
上三角矩阵R的逆矩阵仍然是上三角矩阵,可以用分块矩阵迭代的方法很容易地求出来

下三角矩阵的逆矩阵也是类似求法

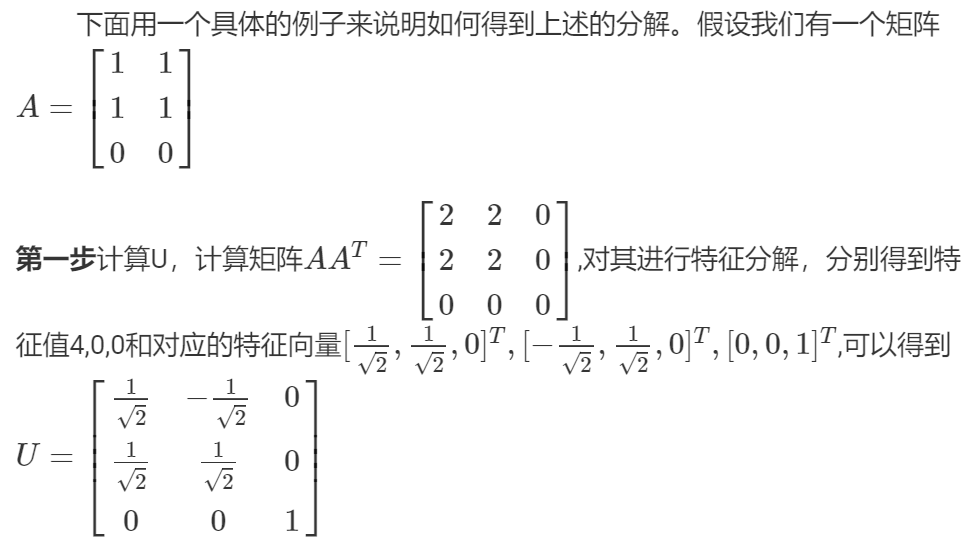
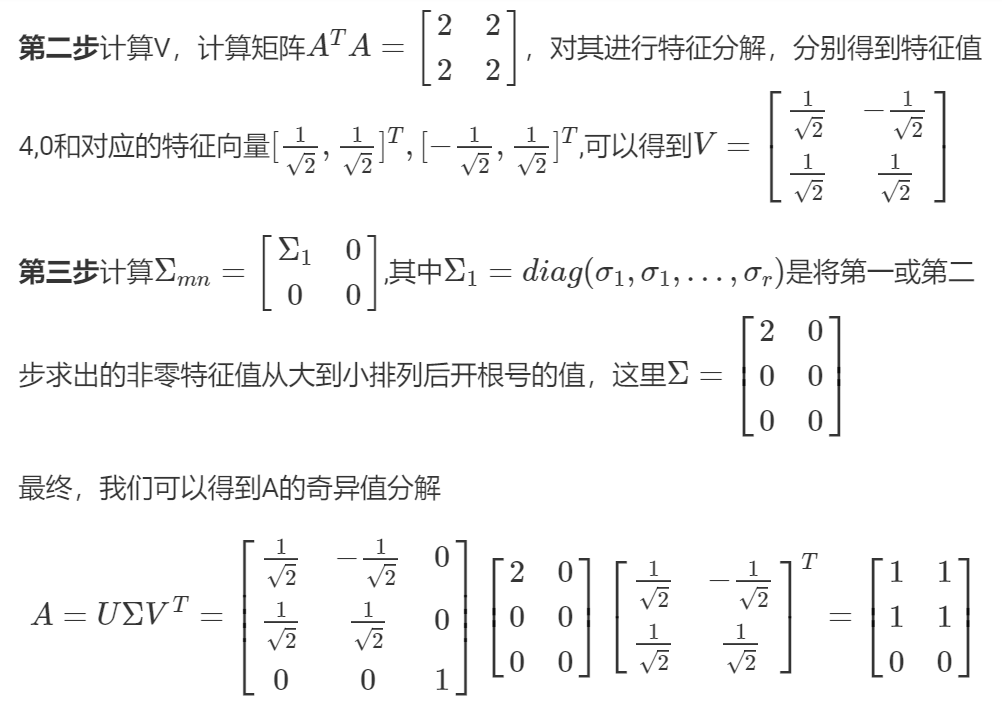
SVD分解 - 奇异值分解

特征值分解仅针对方阵,而不是方阵的矩阵就有了SVD分解:

其中A为m x n的矩阵, 正交矩阵 U(m x m阶) 和 V(n x n阶)。

其中 是矩阵 的特征值

矩阵U的列称为左奇异向量,是正交的。 矩阵V的列向量(也称为右奇异向量)也是正交的.

此时的A如果是方阵,那么逆矩阵也很容易求出:

奇异值分解同时包含了旋转、缩放()和投影三种作用。特征值分解只有缩放的效果。


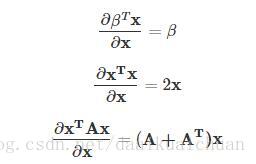
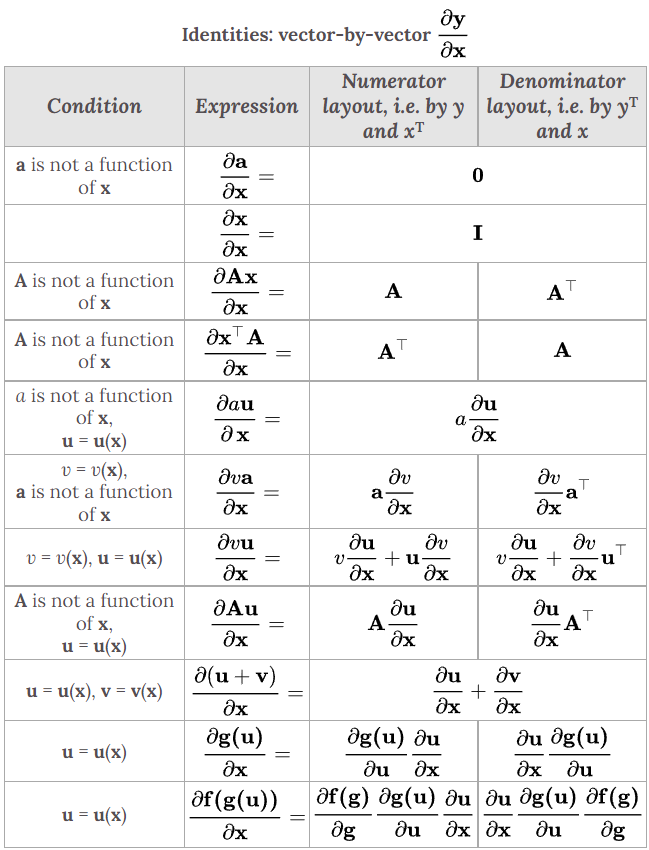
矩阵求导

最常用:

矩阵求导 1.jpg


左边为分子布局,右边为分母布局,不推荐固定用哪个

不管啥layout归根结底一句话…保证雅可比矩阵乘起来的时候维度对应即可。如果有方阵,那肯定某两层中间变量的维度相同的,直接强行让两者的维度记号不一样即可。

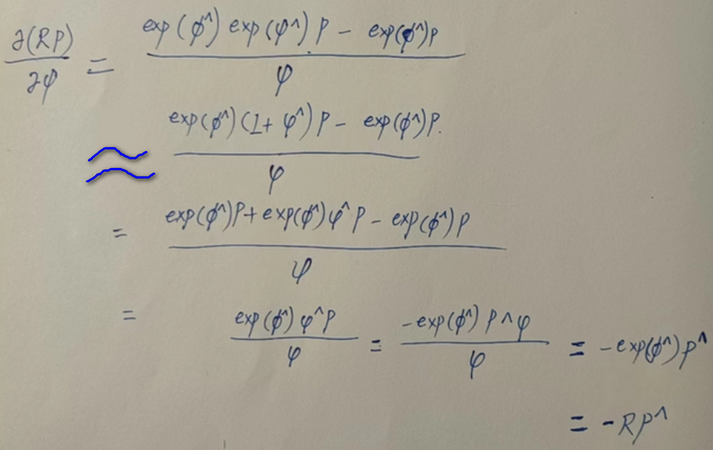
叉乘的导数:

举例: 对 x 求导,最后结果是


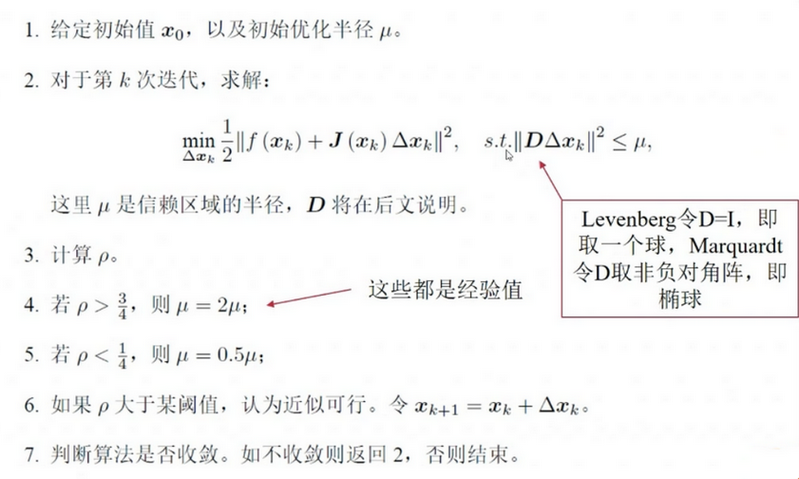
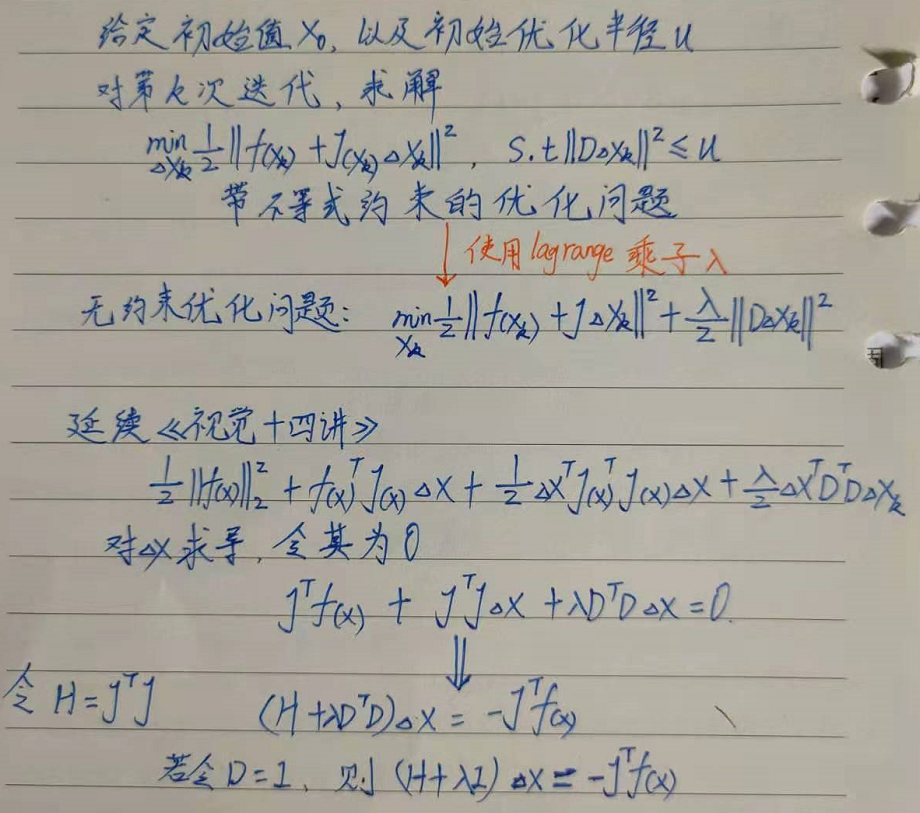
利文伯格法

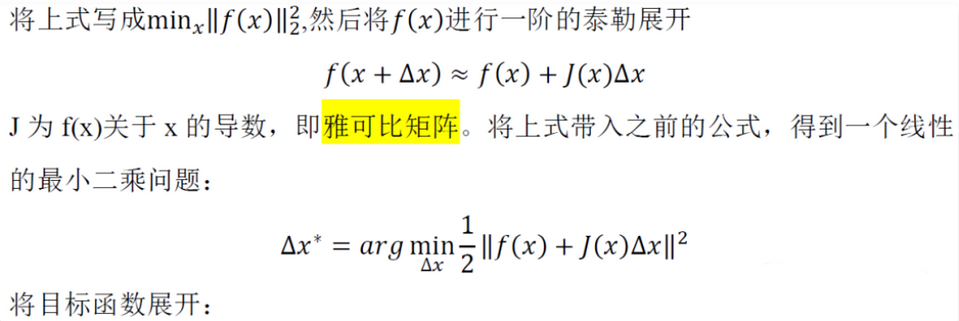
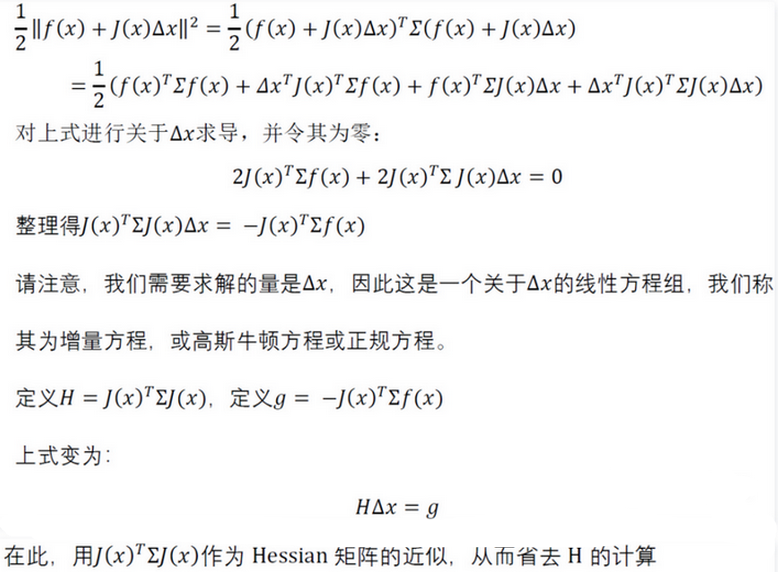
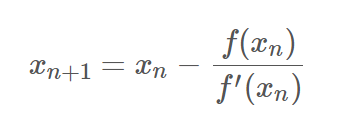
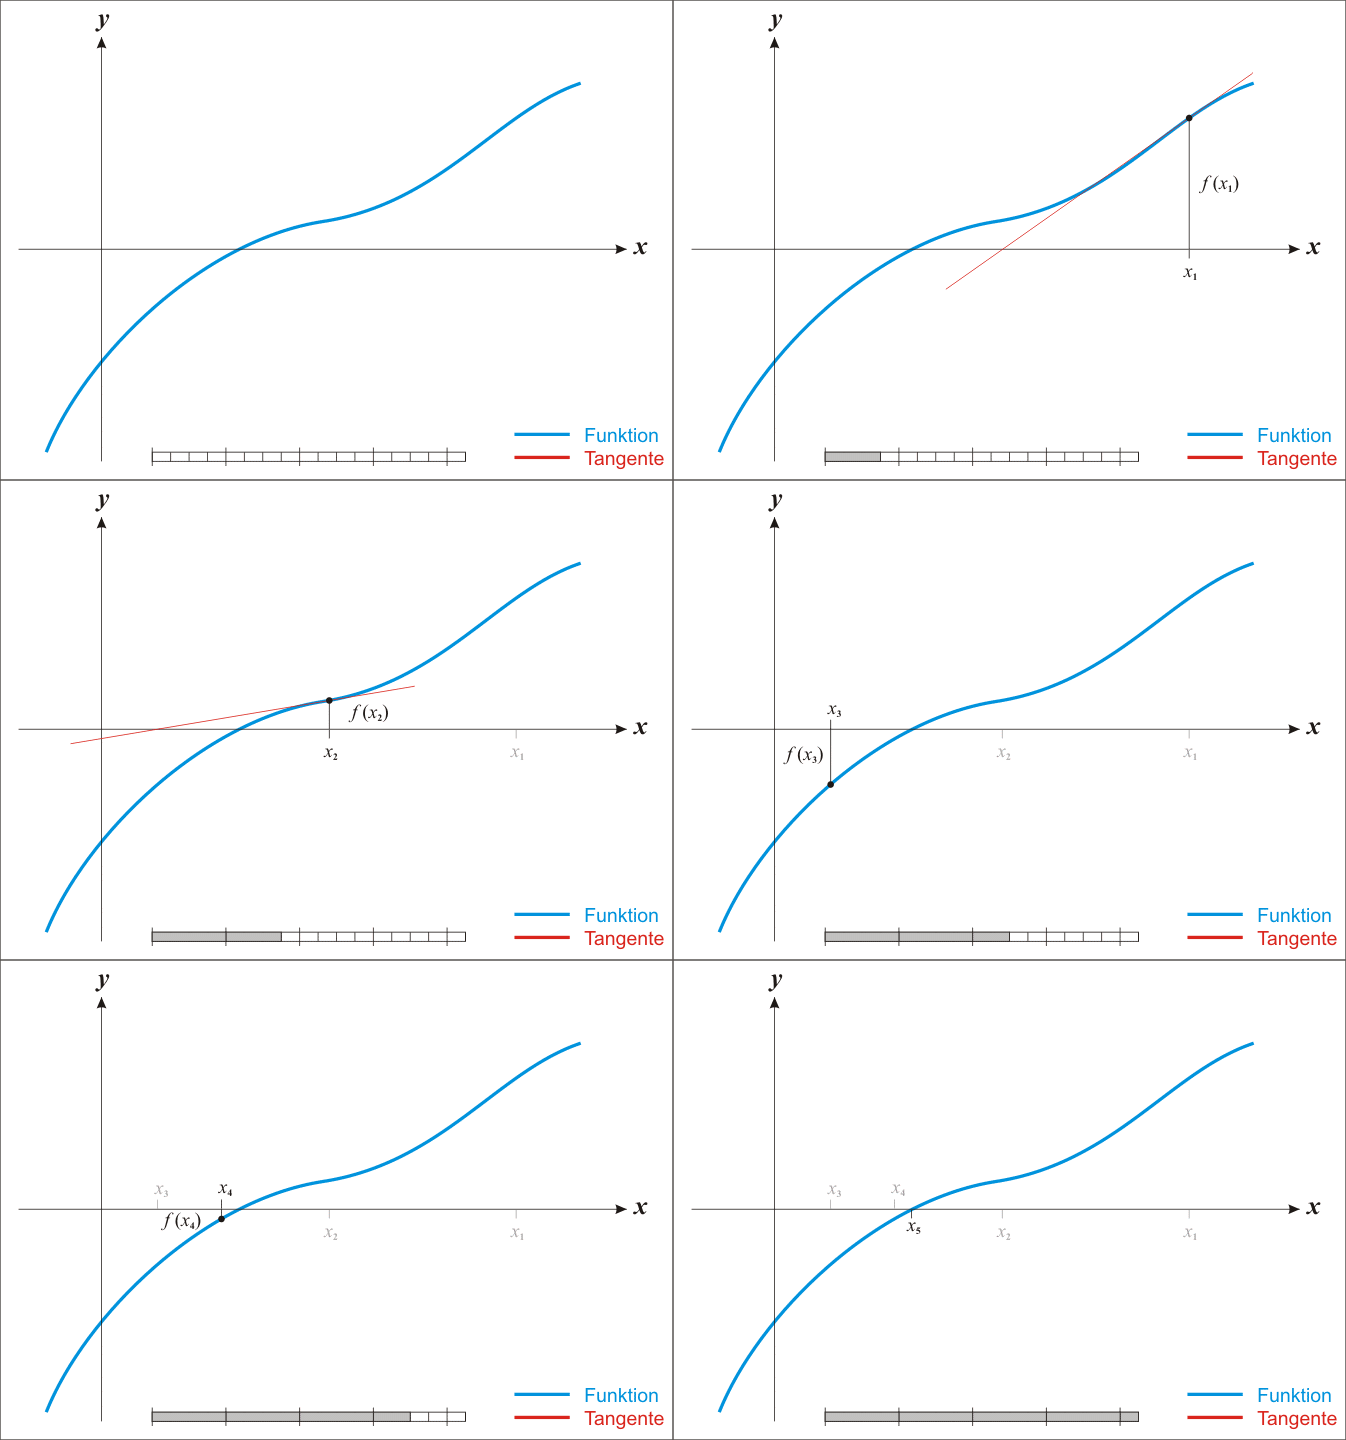
利文伯格法是对高斯牛顿法的改进,是把梯度下降法与高斯牛顿法进行线性组合,属于信赖区域法,认为近似只在区域内可靠,控制每一步迭代的步长以及方向。 高斯牛顿法属于线搜索,即先找方向,再确定步长。


推导.png

一直到 满足Lipschitz连续且非奇异,算法二次收敛。利普希茨连续的定义为:对于函数 f(x),若其任意定义域中的 , ,都存在 ,使得

阻尼因子μ作用如下:

  • μ非常大,说明此时高斯牛顿的一次泰勒展开近似效果不好,更新方式偏向近似最速下降法。

  • μ比较小,说明此时高斯牛顿的一次泰勒展开近似效果挺好的,更新方式偏向近似高斯牛顿法。

狗腿法就是引入信赖区域代替LM算法中的阻尼项

利文伯格法的特点:

  • μ大于0 保证了系数矩阵的正定,解决了高斯牛顿法的缺陷,迭代朝着下降方向进行。
  • 即使初值距离(局部)最优解非常远,利文伯格法仍可以求解成功

  • 利文伯格法的收敛速度要稍微低于高斯牛顿法,但更鲁棒

  • 可以在一定程度避免系数矩阵的奇异和病态问题


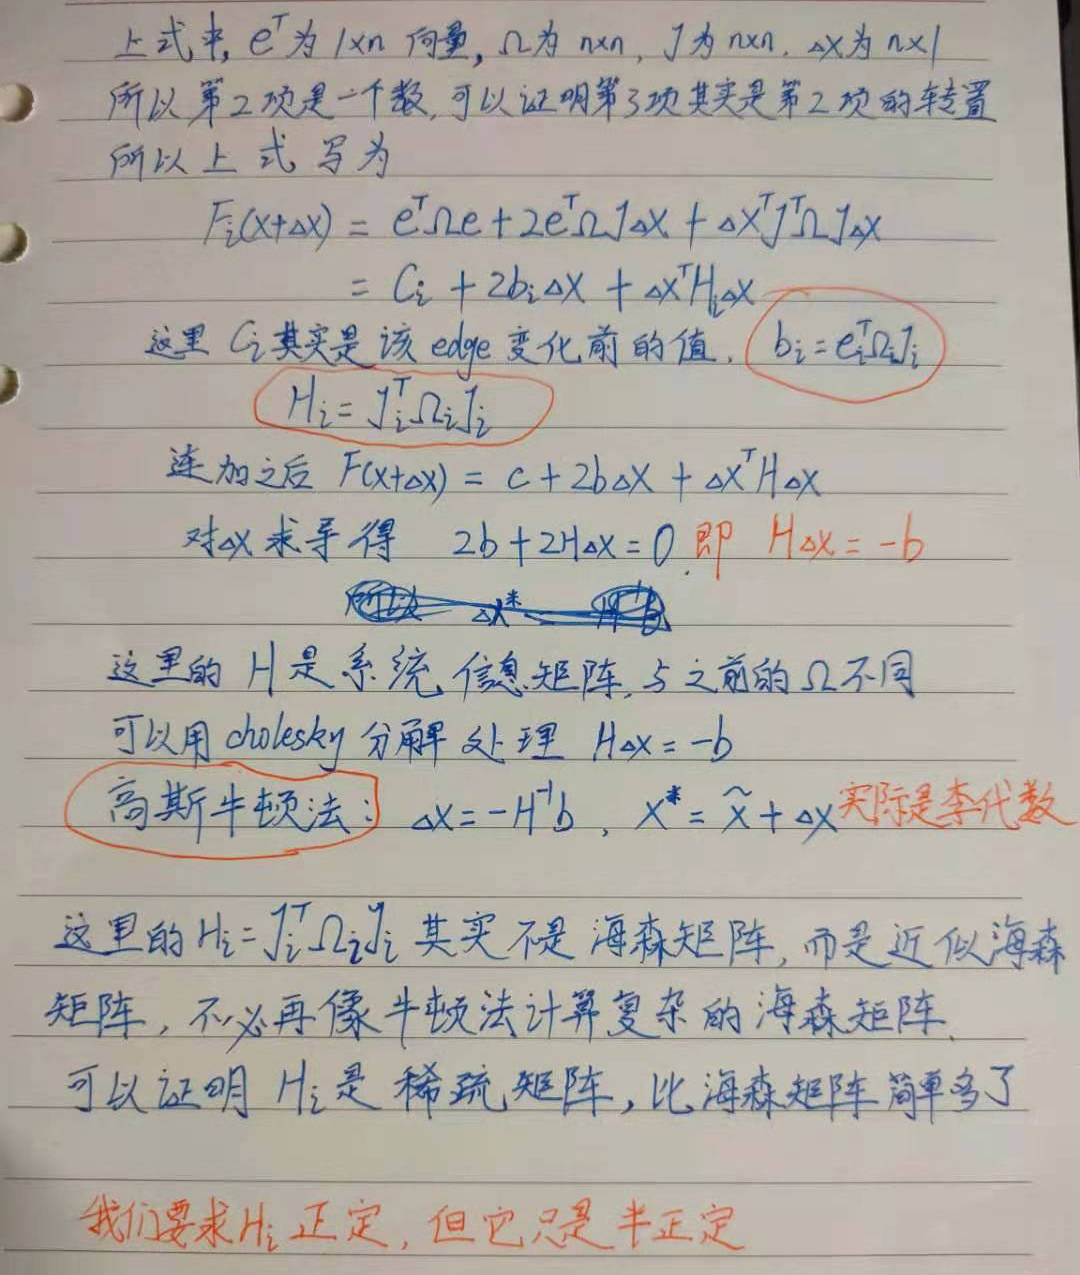
对于以上几种方法, 不会直接求系数矩阵的逆,而是用矩阵分解,例如QR, Cholesky分解,这个矩阵往往有稀疏形式,为SLAM的实时求解提供了可能。SLAM中,Pose Graph的结构会越来越大,H矩阵如果不是稀疏的,维数会达到几千,求逆矩阵会极其耗时,不可能实时求解。

矩阵之所以是稀疏,根本原因是约束只和它周边少数的节点有关。
  • 线搜索方法: 首先找到一个下降的方向,目标函数将沿其下降。然后再确定步长,从而决定沿该方向到底移动多远。 下降方向可以通过各种方法计算,如梯度下降法、牛顿法和拟牛顿法。步长可以精确或不精确地确定。

  • 置信域法Trust Region: 在搜索空间的子集内应用模型函数(通常是二次方程)来近似目标函数,这个空间被称为置信域。如果模型函数成功地使真正的目标函数最小化,则扩大置信域。否则收缩置信域并且再次尝试求解模型函数的优化问题。


正定矩阵 对称矩阵 反对称矩阵 奇异矩阵 病态矩阵

正定矩阵

定义: A是n阶方阵,如果对任何非零向量x,都有 >0,其中 表示x的转置,就称A正定矩阵。

性质:

  • 行列式恒为正
  • 正定矩阵可逆。若矩阵A正定,则必有|A|(矩阵A的行列式)>0,所以矩阵A可逆
  • 所有的特征值都是正的
  • 实对称矩阵A正定, 当且仅当 A与单位矩阵合同
  • 两个正定矩阵的和是正定矩阵, 乘积也是正定矩阵
实数域上所说的正定矩阵都是对称矩阵,在复数域上是厄米特矩阵(共轭对称)

判别实对称矩阵A的正定性有两种方法:

  1. 求出A的所有特征值,若全为正数,则A是正定的; 若特征值全为负数,则A为负定的。

  2. 若A的所有顺序主子式都大于零,则A是正定的; 若A的奇数阶顺序主子式为负,偶数阶为正,则A为负定的。

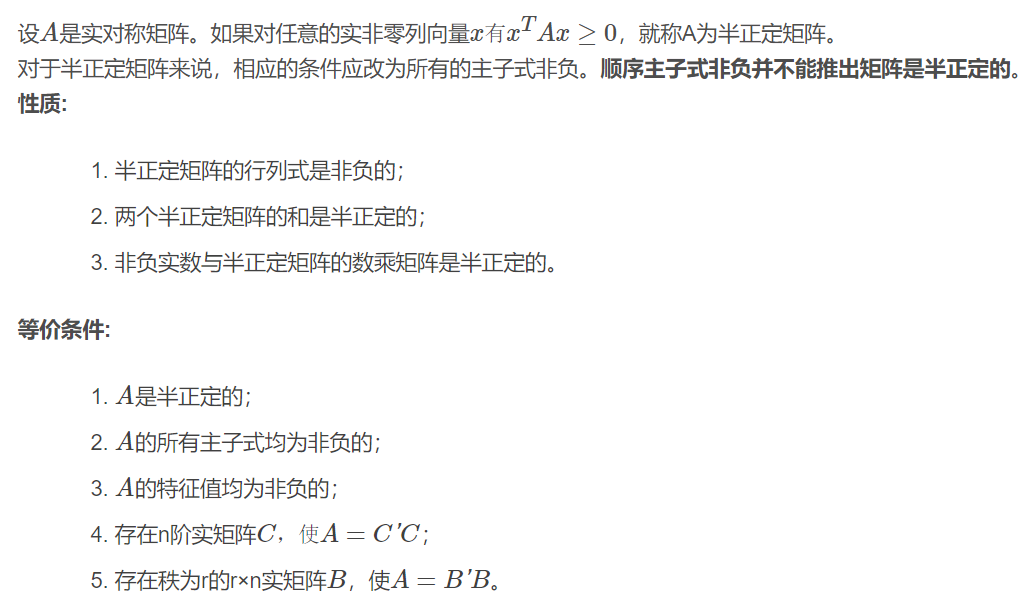
半正定矩阵


正定矩阵的几何意义

定义中的 变为 ()

那么有

也就是说,一个向量 x 经过矩阵A变换后(左乘),与其转置向量的夹角小于90°

反对称矩阵

也就是,或者说元素关系满足 主对角线元素皆为0

  • 斜对称矩阵自身相乘的积是对称矩阵。
  • 任意矩阵 是斜对称矩阵。
  • 是斜对称矩阵,是向量, = 0

稀疏矩阵

在矩阵中,若数值为0的元素数目远远多于非0元素的数目,并且非0​元素分布没有规律时,则称该矩阵为稀疏矩阵

奇异矩阵(singular)

奇异和非奇异矩阵仅针对n阶方阵。 奇异矩阵就是对应的行列式等于0的矩阵。 若一个n阶矩阵是可逆的,则称它为非奇异矩阵。

奇异矩阵的判定方法: 行列式|A|是否等于0,若等于0,称矩阵A为奇异矩阵

非奇异矩阵的判定方法:

  • 一个矩阵非奇异 当且仅当 它的行列式不为零
  • 一个矩阵非奇异 当且仅当 它的秩为n
  • 可逆矩阵就是非奇异矩阵,非奇异矩阵也是可逆矩阵

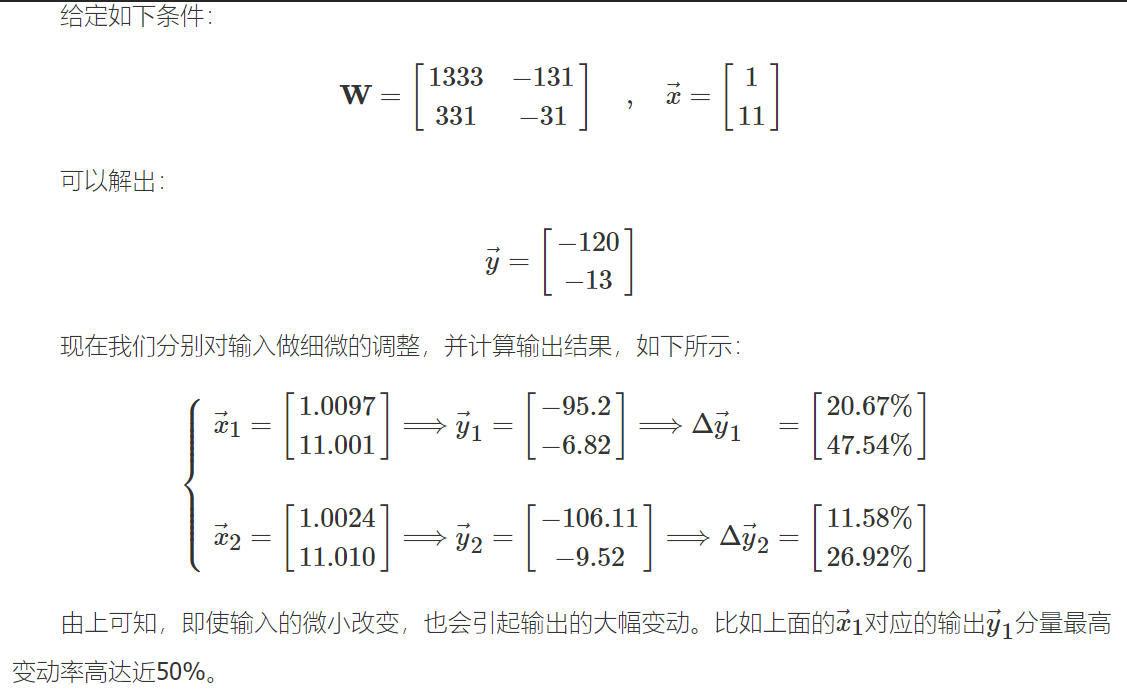
病态矩阵

求解方程组Ax=b时如果对数据进行较小的扰动,则得出的结果具有很大波动,这样的矩阵称为病态矩阵。

最根本的原因在于矩阵的列之间的相关性过大。