
在CONTROLLING状态下,对振荡进行判断:1
2
3
4
5
6
7if(oscillation_timeout_ > 0.0 && ros::Time::now() - last_oscillation_reset_ > ros::Duration(oscillation_timeout_) )
{
publishZeroVelocity();
state_ = CLEARING;
recovery_trigger_ = OSCILLATION_R;
movebase_log.error("oscillate in a small area for a long time !");
}oscillation_timeout参数默认是0,我设置为10。这个时间是从到达振荡点和判定确实是振荡经过的时间,但整个恢复行为花的时间会有几十秒
判断last_oscillation_reset_的赋值是在1
2
3
4
5
6
7
8
9if(distance(current_position, oscillation_pose_) >= oscillation_distance_)
{
last_oscillation_reset_ = ros::Time::now();
oscillation_pose_ = current_position;
//if our last recovery was caused by oscillation, we want to reset the recovery index
if(recovery_trigger_ == OSCILLATION_R)
recovery_index_ = 0;
}
最后彻底失败,会abort:1
2
3
4
5else if(recovery_trigger_ == OSCILLATION_R)
{
movebase_log.error("Aborting because the robot appears to be oscillating over and over. Even after executing all recovery behaviors");
as_->setAborted(move_base_msgs::MoveBaseResult(), "Robot is oscillating. Even after executing recovery behaviors.");
}
出现振荡的日志如下:1
2
3
4
5
6
7
8
9
10
11
12
13
14
15
16
17
18
19
20
21
22
23
24
25
26
27
28
29
30
31
32
33
34
35
36
37
38[10:21:19.968 - INFO] (): robot is oscillating, and also recently_oscillated
# move_base CONTROLLING
[10:21:20.262 - ERROR] (): move_base CONTROLLING: oscillate in a small area for a long time !
# 进入CLEARING状态,OSCILLATION_R,准备进入第1个恢复行为
[10:21:20.262 - INFO] (): robot is oscillating, and also recently_oscillated
# 执行第1个恢复行为,结束后,状态变为PLANNING
[10:21:20.301 - INFO] (): move_base_recovery,state machine is CLEARING, Executing behavior 0 of 2
[10:21:20.301 - WARN] (): Clearing costmap to unstuck robot (3.000000m).
[10:21:20.628 - INFO] (): robot is oscillating, and also recently_oscillated
[10:21:33.657 - INFO] (): robot is oscillating, and also recently_oscillated
[10:21:33.724 - INFO] (): robot is oscillating, and also recently_oscillated
# 第一个恢复行为失败,仍然进入CLEARING状态, OSCILLATION_R
[10:21:33.846 - ERROR] (): move_base CONTROLLING: oscillate in a small area for a long time !
[10:21:33.848 - INFO] (): robot is oscillating, and also recently_oscillated
# 执行第2个恢复行为
[10:21:33.900 - INFO] (): move_base_recovery,state machine is CLEARING, Executing behavior 1 of 2
[10:21:33.900 - WARN] (): Clearing costmap to unstuck robot (0.000000m).
[10:21:37.559 - INFO] (): robot is oscillating, and also recently_oscillated
[10:21:37.617 - INFO] (): robot is oscillating, and also recently_oscillated
[10:21:37.805 - INFO] (): robot is oscillating, and also recently_oscillated
[10:21:37.863 - INFO] (): robot is oscillating, and also recently_oscillated
# 省略一段时间
[10:21:48.917 - ERROR] (): move_base CONTROLLING: oscillate in a small area for a long time !
# 两个恢复行为都失败,状态又变为CLEARING OSCILLATION_R
[10:21:48.919 - INFO] (): robot is oscillating, and also recently_oscillated
# 彻底失败,Abort
[10:21:49.103 - ERROR] (): Aborting because the robot appears to be oscillating over and over. Even after executing all recovery behaviors
有时会出现进行一次恢复行为后,机器人走了一点,但是又陷入振荡,然后又进行恢复行为
类的定义1
2
3
4
5
6
7
8
9
10
11
12
13
14
15
16
17
18
19
20
21
22
23
24
25
26
27
28
29
30
31
32
33
34
35
36
37
38
39
40
41
42
43
44
45
46
47
48
49
50
51
52
53
54
55
56
57
58
59
60
61
62
63
64
65
66
67
68
69
70
71
72
73
74
75
76
77
78
79
80
81
82
83
84
85
86
87/**
* Edge defining the cost function for keeping a minimum distance from obstacles.
* The edge depends on a single vertex \f$ \mathbf{s}_i \f$ and minimizes:
* \f$ \min \textrm{penaltyBelow}( dist2point ) \cdot weight \f$.
* \e dist2point denotes the minimum distance to the point obstacle.
* \e weight can be set using setInformation(). \n
* \e penaltyBelow denotes the penalty function, see penaltyBoundFromBelow()
* @see TebOptimalPlanner::AddEdgesObstacles, TebOptimalPlanner::EdgeInflatedObstacle
* @remarks Do not forget to call setTebConfig() and setObstacle()
*/
class EdgeObstacle : public BaseTebUnaryEdge<1, const Obstacle*, VertexPose>
{
public:
EdgeObstacle()
{
_measurement = NULL;
}
/**
* @brief Set pointer to associated obstacle for the underlying cost function
* @param obstacle 2D position vector containing the position of the obstacle
*/
void setObstacle(const Obstacle* obstacle)
{
_measurement = obstacle;
}
/**
* @brief Set pointer to the robot model
* @param robot_model Robot model required for distance calculation
*/
void setRobotModel(const BaseRobotFootprintModel* robot_model)
{
robot_model_ = robot_model;
}
/**
* @brief Set all parameters at once
* @param cfg TebConfig class
* @param robot_model Robot model required for distance calculation
* @param obstacle 2D position vector containing the position of the obstacle
*/
void setParameters(const TebConfig& cfg,
const BaseRobotFootprintModel* robot_model, const Obstacle* obstacle)
{
cfg_ = &cfg;
robot_model_ = robot_model;
_measurement = obstacle;
}
// cost function
void computeError()
{
ROS_ASSERT_MSG(cfg_ && _measurement && robot_model_, "You must call setTebConfig(), setObstacle() and setRobotModel() on EdgeObstacle()" );
const VertexPose* bandpt = static_cast<const VertexPose*>(_vertices[0]);
/* inline double penaltyBoundFromBelow( const double& var,
const double& a, const double& epsilon)
{
if (var >= a+epsilon)
return 0.;
else
return (-var + (a+epsilon));
} */
double dist = robot_model_->calculateDistance(bandpt->pose(), _measurement);
// Original obstacle cost
_error[0] = penaltyBoundFromBelow( dist,
cfg_->obstacles.min_obstacle_dist,
cfg_->optim.penalty_epsilon );
if (cfg_->optim.obstacle_cost_exponent != 1.0 && cfg_->obstacles.min_obstacle_dist > 0.0)
{
// Optional non-linear cost. Note the max cost (before weighting) is
// the same as the straight line version and that all other costs are
// below the straight line (for positive exponent), so it may be
// necessary to increase weight_obstacle and/or the inflation_weight
// when using larger exponents
_error[0] = cfg_->obstacles.min_obstacle_dist * std::pow(
_error[0] / cfg_->obstacles.min_obstacle_dist,
cfg_->optim.obstacle_cost_exponent);
}
ROS_ASSERT_MSG(std::isfinite(_error[0]),
"EdgeObstacle::computeError() _error[0]=%f\n",
_error[0]);
}
protected:
const BaseRobotFootprintModel* robot_model_;
public:
EIGEN_MAKE_ALIGNED_OPERATOR_NEW
};
一元边,观测值维度为1,测量值类型为Obstacle基类,连接VertexPose顶点。存储了某个障碍物的中心点的三维位置,形状与顶点的位置
只将离某个Pose最近的最左边与最右边的两个Obstacle加入优化中。(因为优化路径不会使得路径相对于障碍物的位置关系发生改变)。同时,还设了一个阈值,凡是离该Pose距离低于某个距离的障碍物也一并加入考虑之中。1
2
3
4
5
6
7
8
9
10
11
12
13
14
15
16
17
18
19
20
21
22
23
24
25
26
27
28
29
30
31
32
33
34
35
36
37
38
39
40
41
42
43
44
45
46
47
48
49
50
51
52
53
54
55
56
57
58
59
60
61
62
63
64
65
66
67
68
69
70
71
72
73
74
75
76
77
78
79
80
81
82
83
84
85
86
87
88
89
90
91
92
93
94
95
96
97
98
99
100
101
102
103
104
105
106
107
108
109void TebOptimalPlanner::AddEdgesObstacles(double weight_multiplier)
{
if (cfg_->optim.weight_obstacle==0 || weight_multiplier==0 || obstacles_==nullptr )
return;
// 判断 inflation_dist > min_obstacle_dist
bool inflated = cfg_->obstacles.inflation_dist > cfg_->obstacles.min_obstacle_dist;
Eigen::Matrix<double,1,1> information;
information.fill(cfg_->optim.weight_obstacle * weight_multiplier);
Eigen::Matrix<double,2,2> information_inflated;
information_inflated(0,0) = cfg_->optim.weight_obstacle * weight_multiplier;
information_inflated(1,1) = cfg_->optim.weight_inflation;
information_inflated(0,1) = information_inflated(1,0) = 0;
auto iter_obstacle = obstacles_per_vertex_.begin();
auto create_edge = [inflated, &information, &information_inflated, this] (int index,
const Obstacle* obstacle) {
if (inflated)
{
// 一元边,观测值维度为2,类型为Obstacle基类,连接VertexPose顶点
EdgeInflatedObstacle* dist_bandpt_obst = new EdgeInflatedObstacle;
dist_bandpt_obst->setVertex(0,teb_.PoseVertex(index));
// 信息矩阵为2x2对角阵,(0,0) = weight_obstacle, (1,1) = weight_inflation
dist_bandpt_obst->setInformation(information_inflated);
dist_bandpt_obst->setParameters(*cfg_, robot_model_.get(), obstacle);
optimizer_->addEdge(dist_bandpt_obst);
}
else
{
// 一元边,观测值维度为1,测量值类型为Obstacle基类,连接VertexPose顶点
EdgeObstacle* dist_bandpt_obst = new EdgeObstacle;
dist_bandpt_obst->setVertex(0,teb_.PoseVertex(index));
// 信息矩阵为 1x1 weight_obstacle * weight_multiplier
dist_bandpt_obst->setInformation(information);
dist_bandpt_obst->setParameters(*cfg_, robot_model_.get(), obstacle);
optimizer_->addEdge(dist_bandpt_obst);
};
};
/* iterate all teb points, skipping the last and, if the
EdgeVelocityObstacleRatio edges should not be created, the first one too*/
const int first_vertex = cfg_->optim.weight_velocity_obstacle_ratio == 0 ? 1 : 0;
for (int i = first_vertex; i < teb_.sizePoses() - 1; ++i)
{
double left_min_dist = std::numeric_limits<double>::max();
double right_min_dist = std::numeric_limits<double>::max();
ObstaclePtr left_obstacle;
ObstaclePtr right_obstacle;
const Eigen::Vector2d pose_orient = teb_.Pose(i).orientationUnitVec();
// iterate obstacles
for (const ObstaclePtr& obst : *obstacles_)
{
// we handle dynamic obstacles differently below
if(cfg_->obstacles.include_dynamic_obstacles && obst->isDynamic())
continue;
// calculate distance to robot model
double dist = robot_model_->calculateDistance(teb_.Pose(i), obst.get());
// force considering obstacle if really close to the current pose
if (dist < cfg_->obstacles.min_obstacle_dist*cfg_->obstacles.obstacle_association_force_inclusion_factor)
{
iter_obstacle->push_back(obst);
continue;
}
// cut-off distance
if (dist > cfg_->obstacles.min_obstacle_dist*cfg_->obstacles.obstacle_association_cutoff_factor)
continue;
// determine side (left or right) and assign obstacle if closer than the previous one
if (cross2d(pose_orient, obst->getCentroid()) > 0) // left
{
if (dist < left_min_dist)
{
left_min_dist = dist;
left_obstacle = obst;
}
}
else
{
if (dist < right_min_dist)
{
right_min_dist = dist;
right_obstacle = obst;
}
}
}
// create obstacle edges
if (left_obstacle)
iter_obstacle->push_back(left_obstacle);
if (right_obstacle)
iter_obstacle->push_back(right_obstacle);
// continue here to ignore obstacles for the first pose, but use them later to create the EdgeVelocityObstacleRatio edges
if (i == 0)
{
++iter_obstacle;
continue;
}
// create obstacle edges
for (const ObstaclePtr obst : *iter_obstacle)
create_edge(i, obst.get());
++iter_obstacle;
}
}
两个类根据机器人的轮廓模型计算当前Pose与某个障碍物的距离dist,至于如何计算,属于另一个话题。 然后EdgeObstacle的error如下1
error = (dist > min_obstacle_dist+ε) ? 0 : (min_obstacle_dist+ε) - dist
EdgeInflatedObstacle则是1
2
3
4# Original "straight line" obstacle cost. The max possible value
# before weighting is min_obstacle_dist,和 EdgeObstacle的相同
error[0] = (dist > min_obstacle_dist+ε) ? 0 : (min_obstacle_dist+ε) - dist
error[1] = (dist > inflation_dist) ? 0 : (inflation_dist) - dist
但是这两个类的computeError在error[0]赋值结束后又补充这样一段:1
2
3
4
5
6
7
8
9
10if (cfg_->optim.obstacle_cost_exponent != 1.0 && cfg_->obstacles.min_obstacle_dist > 0.0)
{
/* Optional 非线性代价. Note the max cost (before weighting) is
the same as the straight line version and that all other costs are
below the straight line (for positive exponent), so it may be
necessary to increase weight_obstacle and/or the inflation_weight
when using larger exponents */
_error[0] = cfg_->obstacles.min_obstacle_dist * std::pow(
_error[0] / cfg_->obstacles.min_obstacle_dist, cfg_->optim.obstacle_cost_exponent);
}
涉及参数obstacle_cost_exponent,不明白这个公式是怎么来的
1 | // 如果优化结果违反约束(由于是软约束,所以是可能的), Saturate 速度 |
若规划出来的速度超过限制速度,则令其等于最大限制速度1
2
3
4
5
6
7
8
9
10
11
12
13
14
15
16
17
18
19
20
21
22
23// Limit translational velocity for forward driving
if (vx > max_vel_x)
vx = max_vel_x;
// limit strafing velocity
if (vy > max_vel_y)
vy = max_vel_y;
else if (vy < -max_vel_y)
vy = -max_vel_y;
if(vx>= -0.12 && vx< 0)
{
vx = -0.12;
}
else if(vx< -0.12)
{
planner_->clearPlanner();
}
// Limit angular velocity
if (omega > max_vel_theta)
omega = max_vel_theta;
else if (omega < -max_vel_theta)
omega = -max_vel_theta;
剩余部分也很简单1
2
3
4
5
6
7
8
9
10
11
12
13
14
15
16
17// 对汽车机器人,convert rot-vel to steering angle if desired
// The min_turning_radius is allowed to be slighly smaller since it is a soft-constraint
// and opposed to the other constraints not affected by penalty_epsilon. The user might add a safety margin to the parameter itself.
if (cfg_.robot.cmd_angle_instead_rotvel)
{ // 目前是false,省略
}
// a feasible solution should be found, reset counter
no_infeasible_plans_ = 0;
// 保存上一个速度命令 (for recovery analysis etc.)
last_cmd_ = cmd_vel;
// Now visualize everything
planner_->visualize();
visualization_->publishObstacles(obstacles_);
visualization_->publishViaPoints(via_points_);
visualization_->publishGlobalPlan(global_plan_);
return true; // 函数 computeVelocityCommands 结束
可视化部分,见下一篇
调用是这样的:1
2
3
4
5
6
7
8
9
10
11
12// Get the velocity command for this sampling interval
if (!planner_->getVelocityCommand(cmd_vel.linear.x, cmd_vel.linear.y, cmd_vel.angular.z,
cfg_.trajectory.control_look_ahead_poses, robot_vel_.linear.x,
robot_vel_.angular.z) )
{
planner_->clearPlanner();
ROS_WARN("TebLocalPlannerROS: velocity command invalid. Resetting planner...");
++no_infeasible_plans_; // increase number of infeasible solutions in a row
time_last_infeasible_plan_ = ros::Time::now();
last_cmd_ = cmd_vel;
return false;
}
1 | bool TebOptimalPlanner::getVelocityCommand(double& vx, double& vy, double& omega, |
参数control_look_ahead_poses增大,会让look_ahead_poses变量增大,dt也会增大
间接导致最终的look_ahead_poses也比较大。如果参数dt_ref也增大,那此二者就更大了。
提取机器人的速度在本体坐标系下的表示1
2
3
4
5
6
7
8
9
10
11
12
13
14
15
16
17
18
19
20
21
22
23
24
25
26// pose2 是 teb_.Pose(look_ahead_poses)
void TebOptimalPlanner::extractVelocity(const PoseSE2& pose1, const PoseSE2& pose2,
double dt, double& vx, double& vy, double& omega) const
{
if (dt == 0)
{
vx = 0; vy = 0; omega = 0;
return;
}
Eigen::Vector2d deltaS = pose2.position() - pose1.position();
if (cfg_->robot.max_vel_y == 0) // nonholonomic robot
{
Eigen::Vector2d conf1dir( cos(pose1.theta()), sin(pose1.theta()) );
// translational velocity
double dir = deltaS.dot(conf1dir);
// 无后退的情况下,sign函数都返回 1
vx = (double) g2o::sign(dir) * deltaS.norm() / dt;
vy = 0;
}
else // holonomic robot ...... 省略
// rotational velocity
double orientdiff = g2o::normalize_theta(pose2.theta() - pose1.theta());
omega = orientdiff / dt;
}
前面两个参数的增大导致deltaS.norm()和dt都增大,从这里直接看不出vx是增大还是减小了,实际运行后,通过日志可以看到vx整体增大了。
1 | inline int sign(T x) |
1 | void TebLocalPlannerROS::configureBackupModes( |
shrink_horizon_backup: true. 在自动检测到问题(plan not feasible)的情况下,允许planner临时缩小范围(50%). TEB将以更近的点作为规划目标,尝试重新规划出可行路径。调试时可关闭,以在可视化界面上观察原出错路径。另请参阅参数shrink_horizon_min_duration
shrink_horizon_min_duration: 10,单位秒。 如果检测到不可行的轨迹,激活缩小的水平线后备模式,本参数为其最短持续时间。个人怀疑这个参数无意义,因为它更新值的地方也都有no_infeasible_plans_变量的更新,判断时,只根据no_infeasible_plans_即可,详见代码configureBackupModes
1 | // detect and resolve oscillations |
但是如果机器人确实stucked,最终会在move_base里Abort
设置期望的初始转弯方向 (也就是惩罚相反的方向)。A desired (initial) turning direction might be specified in case the planned trajectory oscillates between two solutions (in the same equivalence class!) with similar cost. 配置参数以调整惩罚的权重,Initial 说明惩罚只适用于trajectory的前几个位姿
参数dir可以是RotType::left, RotType::right, RotType::none
代码实际调用的是:1
2
3
4
5
6
7
8void HomotopyClassPlanner::setPreferredTurningDir(RotType dir)
{
// set preferred turning dir for all TEBs
for (TebOptPlannerContainer::const_iterator it_teb = tebs_.begin(); it_teb != tebs_.end(); ++it_teb)
{
(*it_teb)->setPreferredTurningDir(dir);
}
}
结果还是TebOptimalPlanner的同名成员函数,赋值而已1
virtual void setPreferredTurningDir(RotType dir) { prefer_rotdir_ = dir; }
赋值完了,prefer_rotdir_会在AddEdgesPreferRotDir里产生影响
1 | void TebOptimalPlanner::AddEdgesPreferRotDir() |
调用时在configureBackupModes第二部分,那里是对prefer_rotdir_赋值,
类FailureDetector的代码在TEB的recovery_behaviors.cpp,FailureDetector检测机器人是否 stucked或者振荡,分析last N(buffer的大小)个速度命令,看这些线速度和角速度的平均值是否小于oscillation_v_eps 和 oscillation_omega_eps
构造函数和析构全是空。
1 | // Set buffer length (measurement history) |
调用:1
2failure_detector_.setBufferLength(std::round(
cfg_.oscillation_filter_duration * controller_frequency ) );
默认是10*30,其实比较大,可以降低oscillation_filter_duration
1 | // Clear buffer, 置为不振荡状态 |
先看调用,只有第一个参数是速度控制量,其他都是配置参数:1
2
3
4failure_detector_.update(last_cmd_, cfg_.robot.max_vel_x, cfg_.robot.max_vel_x_backwards,
max_vel_theta, cfg_.recovery.oscillation_v_eps, cfg_.recovery.oscillation_omega_eps);
bool oscillating = failure_detector_.isOscillating();
源码其实也简单1
2
3
4
5
6
7
8
9
10
11
12
13
14
15
16
17
18
19
20
21
22
23
24
25
26void FailureDetector::update(const geometry_msgs::Twist& twist, double v_max, double v_backwards_max, double omega_max, double v_eps, double omega_eps)
{
if (buffer_.capacity() == 0)
return;
VelMeasurement measurement;
/*
struct VelMeasurement
{
double v = 0;
double omega = 0;
}; */
measurement.v = twist.linear.x; // 不考虑 y 方向速度
measurement.omega = twist.angular.z;
if (measurement.v > 0 && v_max>0)
measurement.v /= v_max;
else if (measurement.v < 0 && v_backwards_max > 0)
measurement.v /= v_backwards_max;
if (omega_max > 0)
measurement.omega /= omega_max;
buffer_.push_back(measurement);
// immediately compute new state
detect(v_eps, omega_eps);
}
v_eps: (0,1)内的normalized 线速度的平均值的阈值,默认0.1omega_eps: (0,1)内的normalized 角速度的平均值,默认0.1如果机器人stucked则返回true,否则false1
2
3
4
5
6
7
8
9
10
11
12
13
14
15
16
17
18
19
20
21
22
23
24
25
26
27bool detect(double v_eps, double omega_eps)
{
oscillating_ = false;
//至少有一半的速度数据才检测,也就是过一点时间才判断
if (buffer_.size() < buffer_.capacity()/2)
return false;
double n = (double)buffer_.size();
// 计算buffer内线速度和角速度的均值
double v_mean=0;
double omega_mean=0;
int omega_zero_crossings = 0;
for (int i=0; i < n; ++i)
{
v_mean += buffer_[i].v;
omega_mean += buffer_[i].omega;
if ( i>0 && g2o::sign(buffer_[i].omega) != g2o::sign(buffer_[i-1].omega) )
++omega_zero_crossings;
}
v_mean /= n;
omega_mean /= n;
if (std::abs(v_mean) < v_eps && std::abs(omega_mean) < omega_eps
&& omega_zero_crossings>1 )
{
oscillating_ = true;
}
return oscillating_;
}
我用的参数值如下:1
2
3
4
5
6
7shrink_horizon_backup = true;
shrink_horizon_min_duration = 10: # 默认10
oscillation_recovery = true;
oscillation_v_eps = 0.1; # 线速度和角速度设置0.1已经足够
oscillation_omega_eps = 0.1;
oscillation_recovery_min_duration = 5;
oscillation_filter_duration = 6 # 默认10,这个大了会使buffer太大
要出现振荡,最直观的就是车左右摇摆或者车前后小步行走,因为代码中没有绝对值,否则朝一个方向小幅行走也算振荡了。实际中当然是不允许这种奇怪的行为。
所有边都在头文件base_teb_edges.h中,顶点就是g2o_types\vertex_timediff.h 和 g2o_types\vertex_pose.h。两个顶点都比较简单,值得注意的是vertex_timediff.h的setToOriginImpl1
2
3
4virtual void setToOriginImpl()
{
_estimate = 0.1; // 不是0,不明白为什么
}
一元边: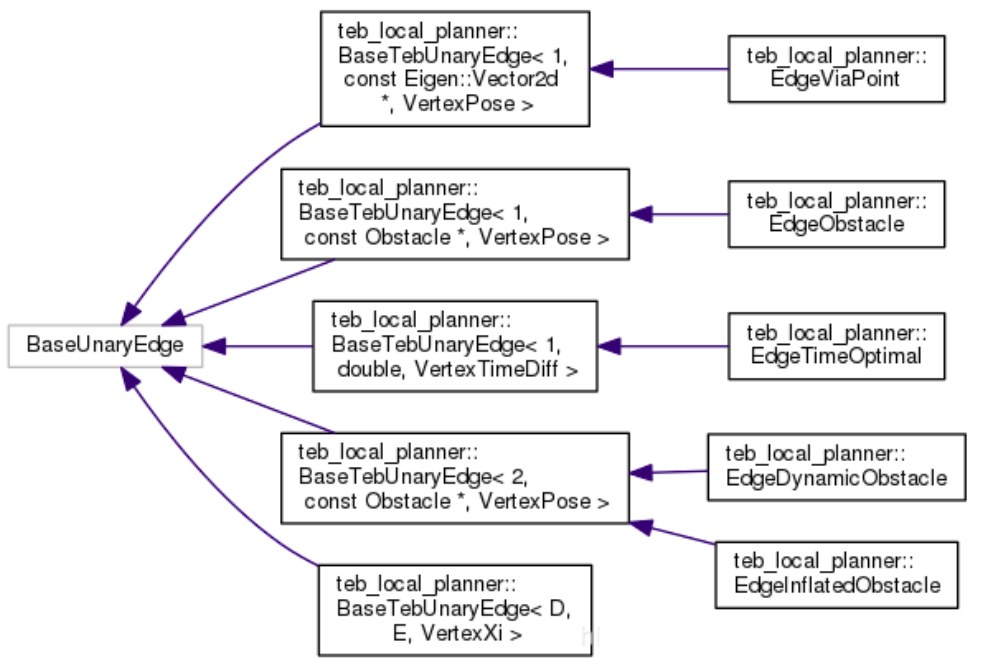
1
2template <int D, typename E, typename VertexXi>
class BaseTebUnaryEdge : public g2o::BaseUnaryEdge<D, E, VertexXi>
EdgeViaPoint:以指定的经过点位置与待优化位姿(顶点)的误差作为目标。(保证轨迹会经过指定点)
EdgeObstacle:以障碍物与待优化位姿(顶点)的距离经过惩罚函数后的输出作为目标(保证离障碍物大于一定距离)
EdgeTimeOptimal:以时间间隔dt最小作为目标(保证时间最短轨迹)
二元边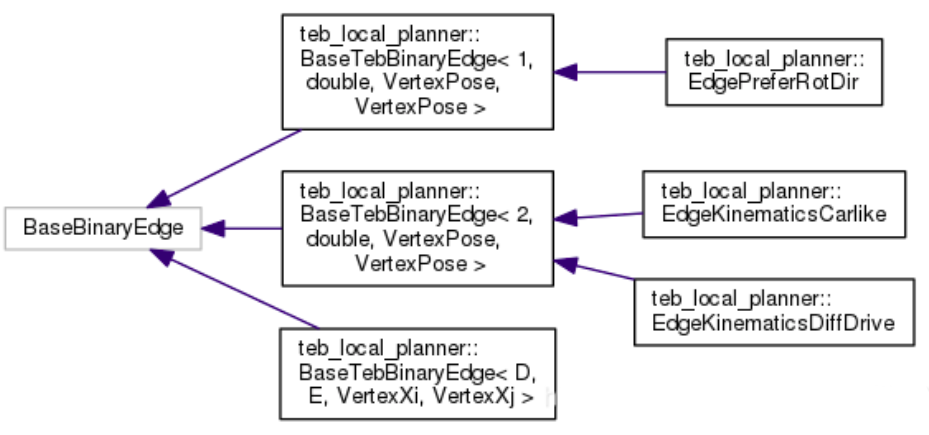
1
2template <int D, typename E, typename VertexXi, typename VertexXj>
class BaseTebBinaryEdge : public g2o::BaseBinaryEdge<D, E, VertexXi, VertexXj>
主要是考虑了运动学的约束关系(车的相邻的两个位姿态必须落在一个圆弧上)。二元边的两个顶点分别是两个位姿,还限制了最小转弯半径。
多元边(构造函数中resize顶点的个数):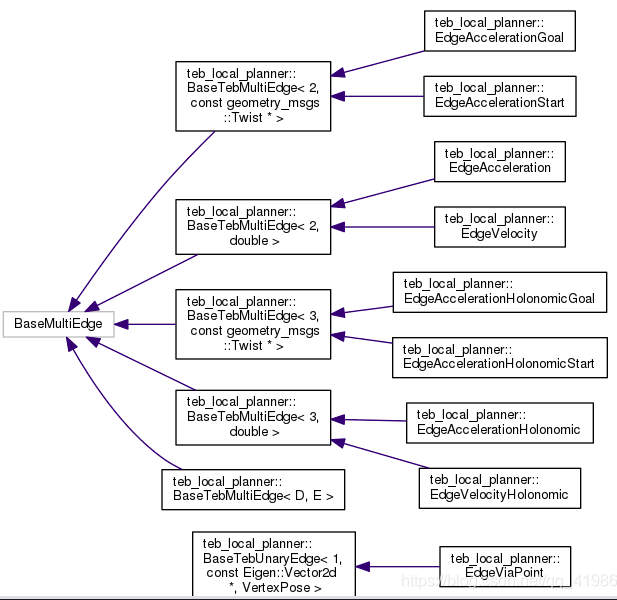
1
2
template <int D, typename E>
class BaseTebMultiEdge : public g2o::BaseMultiEdge<D, E>
EdgeVelocity:以实际速度和限定最大速度经过惩罚函数的输出作为目标函数,顶点为相邻的位姿和时间间隔。(限制实际速度不超过最大,程序中引入了sigmoid函数决定速度的符号(根据论文内的说法,引入此函数是因为优化算法只能求解连续函数)
Edgevelocityholonomic:与EdgeVelocity的区别在于,ds是机器人本体坐标系下的,然后去求速度在本体坐标系下的表示。其余思路一致
1 | class VertexPose : public g2o::BaseVertex<3, PoseSE2 > |
planner_初始化在if (cfg_.hcp.enable_homotopy_class_planning)的判断里,然后实际调用TebOptimalPlanner::initialize或者HomotopyClassPlanner::initialize,前者调用了TebOptimalPlanner::initOptimizer1
2
3
4
5
6
7
8
9
10
11
12
13
14
15
16
17
18
19
20
21
22
23
24
25
26boost::shared_ptr<g2o::SparseOptimizer> TebOptimalPlanner::initOptimizer()
{
// Call register_g2o_types once, even for multiple TebOptimalPlanner instances (thread-safe)
static boost::once_flag flag = BOOST_ONCE_INIT;
// 将为TEB定义的顶点和边注册到g2o::Factory
boost::call_once(®isterG2OTypes, flag);
// allocating the optimizer
boost::shared_ptr<g2o::SparseOptimizer> optimizer = boost::make_shared<g2o::SparseOptimizer>();
// linear solver utilized for optimization
// 针对稀疏矩阵,写死为 g2o::LinearSolverCSparse
// typedef g2o::LinearSolverCSparse<TEBBlockSolver::PoseMatrixType> TEBLinearSolver;
TEBLinearSolver* linearSolver = new TEBLinearSolver(); // see typedef in optimization.h
linearSolver->setBlockOrdering(true);
// block solver utilized for optimization
// typedef g2o::BlockSolver< g2o::BlockSolverTraits<-1, -1> > TEBBlockSolver;
TEBBlockSolver* blockSolver = new TEBBlockSolver(linearSolver);
g2o::OptimizationAlgorithmLevenberg* solver =
new g2o::OptimizationAlgorithmLevenberg(blockSolver);
optimizer->setAlgorithm(solver);
optimizer->initMultiThreading(); // required for >Eigen 3.1
return optimizer;
}
注意算法求解器写死为 利文伯格法 和 g2o::LinearSolverCSparse
1 | bool TebOptimalPlanner::buildGraph(double weight_multiplier) |
1 | void TebOptimalPlanner::AddTEBVertices() |
这里的Vertex没有调用setEstimate函数,不设置初值。
1 | void TebOptimalPlanner::AddEdgesVelocity() |
error有两项,分别是线速度与线速度线速度是否在设定好的区间内。
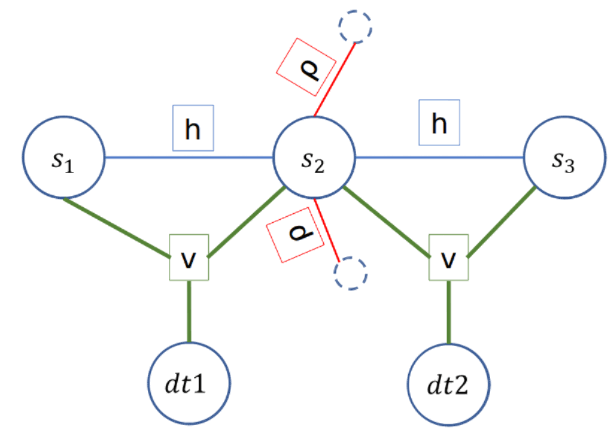
只要看懂了论文和g2o的应用套路,这里的添加的edge大部分都能看懂。比较复杂而且重要的是AddEdgesObstacles 和 AddEdgesViaPoints。 via_point规定了轨迹应当经过这些点,否则会产生相应的cost。via_point边会与原规划的路径中与其距离最近的Pose顶点相连。
对于加速度约束,还要注意 vel_start_.first 和 vel_goal_.first,前者一般会添加,后者基本是false,信息矩阵一直是同一个。
1 | void TebOptimalPlanner::clearGraph() |
局部规划可以让路径显示graph,在rviz中配置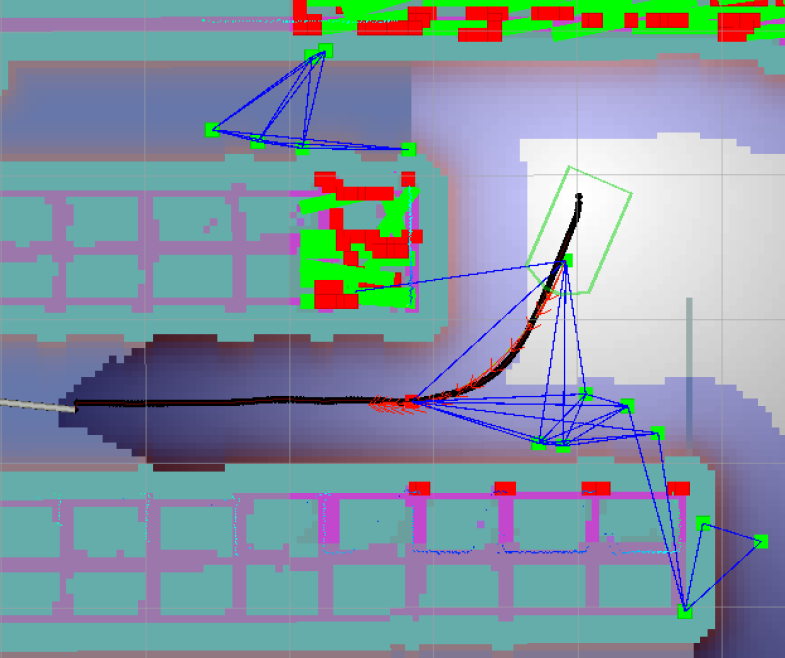
1 | // Do not allow config changes during the following optimization step |
接下来算法遍历前n个位姿(n就是参数feasibility_check_no_poses),从当前的机器人位姿开始,检查这几个位姿点是否有碰撞。为了检测是否发生碰撞,validation-model可能用于optimization的footprint更复杂
参数feasibility_check_no_poses不能太大,因为optimizer可能不完全收敛。小的障碍碰撞在未来可以获得纠正,所以设置太大导致的失败不一定是有效的。
狭窄环境中,调试要慎重。局部规划可能拒绝一个infeasible trajectory,但全局规划会认为全局路径是feasible,结果就是机器人stucked。 如果禁止了后退速度,会经常出现not feasible,尤其是在cluttered环境
源码中是这样调用的:1
2
3
4
5
6
7
8
9
10
11
12
13
14bool feasible = planner_->isTrajectoryFeasible(costmap_model_.get(), footprint_spec_,
robot_inscribed_radius_, robot_circumscribed_radius,
cfg_.trajectory.feasibility_check_no_poses);
if (!feasible)
{
cmd_vel.linear.x = 0; cmd_vel.linear.y = 0; cmd_vel.angular.z = 0;
// reset everything to start again with the initialization of new trajectories.
planner_->clearPlanner();
ROS_WARN("trajectory is not feasible. Resetting planner...");
++no_infeasible_plans_;
time_last_infeasible_plan_ = ros::Time::now();
last_cmd_ = cmd_vel;
return false;
}
如果用的是HomotopyClassPlanner,实际上还是对best TebOptimalPlanner验证轨迹可行性,即TebOptimalPlannerPtr best = findBestTeb();,实际用的是同名函数
costmapmodel: costmap model的指针, `costmap_model = boost::makeshared<
base_local_planner::CostmapModel>(*costmap);`
footprintspec: 机器人世界坐标系的轮廓, `costmap_ros->getRobotFootprint();`
look_ahead_idx: 其实就是参数feasibility_check_no_poses,沿着trajectory需要验证的位姿点,
如果是-1,那就验证整个trajectory。
这里的障碍物是以代价地图代表,而不是算法内部的ObstacleContainer1
2
3
4
5
6
7
8
9
10
11
12
13
14
15
16
17
18
19
20
21
22
23
24
25
26
27
28
29
30
31
32
33
34
35
36
37
38
39
40
41
42
43
44
45
46
47
48
49
50
51
52
53
54
55
56
57
58
59
60bool TebOptimalPlanner::isTrajectoryFeasible(base_local_planner::CostmapModel* costmap_model,
const std::vector<geometry_msgs::Point>& footprint_spec,
double inscribed_radius, double circumscribed_radius,
int look_ahead_idx )
{
if (look_ahead_idx < 0 || look_ahead_idx >= teb().sizePoses() )
look_ahead_idx = teb().sizePoses() - 1;
for (int i=0; i <= look_ahead_idx; ++i)
{
// 只考虑覆盖一个障碍的情况,撞了则直接 return
if ( costmap_model->footprintCost(teb().Pose(i).x(),
teb().Pose(i).y(),
teb().Pose(i).theta(),
footprint_spec, inscribed_radius, circumscribed_radius) == -1 )
{
if (visualization_)
visualization_->publishInfeasibleRobotPose(teb().Pose(i), *robot_model_);
return false;
}
// 检查两个位姿点的间距是否比机器人内接半径大;或者它们的偏航角差距大于
// 参数min_resolution_collision_check_angular
// 如果符合一种情况, 需要增加插值(临时位姿点)
// 如果两个位姿点被障碍物push away,那么它们的中心可能与障碍碰撞
if (i < look_ahead_idx )
{
double delta_rot = g2o::normalize_theta( g2o::normalize_theta(teb().Pose(i+1).theta()) -
g2o::normalize_theta(teb().Pose(i).theta() ) );
Eigen::Vector2d delta_dist = teb().Pose(i+1).position()-teb().Pose(i).position();
if( fabs(delta_rot) > cfg_->trajectory.min_resolution_collision_check_angular ||
delta_dist.norm() > inscribed_radius )
{
int n_additional_samples = std::max( std::ceil(fabs(delta_rot) /
cfg_->trajectory.min_resolution_collision_check_angular ),
std::ceil(delta_dist.norm() / inscribed_radius) ) - 1;
ROS_INFO("n_additional_samples: %d", n_additional_samples);
PoseSE2 intermediate_pose = teb().Pose(i);
for(int step = 0; step < n_additional_samples; ++step)
{
intermediate_pose.position() = intermediate_pose.position() + delta_dist /
(n_additional_samples + 1.0);
intermediate_pose.theta() = g2o::normalize_theta(
intermediate_pose.theta() + delta_rot / (n_additional_samples + 1.0) );
if ( costmap_model->footprintCost(intermediate_pose.x(),
intermediate_pose.y(), intermediate_pose.theta(),
footprint_spec, inscribed_radius, circumscribed_radius) == -1 )
{
if (visualization_)
visualization_->publishInfeasibleRobotPose(intermediate_pose, *robot_model_);
return false;
}
}
}
}
}
return true;
}
实质上比较简单,判断路径feasible用的是base_local_planner::CostmapModel的footprintCost函数,位姿点间距大则增加插值。 详细参考文章CostmapModel 判断是否碰撞
有时会无法把footprint point转为map坐标系的坐标,因为它在局部代价地图之外。如果isTrajectoryFeasible函数检查的局部路径点太多,有的会超出局部代价地图,这样会一直返回false
日志:1
2
3
4
5footprint cost in isTrajectoryFeasible: -1.000000
[17:17:26.883 - WARN] (): trajectory is not feasible. Resetting planner..
[17:17:26.940 - INFO] (): footprint cost in isTrajectoryFeasible: 0.00
[17:17:26.940 - INFO] (): footprint cost in isTrajectoryFeasible: 0.00
# 后面一直是 0costmap_model->footprintCost如果是-1,就是撞了障碍,但只有第一次是-1,后面全是0. 撞一次就离开了障碍,自然是0. 之所以继续撞,是因为路径规划的开头,手动让机器人位姿先调整到transformed_plan的第一个元素的朝向,这二者没有关系。