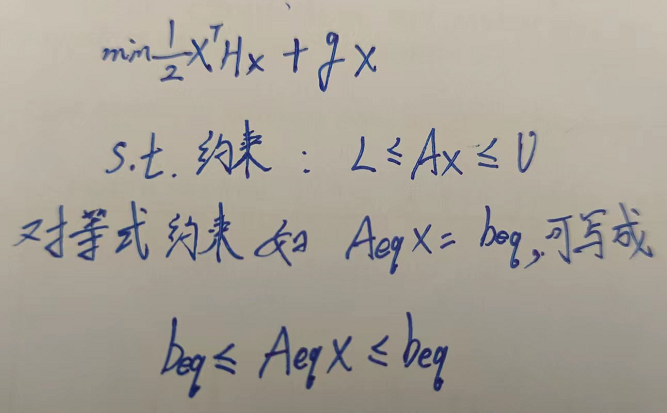
二次规划的一般形式可以表示如下
其中是n维的输入变量,是n维向量,是的对称矩阵,是的矩阵,是m维向量。
是矩阵,是向量。
二次规划的要求就是在约束条件下找到一个n维的向量X,使得的值最小。
二次规划问题的求解速度和怎么构造优化问题有一定的联系, 要想提升整体的求解速度和求解成功率, 应该尽量少的使用等式约束。
另一种形式如下,是OsqpEigen 所用的形式,以后主要用这种
就是Hessian矩阵,为方阵,大小和变量的个数相同。 就是Gradient,如果没有线性部分,就设置为零向量。 就是约束矩阵,矩阵尺寸为约束个数 x 变量个数 。 OSQP把等式和不等式约束放在一起了, 这里有时就需要自己推导一下约束矩阵了。如果是等式约束,就把上下限写成一个数就行
上下限向量的大小是约束的大小
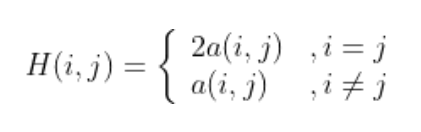
对于维数较低情况,把二次型表达式转为矩阵形式比较简单,矩阵H的元素是二次型中的矩阵元素大小的两倍。 设矩阵H第i行第j列的元素大小为H(i,j),二次项 的系数为a(i,j),则
如果表达式太复杂,无法直接手写,使用Matlab求海森矩阵获得1 2 3 4 5 6 7 syms x1 x2; f = 0.5 *x1.^2 +x2.^2 -x1*x2; H = hessian(f, [x1, x2]); % 转换为double类型 H = double(H); % 输出矩阵 disp(h)
c++ C++的求解使用osqp-eigen库,使用ospq感觉有点繁琐
安装 osqp(必需) 和 osqp-eigen1 2 3 4 5 6 7 8 9 10 11 12 13 14 15 16 17 git clone --recursive https://github.com/osqp/osqp cd osqpmkdir build cd buildcmake -G "Unix Makefiles" .. cmake --build . cmake --build . --target install cd ../..git clone https://github.com/robotology/osqp-eigen.git cd osqp-eigenmkdir build cd build安装到 /usr/local /lib/ cmake -DCMAKE_INSTALL_PREFIX:PATH=/usr/local ../ make sudo make install
CMake配置1 2 3 4 5 cmake_minimum_required(VERSION 3.0) project(myproject) find_package(OsqpEigen REQUIRED) add_executable(example example.cpp) target_link_libraries(example OsqpEigen::OsqpEigen)
1 2 3 4 5 6 7 8 9 10 11 12 13 14 15 16 17 18 19 20 21 22 23 24 25 26 27 28 29 30 31 32 33 34 35 36 37 38 39 40 41 42 43 44 45 46 47 48 49 50 51 52 53 54 55 56 57 #include "OsqpEigen/OsqpEigen.h" #include <Eigen/Dense> #include <iostream> int main () Eigen::SparseMatrix<double > hessian (2 , 2 ) ; Eigen::VectorXd gradient (2 ) ; Eigen::SparseMatrix<double > linearMatrix (2 , 2 ) ; Eigen::VectorXd lowerBound (2 ) ; Eigen::VectorXd upperBound (2 ) ; hessian.insert (0 , 0 ) = 2.0 ; hessian.insert (1 , 1 ) = 2.0 ; std::cout << "hessian:" << std::endl << hessian << std::endl; gradient << -2 , -2 ; linearMatrix.insert (0 , 0 ) = 1.0 ; linearMatrix.insert (1 , 1 ) = 1.0 ; std::cout << "linearMatrix:" << std::endl << linearMatrix << std::endl; lowerBound << 1 , 1 ; upperBound << 1.5 , 1.5 ; OsqpEigen::Solver solver; solver.settings ()->setVerbosity (false ); solver.settings ()->setWarmStart (true ); solver.data ()->setNumberOfVariables (2 ); solver.data ()->setNumberOfConstraints (2 ); if (!solver.data ()->setHessianMatrix (hessian) ) return 1 ; if (!solver.data ()->setGradient (gradient)) return 2 ; if (!solver.data ()->setLinearConstraintsMatrix (A)) return 3 ; if (!solver.data ()->setLowerBound (lowerBound)) return 4 ; if (!solver.data ()->setUpperBound (upperBound)) return 5 ; if (!solver.initSolver ()) return 6 ; Eigen::VectorXd QPSolution; if (!solver.solve ()) { return 7 ; } QPSolution = solver.getSolution (); std::cout << "QPSolution" << std::endl << QPSolution << std::endl; return 0 ; }
结果为 1.0003, 1.0003
Matlab x = quadprog(H,f,A,b,Aeq,beq,lb,ub) 在满足 lb ≤ x ≤ ub 的限制条件下求解上述问题。输入 lb 和 ub 是由双精度值组成的向量,这些限制适用于每个 x 分量。如果不存在等式约束,请设置 Aeq = [] 和 beq = []
1 2 3 4 5 6 7 8 H = [2 0; 0 2]; g = [-2; -2] A = [1 0; 0 1]; b = [1.5; 1.5]; lb = [1; 1]; [x,fval,exitflag,output,lambda] = quadprog(H,g,A,b,[],[],lb);
结果直接为 1.0000, 1.0000. 比osqp-eigen更精确。
x是解。 fval是解处的目标函数值
python OSQP的python的使用很简单,如果只是求解OSQP,不用C++,可以优先用python。 安装步骤
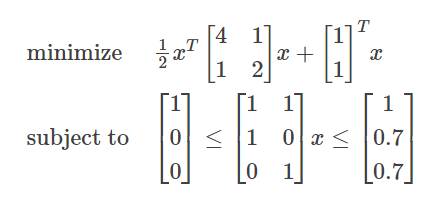
1 2 3 4 5 6 7 8 9 10 11 12 13 14 15 16 import osqpimport numpy as npfrom scipy import sparseP = sparse.csc_matrix([[4 , 1 ], [1 , 2 ]]) q = np.array([1 , 1 ]) A = sparse.csc_matrix([[1 , 1 ], [1 , 0 ], [0 , 1 ]]) l = np.array([1 , 0 , 0 ]) u = np.array([1 , 0.7 , 0.7 ]) prob = osqp.OSQP() prob.setup(P, q, A, l, u, alpha=1.0 ) res = prob.solve()
参考:Matlab中的quadprog函数 OSQP库计算标准二次规划 Matlab计算二次规划 利用OSQP库计算标准二次规划(QP)问题的实例 如何使用OSQP-Eigen