ssh自动登录远程机和expect的使用

从本机连接到远程机,发起SSH连接,执行命令cd ~/Downloads;ls

1
2
3
4
5
6
7
8
9
10
11
12
13
14
15
16
#!/bin/bash

# router parameters
ROUTER_USER="xiaoqiang"
ROUTER_HOST="192.168.0.110"
ROUTER_PASSWORD="1"
ROUTER_PORT="22" # default

# start except
expect <<-EOF
set timeout -1
spawn ssh $ROUTER_USER@$ROUTER_HOST -p $ROUTER_PORT -o StrictHostKeyChecking=no -C "cd ~/Downloads;ls"
expect "*password:"
send "$ROUTER_PASSWORD\n\r\n"
expect eof;
EOF

首次远程连接时,会提示公钥确认,远程IP改变时,会提示公钥不一致,这种情况有时非常烦人。对于自动化任务,我们希望跳过公钥确认,修改/etc/ssh/ssh_config,加入:
1
StrictHostKeyChecking no

或者在命令行中使用-o参数: ssh -o StrictHostKeyChecking=no

运行结果:

1
2
3
4
5
6
7
spawn ssh xiaoqiang@192.168.0.110 -p 22 -o StrictHostKeyChecking=no -C cd ~/Downloads;ls
xiaoqiang@192.168.0.110's password:
c-ares-1.17.0.tar.gz
cd1folder.zsh
CursorTheme
darcula.css
g2o_curve_fitting

在password一行之后为命令执行的结果,一直没法实现换行,不太完美


编译链接 ${catkin_LIBRARIES} 的问题

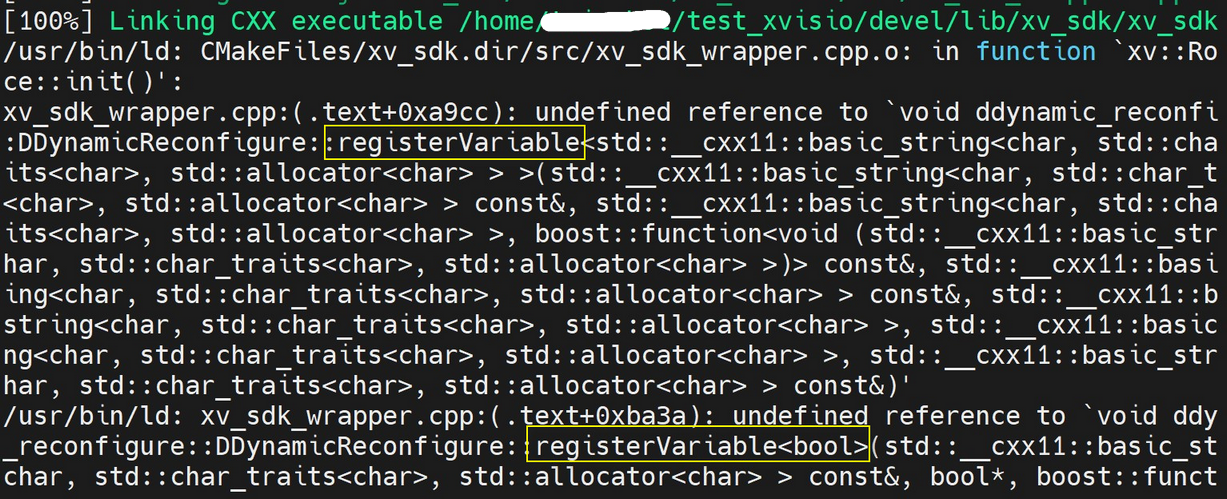
编译xvisio相机驱动时,遇到了这样的错误

显然是ddynamic_reconfigure包的问题,于是安装对应的ROS包,但是问题依旧,真是奇怪

于是在cmake中使用MESSAGE(${catkin_LIBRARIES})看看链接的文件有什么问题,结果发现其他的ROS库都是链接到了ROS安装目录,比如 /opt/ros/noetic/lib/libcamera_info_manager.so/usr/lib/x86_64-linux-gnu/libtinyxml2.so。 唯独ddynamic_reconfigure链接到了我之前放的库文件: /home/user/catkin_ws/devel/lib/libddynamic_reconfigure.so

这真是太奇怪了,环境变量catkin_LIBRARIES是如何换到另一个so库文件的??? 于是我把ROS安装目录的libddynamic_reconfigure.so覆盖catkin_ws的so库文件,重新编译成功了,相机驱动可以正常运行。

但是这样其实没有解决根本问题,最后只好把target_link_libraries${catkin_LIBRARIES}换成一个个的so文件,在开头要LINK_DIRECTORIES(/opt/ros/noetic/lib)


find 和 find_if, find_if_not

头文件: #include <algorithm>

返回范围 [first, last) 中满足特定判别标准的首个元素:

  • find: 搜索等于 value 的元素

  • find_if: 根据指定的查找规则,在指定区域内查找第一个符合该函数要求(使函数返回 true)的元素。如果查找成功,该迭代器指向的是查找到的那个元素;反之,如果查找失败,该迭代器的指向和 last 迭代器相同

  • find_if_not: 与find_if相反

示例代码:

1
2
3
4
5
6
7
8
9
10
11
std::vector<int> score{ 10, 20, 30, 40 };

auto it_1 = std::find(score.begin(), score.end(), 30 );
if(it_1 != score.end() )
qDebug()<< "found !";
else qDebug()<< "no found !";

auto it_2 = std::find_if(score.begin(), score.end(), [](int& m){return m>20;} );
if(it_2 != score.end() )
qDebug()<< "found: " << *it_2;
else qDebug()<< "no found !";

  • 若作为算法一部分调用的函数的执行抛出异常,且 ExecutionPolicy 为标准策略之一,则调用 std::terminate 。对于任何其他 ExecutionPolicy ,行为是实现定义的。
  • 若算法无法分配内存,则抛出 std::bad_alloc

pre和next

std::prev

原型template <class BidirectionalIterator> BidirectionalIterator prev (BidirectionalIterator it, typename iterator_traits<BidirectionalIterator>::difference_type n = 1);

该函数会返回一个距离 it 迭代器 n 个元素的新迭代器。当 n 为正数时,其返回的迭代器将位于 it 左侧;反之,当 n 为负数时,其返回的迭代器位于 it 右侧。

1
2
3
4
5
6
7
8
9
10
11
12
13
14
15
16
17
18
#include <iostream>     // std::cout
#include <iterator> // std::next
#include <list> // std::list
using namespace std;
int main() {
//创建并初始化一个 list 容器
std::list<int> mylist{ 1,2,3,4,5 };
std::list<int>::iterator it = mylist.end();
//获取一个距离 it 迭代器 2 个元素的迭代器,由于 2 为正数,newit 位于 it 左侧
auto newit = prev(it, 2);
cout << "prev(it, 2) = " << *newit << endl; // 4

//n为负数,newit 位于 it 右侧
it = mylist.begin();
newit = prev(it, -2);
cout << "prev(it, -2) = " << *newit; // 3
return 0;
}

prev() 函数自身不会检验新迭代器的指向是否合理,需要我们自己来保证其合理性。

next()函数和prev()函数恰好相反


ninja

如果没有ninja,在使用时会报错: CMake was unable to find a build program corresponding to "Ninja". CMAKE_MAKE_PROGRAM is not set. You probably need to select a different build tool.

安装

ninja需要依赖于re2c,否则编译是会报错,re2c是一款语法分析器,官网地址是:http://re2c.org/
下载页面的安装说明都在: http://re2c.org/install/install.html, 这里直接从源码安装最新版本

安装re2c:

1
2
3
4
5
git clone https://github.com/skvadrik/re2c
cd re2c
./autogen.sh
./configure make
make install

可以从ninja的github仓库切换到release分支或者使用git下载:

1
2
git clone https://github.com/ninja-build/ninja.git
cd ninja

采用python的安装方式
1
./configure.py --bootstrap

等待完成即可

ninja比较精简,只需要一个可执行文件即可,现在可以做软链或者复制到/usr/bin下面就可以直接调用了

1
cp ninja /usr/bin/ 


Ceres(二) 自动求导

头文件只有一个"ceres/ceres.h"

调试几个经典例子的过程

1
2
3
4
5
6
7
#include "ceres/ceres.h"

using ceres::AutoDiffCostFunction;
using ceres::CostFunction;
using ceres::Problem;
using ceres::Solver;
using ceres::Solve;


1
2
3
4
5
6
7
8
9
10
11
struct  Functor
{
template <typename T> bool operator()(const T* const x, T* residual) const
{
residual[0] = 10.0 - x[0];
residual[1] = 3.0 - x[1];
// 直接让第2维度为0,优化后的x[1]还是初值2
// residual[1] = T(0.0);
return true;
}
};

这里的变量为二维的,目标函数为10.0-x3.0-x

如果这里不写10.0而是10,就会报错。 Ceres中没有int,只接受double

对于residual[1] = T(0.0);的情况,如果不加T,编译就会报错 error: no match for ‘operator=’ (operand types are ‘ceres::Jet’ and ‘double’) . Jet类型是ceres内置类型,我们要把double转成Jet类型,也就是T(0.0)

1
2
3
4
5
6
7
8
struct  TestLocalParam
{
template<typename T> bool operator()(const T* x, const T* delta, T* x_plus_delta) const{
x_plus_delta[0] = x[0] + 0.4 * delta[0];
x_plus_delta[1] = x[1] + 0.4 * delta[1];
return true;
}
};

CostFunctoroperator就是计算残差,不带平方项,平方是ceres自动添加,相当于最小二乘的函数 f

1
2
3
4
5
6
7
8
9
10
11
12
13
14
15
16
17
18
// double x = 0.5;
double x[] = {0.5, 2.0};

Problem problem;

problem.AddParameterBlock(x, 2,
(new ceres::AutoDiffLocalParameterization
// 真正的维度是2, 参与优化的维度是1
<TestLocalParam, 2, 1> ())
);
// AddParameterBlock 修改之后,无论下面的AutoDiffCostFunction参数是多少,只优化第1维度


// 残差的维度,参数的维度
// 如果此时是 2,1. 报错
CostFunction* cost_func = new AutoDiffCostFunction<Functor, 2, 2>(new Functor);
// 参数:CostFunction,可选的LossFunction,将CostFunction连接到一组参数块
problem.AddResidualBlock(cost_func, nullptr, x);

创建最小二乘问题,可以使用Problem::AddResidualBlock()Problem::AddParameterBlock()。 可以使用Problem::AddParameterBlock()显式添加参数块,这将导致额外的正确性检查; 然而,如果参数块不存在,Problem::AddResidualBlock()会隐式添加参数块。

AddParameterBlock()显式地向Problem添加了一个参数块。它还允许用户将LocalParameterization对象与参数块关联起来。

AddResidualBlock默认会先调用AddParameterBlock,一般不用后者。

损失函数LossFunction,给异常值做限定,如果是nullptr,该项的代价就是残差的平方范数

代价函数携带关于它所期望的参数块大小的信息。函数检查这些参数是否与parameter_blocks中列出的参数块的大小匹配。如果检测到不匹配,程序将中止。

Solver

1
2
3
4
5
6
7
8
9
10
11
12
13
14
  Solver::Options  option;
option.minimizer_progress_to_stdout = true;
option.linear_solver_type = ceres::SPARSE_NORMAL_CHOLESKY;

Solver::Summary summary;
Solve(option, &problem, &summary);

std::cout << summary.BriefReport() << std::endl<<std::endl;
// std::cout << summary.FullReport() << std::endl<<std::endl;

// std::cout << "initial x: " << initial_x <<" x: "<< x << std::endl;
std::cout <<"x[0]: "<< x[0] <<" x[1]: "<< x[1]<< std::endl;
return 0;
}

优先选用自动微分算法,某些情况可能需要用到解析微分算法,尽量避免数值微分算法。

曲线拟合

使用十四讲第六章的曲线拟合的例子,已知 N 个数据 ,它们符合曲线 ,通过曲线拟合求 a, b, c

跟上面的例子不同,这次目标函数为 残差维度为3(未知a,b,c)

CMake配置如下

1
2
3
4
5
6
7
8
find_package(OpenCV REQUIRED)
INCLUDE_DIRECTORIES(${OpenCV_DIRS})

target_link_libraries(node_2
${catkin_LIBRARIES}
${CERES_LIBRARIES}
${OpenCV_LIBS}
)

先生成带有高斯噪声的数据

1
2
3
4
5
6
7
8
9
10
11
12
13
14
15
16
17
18
#include <opencv2/opencv.hpp>

// 真实值
double a =1.0, b=2.0, c=1.0;
// abc的初值
double abc[3] = {0,0,0};

// 生成带有噪声的模拟数据
vector<double> x_data, y_data;
int N = 240; // 数据数量
double w_sigma = 1.0; // 高斯标准差
cv::RNG rng;
for(unsigned int i =0; i<N; i++)
{
double x = i/100.0;
x_data.push_back(x);
y_data.push_back(exp(a*x*x + b*x + c) + rng.gaussian(w_sigma) );
}

高斯噪声的产生: cv::RNG rng; rng.gaussian(w_sigma)

1
2
3
4
5
6
7
8
9
10
11
12
13
14
15
16
17
18
19
20
21
22
23
24
struct Functor
{
Functor(double x, double y):
m_x(x), m_y(y) { }
#if 0
// 开始我是这么写的,没弄清残差的维度
template<typename T> bool operator()( const T* const a,
const T* const b,
const T* const c,
T* residual) const
{
residual[0] = m_y - exp(a[0] * m_x * m_x + b[0] * m_x + c[0]);
return true;
}
#endif

// 因为要传入数据(x,y), 所以要定义两个成员变量
template<typename T> bool operator()( const T* const abc, T* residual) const
{
residual[0] = m_y - exp(abc[0] * m_x * m_x + abc[1] * m_x + abc[2]);
return true;
}
const double m_x, m_y;
};

因为自变量x是一维的,而不是向量,所以残差只计算一维 residual[0]

1
2
3
4
5
6
7
8
9
10
11
12
13
14
15
16
Problem problem;
for(unsigned int i=0; i<N; i++)
{
// 残差维度, 所估计变量的维度
CostFunction* cost_func = new AutoDiffCostFunction<Functor,1,3>(new Functor(x_data[i], y_data[i]) );
problem.AddResidualBlock(cost_func, nullptr, abc);
}
Solver::Options option;
option.minimizer_progress_to_stdout = true;
option.linear_solver_type = ceres::SPARSE_NORMAL_CHOLESKY;

Solver::Summary summary;
Solve(option, &problem, &summary);

cout << summary.BriefReport() << endl <<endl;
cout << "a: "<< abc[0] <<" b: "<< abc[1]<< " c: "<< abc[2] <<endl;

参考:
Curve Fitting(曲线拟合)
Problem类
资料


move_base的服务端和客户端

find_package中添加actionlibactionlib_msgs

1
2
3
4
5
add_action_files(
DIRECTORY action
FILES
DoDishes.action
)

package.xml添加actionlib的编译和执行依赖,如下:

1
2
3
4
<build_depend>actionlib</build_depend>
<build_depend>actionlib_msgs</build_depend>
<run_depend>actionlib</run_depend>
<run_depend>actionlib_msgs</run_depend>

服务端

1
2
3
4
5
6
7
8
9
10
11
12
13
14
15
16
17
18
19
20
21
22
23
24
// action定义在 scheduler/action/Scheduler.action
typedef actionlib::SimpleActionServer<scheduler::SchedulerAction> Server;
actionlib::SimpleActionServer<scheduler::SchedulerAction> as_;

// 注册抢占回调函数
as_.registerPreemptCallback(boost::bind(&Explore::preemptCB, this))
as_.registerGoalCallback(boost::bind(&Explore::goalCB, this));


void Explore::preemptCB()
{
ROS_INFO("%s: Preempted", action_name_.c_str());
explore_ = false;
explore_state_ = STOP;
ac_.cancelAllGoals();
if(as_.isActive())
as_.setPreempted();
}

void Explore::goalCB()
{
explore_state_ = FULL_ROTATE;
as_.acceptNewGoal();
}

SimpleActionServer有构造函数可以注册ExecuteCallback回调函数,但没有其他两个回调,原型:
SimpleActionServer (ros::NodeHandle n, std::string name, ExecuteCallback execute_callback, bool auto_start)

move_base的构造函数中是这样使用的:
as_ = new MoveBaseActionServer(ros::NodeHandle(), "move_base", boost::bind(&MoveBase::executeCb, this, _1), false);

服务端as_最后需要start()来启动,再加ros::spin()阻塞。 MoveBase构造函数的最后只有前者,ros::spin()其实是在move_base_node.cpp

客户端

这里只看带回调函数的函数原型:

1
2
3
4
5
void actionlib::SimpleActionClient< ActionSpec >::sendGoal(const Goal& goal,
SimpleDoneCallback done_cb = SimpleDoneCallback(),
SimpleActiveCallback active_cb = SimpleActiveCallback(),
SimpleFeedbackCallback feedback_cb = SimpleFeedbackCallback()
)

ActionServer发送goal, 并注册回调函数。 如果调用本函数时已经有个goal处于active,状态机就会忽略goal并且开始向新的goal导航,不用发取消的请求。

  • done_cb: Callback that gets called on transitions to Done,用于监听服务器任务执行完后的相应消息以及客户端的相应处理
  • active_cb: Callback that gets called on transitions to Active,服务器任务被激活时的消息提示以及客户端的相应处理
  • feedback_cb: Callback that gets called whenever feedback for this goal is received,接收服务器的反馈消息以及客户端的相应处理
    1
    2
    3
    4
    5
    6
    7
    8
    9
    10
    11
    12
    13
    14
    15
    16
    17
    18
    19
    20
    21
    22
    23
    24
    25
    26
    27
    28
    typedef actionlib::SimpleActionClient<move_base_msgs::MoveBaseAction> MoveBaseClient;
    MoveBaseClient ac_;

    // 示例
    ac_.sendGoal(goal,
    boost::bind(&DoDishesActionClient::DoneCb, this, _1, _2),
    boost::bind(&DoDishesActionClient::ActiveCb, this),
    boost::bind(&DoDishesActionClient::FeedbackCb, this, _1));


    void DoneCb(const actionlib::SimpleClientGoalState& state,
    const first_actionlib_sample::DoDishesResultConstPtr& result)
    {
    ROS_INFO("Finished in state [%s]", state.toString().c_str());
    ROS_INFO("Toal dish cleaned: %i", result->toal_dishes_cleaned);
    ros::shutdown();
    }

    // 当目标激活的时候,会调用一次
    void ActiveCb()
    {
    ROS_INFO("Goal just went active");
    }

    // 接收服务器的反馈信息
    void FeedbackCb(const first_actionlib_sample::DoDishesFeedbackConstPtr& feedback) {
    ROS_INFO("Got Feedback Complete Rate: %f", feedback->percent_complete);
    }

Goal的状态

GoalStatus

1
2
3
4
5
6
7
8
9
10
PENDING = 0
ACTIVE = 1
PREEMPTED = 2
SUCCEEDED = 3
ABORTED = 4
REJECTED = 5
PREEMPTING = 6
RECALLING = 7
RECALLED = 8
LOST = 9

1
2
3
4
5
6
7
cout<< ac_.getState().toString() <<endl;

// 获取goal的状态信息
// PENDING, ACTIVE, RECALLED, REJECTED, PREEMPTED, ABORTED, SUCCEEDED, LOST(isn't tracking a goal)
SimpleClientGoalState getState () const
// 输出上面的几个状态,大写字母,对调试很有用
std::string toString() const

如果当前已经在某个状态,再次设置为这个状态就会报警:比如ABORTED状态 To transition to an aborted state, the goal must be in a preempting or active state, it is currently in state: 4

参考:ROS Action动作通讯编程


连续发导航目标时的导航中断

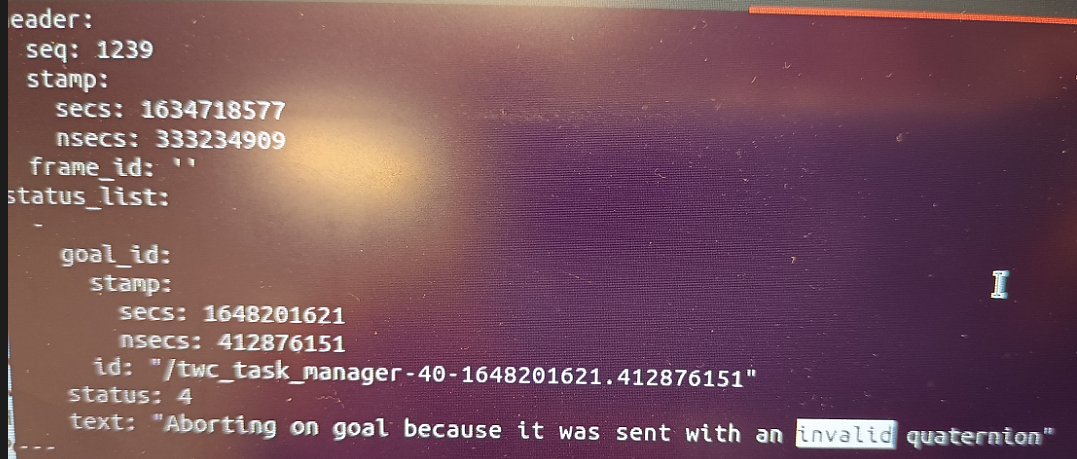
车收到导航命令没有动,查日志如下
move_base接收的目标四元数invalid.png

在一个客户端程序里,在sendGoal之前调用了两次cancelAllGoals,结果得到下面的日志,某次goal的消息全是0

1
2
3
4
5
6
7
8
9
10
11
12
13
14
15
16
17
18
19
20
21
22
23
24
25
26
27
28
29
30
31
32
33
34
35
36
37
38
39
40
41
42
43
44
45
46
47
48
49
50
51
52
53
54
55
56
57
58
59
60
61
62
63
64
65
66
67
68
[ INFO] [1648276976.479444090]: move_base client send goal: type: 1
target_pose:
header:
seq: 11
stamp: 1648276976.479361050
frame_id: map
pose:
position:
x: -3.9901
y: 0.427604
z: 0
orientation:
x: 0
y: 0
z: 0
w: 1

[ INFO] [1648276976.492017723]: move base task just went active
[ WARN] [1648276979.458537608]: 32 receive cmd: position:
x: -4.01633
y: 0.440816
z: 0
orientation:
x: 0
y: 0
z: 0
w: 1

[ INFO] [1648276979.494004129]: actionlib result state: PREEMPTED
[ INFO] [1648276979.494157917]: actionlib result: result: 0
result_pose:
header:
seq: 0
stamp: 0.000000000
frame_id:
pose:
position:
x: 0
y: 0
z: 0
orientation:
x: 0
y: 0
z: 0
w: 0

[ INFO] [1648276979.494228945]: actionDoneCb state PREEMPTED
[ INFO] [1648276979.494308493]: move_base client send goal: type: 1
target_pose:
header:
seq: 12
stamp: 1648276979.494253319
frame_id: map
pose:
position:
x: 0
y: 0
z: 0
orientation:
x: 0
y: 0
z: 0
w: 0

[ERROR] [1648276979.504876032]: BUG: Got a transition to CommState [PENDING] when our in SimpleGoalState [DONE]
[ERROR] [1648276979.504963821]: BUG: Got a transition to CommState [RECALLING] when our in SimpleGoalState [DONE]
[ERROR] [1648276979.514087412]: BUG: Got a transition to CommState [PREEMPTING] when in SimpleGoalState [DONE]
[ERROR] [1648276979.515084871]: BUG: Got a second transition to DONE

结果导致move_base漏接了一个目标,最后取消两个cancelAllGoals就好了

  • cancelAllGoals()[inline]: Cancel all goals currently running on the action server. This preempts all goals running on the action server at the point that this message is serviced by the ActionServer.

  • cancelGoal()[inline]: Cancel the goal that we are currently pursuing
cancellAllGoals()cancellGoal()经常放在SIGINT信号的回调函数里,用于停止所有actions

参考: elektron_ballcollector


智能指针(三) weak_ptr

weak_ptr本身也是一个模板类,但是不能直接用它来定义一个智能指针的对象,只能配合shared_ptr来使用,可以将shared_ptr的对象赋值给weak_ptr,并且这样并不会改变引用计数的值。查看weak_ptr的代码时发现,它主要有lockswapresetexpiredoperator=use_count几个函数,与shared_ptr相比多了lockexpired函数,但是却少了get函数,甚至连operator*operator->都没有

weak_ptr解决循环引用

weak_ptr必须跟shared_ptr配合使用, 它用于解决shared_ptr的死锁问题,如果两个shared_ptr一直互相引用,那么它们的引用计数永远不是0,资源永远不释放,这样实际造成了内存泄露。weak_ptr并不拥有其指向的对象,让weak_ptr指向shared_ptr所指向对象,对象的引用计数并不会增加

循环引用的情况:

1
2
3
4
5
6
7
8
9
10
11
12
13
14
15
16
17
class Son;
class Father
{
public:
~Father() {cout<<" father 析构"<<endl; }
shared_ptr<Son> son_;
};
class Son {
public:
~Son() {cout<<" son 析构"<<endl; }
shared_ptr<Father> father_;
};

auto father = make_shared<Father>();
auto son = make_shared<Son>();
father->son_ = son;
son->father_ = father;

结果一个析构函数也没运行,说明对象资源没有释放。使用weak_ptr解决很简单,让Son的成员变量father改为weak_ptr类型,运行后发现两个析构都有了。

main函数退出前,Son对象的引用计数是2,而Father的引用计数是1。
son指针销毁,Son对象的引用计数变成1。
father指针销毁,Father对象的引用计数变成0,导致Father对象析构,Father对象的析构会导致它包含的son_指针被销毁,这时Son对象的引用计数变成0,所以Son对象也会被析构。


std::weak_ptr 是一种弱引用,不会增加所指向对象的引用计数,也不会阻止所指向对象被销毁。它主要用于解决循环引用问题,可以在 std::shared_ptr 的基础上创建一个 std::weak_ptr 对象,当需要使用所指向对象时,可以使用lock() 函数把 std::weak_ptr转换为 std::shared_ptr 来获得所指向对象的强引用。如果转换成功,则返回一个指向所指向对象的 std::shared_ptr 对象,否则返回一个空的 std::shared_ptr

参考:shared_ptr循环引用的例子及解决方法示例


c++11之后的新特性 1

auto 和 for循环

1
2
3
4
5
6
7
std::vector<int> vec {1,2,3,4,5};
for (auto n :vec)
std::cout << n;

int arr[10] = { 1, 2, 3, 4, 5};
for (auto n : arr)
std::cout << n;

C++11的for使用方法简单了很多,但是上述对容器的遍历是只读的,也就是说遍历的值是不可修改的。

如果要修改遍历的值,需要将遍历的变量声明为引用类型:

1
2
3
4
5
6
7
8
9
std::vector<int> vec {1,2,3,4,5};
cout << "修改前" << endl;
for (auto& n :vec)
std::cout << n++;
cout << endl;

cout << "修改后" << endl;
for (auto j : vec)
std::cout << j;

结果:
1
2
3
4
修改前
12345
修改后
23456

maybe_unused (C++17 起)

[[maybe_unused]]抑制针对未使用实体的警告。此属性可出现在下列实体的声明中:

  • class/struct/union
  • typedef
  • 变量
  • 非静态数据成员
  • 函数
  • 枚举
  • 枚举项

可以说几乎能随处使用。若编译器针对未使用实体发布警告,则对于任何声明为 maybe_unused 的实体抑制该警告。

获取当前的程序路径

1
std::filesystem::path current_path = std::filesystem::current_path();

代码经常出现相对路径,有时我们想的路径并不是我们需要的,此时最好获取一下当前的程序路径,再使用相对路径

static_assert

noexcept

查询表达式是否能抛出异常

std::as_const

需要头文件<utility>,将左值转化为const类型

该方法接收一个引用参数,返回它的const引用版本。基本上,std::as_const(obj) 等价于 const_cast<const T&>(obj),其中T是obj的类型。与使用 const_cast 相比,使用 std::as_const() 可以使代码更短更易读。

1
2
3
4
5
string str = { "C++ as const test" };
cout << is_const<decltype(str)>::value << endl; // 0

const string str_const = std::as_const(str);
cout << is_const<decltype(str_const)>::value << endl; // 1

大括号初始化

在C++11中,自动变量和全局变量的初始化方式增加了几种:

1
2
3
int a = {3+4};
int a{6+8};
int a(6+8);

主要是大括号的用法,另外大括号内可以不包含任何内容,此时变量初始化为0
1
2
int roc = {};
int roc{};

STL也可以用大括号的方式初始化,比如 vector

1
vector<int> c{ 1, 2, 3 };

这显然不能从构造函数角度理解了,源于<initializer_list>头文件中initialize_list类模板的支持。只要#include<initializer_list>并声明一个以initialize_List<T>模板类为参数的构造函数,也可以使得自定义类使用列表初始化。

在C++11中,除了初始化列表(在构造函数中初始化)外,允许使用等=或花括号{}进行就地的非静态成员变量初始化,例如:

1
2
3
4
5
class example
{
int a = 1;
double b{ 1.2 };
};

如果在一个类中,既使用了就地初始化来初始化非静态成员变量,又在构造函数中使用了初始化列表,执行顺序是: 先执行就地初始化,然后执行初始化列表。

1
2
3
4
5
6
7
8
enum class SensorType {
RANGE = 0,
IMU,
ODOMETRY,
FIXED_FRAME_POSE,
LANDMARK,
LOCAL_SLAM_RESULT
};

using

1
2
3
4
5
6
7
8
9
class MapBuilderInterface {
public:
using LocalSlamResultCallback =
TrajectoryBuilderInterface::LocalSlamResultCallback;

using SensorId = TrajectoryBuilderInterface::SensorId;

using Callback =
std::function<void(const std::string&, std::unique_ptr<Data>)>;