地图分很多种:稀疏的,稠密的,还有半稀疏的。稀疏的地图放大了看就是一个个离散的空间点,不过我们可以把它变成连续的稠密的网格,这个过程也叫点云的网格化。点云网格化需要对点云进行一系列处理
一般下面这几种情况需要进行点云滤波处理:
点云数据密度不规则需要平滑
因为遮挡等问题造成离群点需要去除
大量数据需要降采样
噪声数据需要去除
滤波程序
package.xml中要添加:1
2<build_depend>libpcl-all-dev</build_depend>
<exec_depend>libpcl-all</exec_depend>
CMake按照第一篇里进行配置
1 |
|
点云合并
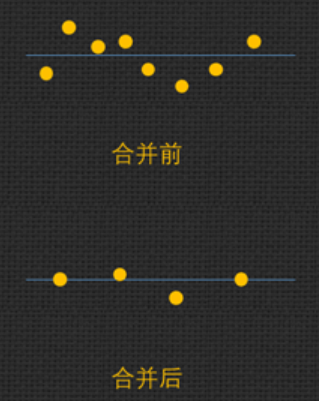
把相邻的点合并成一个点,一方面可以减少图像的数据量,另一方面可以增加点云的稳定度。个人感觉贴近滤波
直通滤波
多线雷达点云大部分的点都集中的中间区域,距离越远点云越稀疏,信息量也越小,应该筛选掉一些较远的点。这就用到了直通滤波,它是最为简单、粗暴的一种滤波方式,就是直接对点云的X、Y、Z轴的点云坐标约束来进行滤波。1
2
3
4
5
6
7
8
9
10
11
12
13
14
15
16
17
18
19
20
21
22
23
24
25
26
27
28
29
30
31
32
33
34
35
36
37
38
39
40
int main(int argc, char** argv)
{
pcl::PointCloud<pcl::PointXYZ>::Ptr cloud(new pcl::PointCloud<pcl::PointXYZ>);
// Fill in the cloud data
pcl::PCDReader reader;
reader.read("16line.pcd", *cloud);
std::cerr << "Cloud before filtering: " << cloud->points.size() << std::endl;
pcl::PointCloud<pcl::PointXYZ>::Ptr cloud_filtered2(new pcl::PointCloud<pcl::PointXYZ>);
pcl::PointCloud<pcl::PointXYZ>::Ptr cloud_filtered3(new pcl::PointCloud<pcl::PointXYZ>);
// Create the filtering object 直通滤波
pcl::PassThrough<pcl::PointXYZ> pass;
pass.setInputCloud(cloud);
pass.setFilterFieldName("x"); // 设置操作的坐标轴
pass.setFilterLimits(-5.0, 5.0);
pass.filter(*cloud_filtered2);
// filter range Y-axis
// 注意多次滤波需要再次输入点云和调用filter函数
pass.setInputCloud(cloud_filtered2);
pass.setFilterFieldName("y");
pass.setFilterLimits(-5.0, 5.0);
pass.filter(*cloud_filtered3);
std::cerr << "Cloud after filtering: " << cloud_filtered3->points.size() << std::endl;
// 读取pcd点云数据进行操作,最后保存为pcd文件
pcl::PCDWriter writer;
writer.write("16line_filtered.pcd", *cloud_filtered3, false);
return 0;
}pass.setFilterLimitsNegative(true);: 是否保存滤波的限制范围内的点云,默认为false,保存限制范围点云,true时候是相反。
条件滤波法
在某些情况下,我们也会需要去除给定区域内部的点,比如激光雷达扫描近处的点(可能就是装载雷达的车),这些点通常对建图和感知不会有作用。
设定滤波条件进行滤波,点在范围内保留,不在范围内丢弃。
getFilterLimitsNegative 可以对选定范围取反,将其设为 true 时可以进行给定只保留给定范围内的点的功能。
体素滤波
实现降采样,既减少点云的数量,并同时保持点云的形状特征。创建一个三维体素,用体素内所有点的重心近似表示体素中的其他点,这样体素内所有点就用一个重心点最终表示。
使用小程序进行体素滤波,输入input.pcd,输出output.pcd1
pcl_voxel_grid input.pcd output.pcd -leaf 0.03,0.03,0.03
对于体素下采样接口功能函数pcl提供了两种方式 pcl::ApproximateVoxelGrid和 pcl::VoxelGrid。两种区别主要在于第一种是用每个体素栅格的中心点来近似该体素内的点,提升了速度,但是也损失了原始点云的局部形态精细度。 ApproximateVoxelGrid是依据每一个体素的中心点来获取点云的,并不是依赖每个体素里面是否存在点云。所以会导致两种方式的处理结果又偏差,VoxelGrid的方式更加精确但是耗时相对于ApproximateVoxelGrid更高。
半径滤波
对整个输入迭代一次,对于每个点进行半径R的邻域搜索(球体),如果邻域点的个数低于某一阈值,则该点将被视为噪声点并被移除。1
2
3
4
5
6
7
8
9
10
11
12
13
14
15pcl::PointCloud<pcl::PointXYZ>::Ptr cloud(new pcl::PointCloud<pcl::PointXYZ>); //待滤波点云
if (pcl::io::loadPCDFile("test.pcd", *cloud) < 0)
{
PCL_ERROR("\a点云文件不存在!\n");
system("pause");
return -1;
}
pcl::PointCloud<pcl::PointXYZ>::Ptr cloud_filtered(new pcl::PointCloud<pcl::PointXYZ>); //滤波后点云
pcl::RadiusOutlierRemoval<pcl::PointXYZ> ror; //创建滤波器对象
ror.setInputCloud(cloud); //设置待滤波点云
ror.setRadiusSearch(0.02); //设置查询点的半径邻域范围
ror.setMinNeighborsInRadius(5); //设置判断是否为离群点的阈值,即半径内至少包括的点数
//ror.setNegative(true); //默认false,保存内点;true,保存滤掉的外点
ror.filter(*cloud_filtered); //执行滤波,保存滤波结果于cloud_filtered
实现:1
2
3
4
5
6
7
8
9
10
11
12
13
14
15
16
17void radiusremoval(pcl::PointCloud<pcl::PointXYZ>::Ptr& cloud, pcl::PointCloud<pcl::PointXYZ>::Ptr& cloud_filtered, double radius, int min_pts)
{
pcl::KdTreeFLANN<pcl::PointXYZ> tree;
tree.setInputCloud(cloud);
vector<float> avg;
for (int i = 0; i < cloud->points.size(); ++i)
{
vector<int> id(min_pts);
vector<float> dist(min_pts);
tree.nearestKSearch(cloud->points[i], min_pts, id, dist);
// 是否是平方
if (dist[dist.size() - 1] < radius)
{
cloud_filtered->push_back(cloud->points[i]);
}
}
}
构建一个 KD 树,对每个点进行范围搜索(最近邻搜索 nearestKSearch),最后判断邻近点数(最大距离)是否满足要求即可。
统计滤波

看过源码后得知, 计算均值 时除以的是点云的点数,不是邻域的点数。 对滤波结果有影响的是标准差阈值系数k和邻域的点数。 使用的也是 nearestKSearch
缺点:对较远的激光线也筛除掉了。首先对激光雷达点云数据中的每个点而言,由于每个激光线束本身扫描频率是一致的, 显然越远的扫描线点会越稀疏,因此其平均距离会越远(即便其本身可能不一定是噪点)。因此更合理的方法可能是对每个点周围小范围内(同一条线内)的点进行高斯拟合,然后判断该点是否满足该高斯分布,但是如果需要得到比较准确的高斯分布参数,点数需要达到一定数量,否则和上述基于点云密度进行去噪差别不大。
1 |
|
常用滤波顺序: 直通 —-> 体素 —-> 统计
参考:统计滤波的源码
