当不正确关闭Gazebo时,再次启动Gazebo会遇到sever无法启动的问题。1
Exception [Master.cc:50] Unable to start server[bind: Address already in use]. There is probably another Gazebo process running.
解决方法:用ps命令查找gzserver进程,将其kill。或是干脆重启系统
报错: Unable to convert from SDF version 1.7 to 1.6
把world文件的第一行改成 <sdf version = '1.6'>
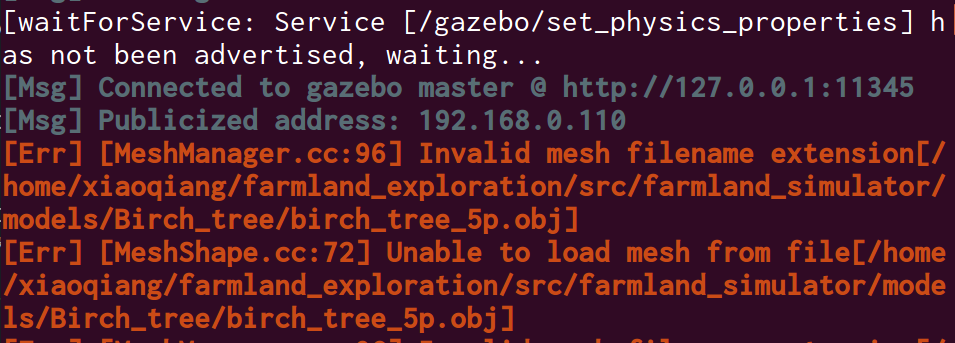
文件使用了OBJ meshes,这是从Gazebo 7.4.0才可支持,使用gazebo -v发现我的gazebo版本是 7.0
报错 [joint_state_publisher-3] process has died 或者 UnicodeEncodeError: ‘ascii’ codec can’t encode characters in position xxx ordinal
去掉urdf、xacro、launch文件中的中文注释,或者改为英文,而且第一行不能有中文。
1 | <plugin name='front_right_middle_sonar_sensor' filename='libgazebo_ros_range.so'> |
.urdf.xacro文件中的颜色不识别。需要在文件开头定义颜色值,否则默认不识别1
2
3
4
5
6
7
8
9
10
11
12
13
14
15<material name="blue">
<color rgba="0.0 0.0 0.8 1.0"/>
</material>
<material name="red">
<color rgba="0.8 0.0 0.0 1.0"/>
</material>
<material name="white">
<color rgba="1.0 1.0 1.0 1.0"/>
</material>
<material name="yellow">
<color rgba="0.8 0.8 0.0 1.0"/>
</material>
运行Gazebo竟然出现错误,Gazebo页面卡住黑屏,在终端出现 Gazebo [Err] [REST.cc:205] Error in REST request
解决方案sudo gedit ~/.ignition/fuel/config.yaml,然后将 url : https://api.ignitionfuel.org注释掉,添加 url: https://api.ignitionrobotics.org
在Gazebo中进行小车仿真的过程中会出现如下警告 The root link base_link has an inertia specified in the URDF, but KDL does not support a root link with an inertia. As a workaround, you can add an extra dummy link to your URDF 该警告的意思是根关节的base_link在urdf中具有惯性参数,但是KDL不支持,建议的解决办法是,增加一个额外的dummy link。
这个问题看似很麻烦,实际解决起来是非常简单的,只需添加一个link和一个joint即可:1
2
3
4
5
6<link name="dummy">
</link>
<joint name="dummy_joint" type="fixed">
<parent link="dummy"/>
<child link="base_link"/>
</joint>
当然link的名称是可以自己改的
ubuntu18.04 装的Gazebo版本是9,升级方式,但是能不升级就不升级。
使用Gazebo时出现下面报错:1
2[spawn_entity.py-5] [ERROR] [1715655287.539237215] [spawn_entity]: Service %s/spawn_entity unavailable. Was Gazebo started with GazeboRosFactory?
[spawn_entity.py-5] [ERROR] [1715655287.540067060] [spawn_entity]: Spawn service failed. Exiting.
1 | [ERROR] [gzserver-1]: process has died [pid 239512, exit code 255, cmd 'gzserver -slibgazebo_ros_init.so -slibgazebo_ros_factory.so -slibgazebo_ros_force_system.so']. |
这是因为关闭的过程中有些Gazebo的程序没有完全关闭,导致再次启动时,无法正常开启。所以,只要把gazebo的相关程序关闭即可: killall gzserver。 此时,再次启动gazebo,就能正常打开了。
如果担心是自己程序的问题,使用ros2 launch gazebo_ros spawn_entity_demo.launch.py验证是不是Gazebo自身的问题
joint_state_publisher报错 UnicodeEncodeError: ‘ascii’ codec can’t encode characters in position 30-36: ordinal not in range(128)
- 可能是urdf文件里有中文注释,将其去掉
- 如果没有注释,修改两个文件
/opt/ros/melodic/lib/joint_state_publisher_gui/joint_state_publisher和/opt/ros/melodic/lib/joint_state_publisher,在开头import sys之后增加1
2reload(sys)
sys.setdefaultencoding('utf8')
或者修改文件/opt/ros/melodic/lib/python2.7/dist-packages/joint_state_publisher/__init__.py,也是添加1
2reload(sys)
sys.setdefaultencoding("utf-8")
运行spawn_model也可能会同样的报错,到/opt/ros/melodic/lib/python2.7/dist-packages文件夹,然后新建一个sitecustomize.py文件,内容为1
2
3
4#coding=utf8
import sys
reload(sys)
sys.setdefaultencoding('utf8')
保存后给文件权限。