只用
catkin_make遍历所有包时,运行的是cmake进程。实际编译时,才运行cc1plus进程,一个核一个进程。catkin_make编译时,对工作空间所有packages的编译顺序是按拓扑遍历的,不是按字母也不是按创建时间。修改任意一个CMakeLists.txt或者package.xml后,执行catkin_make会将工作空间的所有package的CMakeLists重新处理一遍。catkin_make遍历所有包的过程,占CPU并不大,占CPU还是在编译阶段catkin_make可能报错内存不足,尤其是move_base,因为需要占用很多资源catkin_make时占CPU太大,导致几乎死机。可以从另一台电脑SSH,执行pkill cc1plus停止编译
编译整个工作空间是这样的: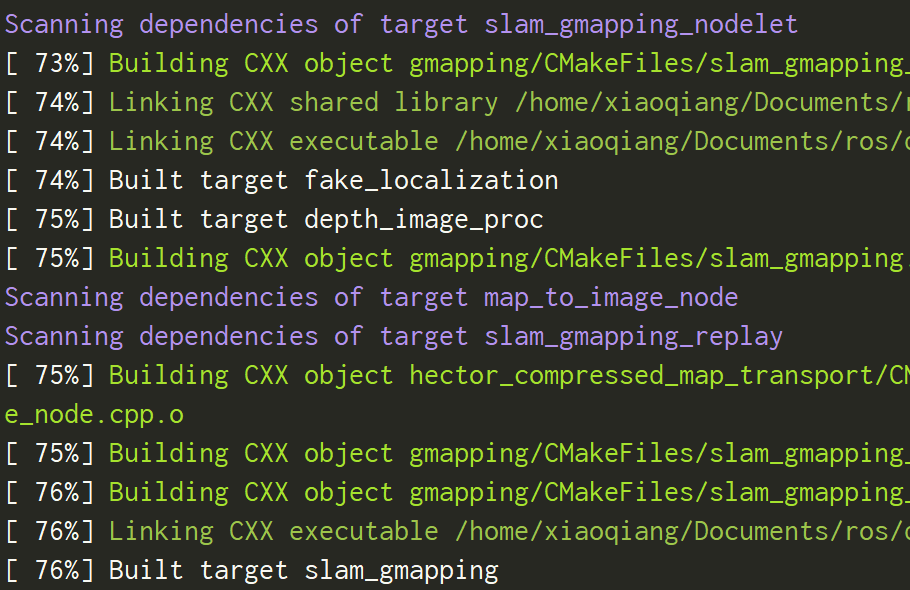
先检查了slam_gmapping_nodelet的依赖项,然后是编译fake_localization和depth_image_proc,然后又开始检查map_to_image_node,并不是按包的顺序编译slam_gmapping_nodelet,也就是并不是一个一个包按顺序编译,而是万箭齐发式的。因此,要看某一个包的问题时,不要编译整个工作空间,否则很难找。
catkin_make -D是指定编译的配置, 在D后面增加命令 ,比如指定编译类型Release和核数编译: catkin_make -DCMAKE_BUILD_TYPE=Release -j8
不同package的类型
编译时,catkin_make会显示各种包的情况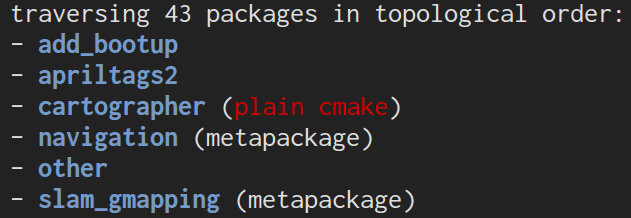
plain cmake是纯cmake的包,不能用catkin_make
metapackage都是ROS官方的,自己不用写这种类型,它不安装任何文件(除了package.xml说明的), 也不包含任何代码文件、test、launch文件,你会发现navigation这个包只有四个文件:CHANGELOG.rst, CMakeLists.txt, package.xml, README.rst
它的package.xml会含有下面内容:1
2
3<export>
<metapackage />
</export>CMakeLists.txt中还有一句catkin_metapackage()
这里涉及到 16和18版本的不同 ,对于16 kinetic,会有如下如下报错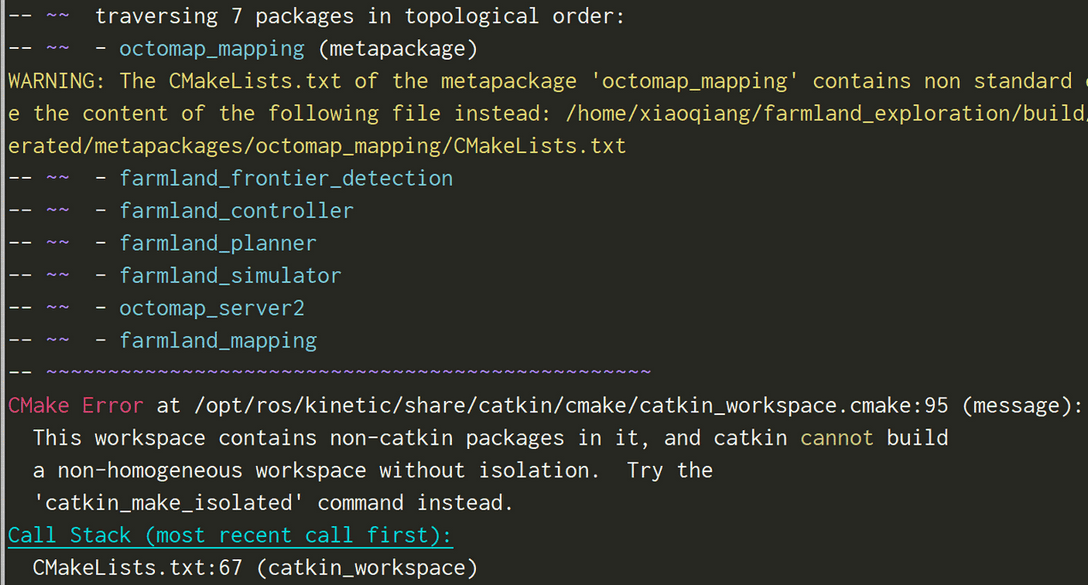
18 melodic不会有这个报错,此外18版对C++11类型的支持更好,有时无需手动修改cmake
不同版本的package.xml
目前常用的package.xml开头是这样的:1
2
3
4
<package format="2">
<name>name</name>
<version>0.0.0</version>
旧版本的是这样的:1
2
3<package>
<name>base_local_planner</name>
<version>1.14.4</version>
旧版本的不能使用exec_depend,而是用run_depend,否则会报错
单独编译某个package
以前一直认为单独编译某个package的命令是catkin_make --pkg package1,结果这样仍然会将工作空间中所有package的CMakeLists全检查一遍,花费时间相当长,实际的命令是这个:1
catkin_make -DCATKIN_WHITELIST_PACKAGES="package1;package2"
可以编译一个或多个package,但是执行这个命令之后再catkin_make回发现它仍然只编译上次的package。恢复成编译所有package去掉引号里面的内容就行:1
2
3catkin_make -DCATKIN_WHITELIST_PACKAGES=""
# 对ninja编译的包
catkin_make -DCATKIN_WHITELIST_PACKAGES="package" --use-ninjabuild文件夹存放cmake和make相关的文件,devel文件夹存放编译生成的文件和目标,包括setup.sh。
clean命令
跟make clean类似,也有个catkin_make clean命令,它会删除所有编译的可执行文件或库文件,但是不会删除删除头文件,例如msg和srv生成的头文件
INSTALL
现在执行INSTALL命令不再是sudo make install了,而是catkin_make install,它相当于:1
2
3
4
5cd ~/catkin_ws/build
# If cmake hasn't already been called
cmake ../src -DCMAKE_INSTALL_PREFIX=../install -DCATKIN_DEVEL_PREFIX=../devel
make
make install
这样执行完以后,工作空间会出现一个install文件夹,里面存放着编译生成的库文件,问题是它会把所有package的install都进行处理,如果想改变这个目录的位置,执行catkin_make -DCMAKE_INSTALL_PREFIX=path install。另外在CMakeLists中指定安装目录用SET(CMAKE_INSTALL_PREFIX < install_path >)
编译出的.so和可执行文件可以直接放到另一台电脑使用,但是如果是跨平台,catkin_make install恐怕不可用,需要交叉编译。
结果会在share/status_panel/cmake中生成两个cmake文件
这两个文件是做依赖包时必需的,比如roscpp就有相应的文件
catkin屏蔽掉不想编译的package
workspace/src下有多个package包,有时候只想不编译某个package。可以在不想被编译的package目录下新建了CATKIN_IGNORE 文件,不用写任何东东。返回到workspace目录下后执行catkin_make就不会编译带有CATKIN_IGNORE的package。
如果当src中有一个package中已经有这样的文件(命名为CATKIN_IGNORE的空文件)时,当你指定要编译这个package时: catkin_make --pkg your-pkg-name会报错:1
Packages "your-pkg-name" not found in the workspace
链接ROS库
如果想使用ROS的头文件,必须在CMakeLists里加入下面内容,也就是链接ROS的头文件和库:1
2
3
4
5
6
7
8include_directories(
# include
${catkin_INCLUDE_DIRS}
)
find_package(roscpp)
target_link_libraries(foo
${catkin_LIBRARIES}
)
别忘了target_link_libraries在add_excutable之后。用message函数可以看到include文件夹和libraries文件夹如下:

在CMakeLists中加入catkin_package(), 才能在执行catkin_make后,在devel/lib中生成可执行文件