以下功能不太合理或者比较冷门,应该尽量少使用
Exception
虚继承,非public继承,多重继承
malloc/free
C风格字符串(
char*)union,* bit fields
padding,对齐规则
宏
char和string之间的关系
隐式转换
模板
友元
数组类型,能退化成指针,但不能当返回值类型,还不能用另一个数组初始化。

以下功能不太合理或者比较冷门,应该尽量少使用
Exception
虚继承,非public继承,多重继承
malloc/free
C风格字符串(char*)
union,* bit fields
padding,对齐规则
宏
char和string之间的关系
隐式转换
模板
友元
数组类型,能退化成指针,但不能当返回值类型,还不能用另一个数组初始化。
这个算法很简单,可以说是对路径的拉直。可以用于处理A*。也可以说是无约束的降采样,可以消除小的抖动,但无法保证路径仍然安全。
有时路径规划获得的点太多,或者录制机器人路径获得的点太多,可以使用RDP算法,对得到的点进行缩减,用少量目标点表示路径。
首先,将起始点和终点连成一条线,找到剩下的点中距离这条线垂直距离最大的点P,记住点P和最大距离max,如果max小于设定的距离epsilon,则直接返回起始点和终止点就可以了。由于最大距离离这条直线也不远,因此可以把所有的点都看做在这条直线上,相当于把整个路径按照首尾拉直了。
如果max大于设定的距离epsilon,那么开始递归,以点P为中心将线段分为两部分,每一部分都重复上述过程,直到递归结束,相当于对两部分各自拉直。

void cv::circle(InputOutputArray img, Point center, int radius, const Scalar& color,
                int thickness = 1, LineTypes lineType = LINE_8, int shift = 0);
lineType
: 可选参数,表示圆边界的类型,可以取以下几个值:
cv::LINE_4: 表示绘制四个相邻的点的圆边界,默认值。
cv::LINE_8: 表示绘制八个相邻的点的圆边界。
cv::LINE_AA: 表示绘制抗锯齿的圆边界。
shift: 可选参数,表示坐标点像素值所占用的位数,默认值为 0。
void cv::rectangle(InputOutputArray img, Rect rect, const Scalar& color,
                   int thickness = 1, LineTypes lineType = LINE_8, int shift = 0)
Rect函数的基本形式是Rect(x, y, width, height),其中x和y代表矩形左上角的坐标,width和height分别代表矩形的宽度和高度。
如果创建一个Rect对象rect(100, 50, 50, 100),有以下常用函数1
2
3
4
5
6
7
8
9
10
11
12
13rect.area(); //返回rect的面积 5000
rect.size(); //返回rect的尺寸 [50 × 100]
rect.tl(); //返回rect的左上顶点的坐标 [100, 50]
rect.br(); //返回rect的右下顶点的坐标 [150, 150]
rect.width(); //返回rect的宽度 50
rect.height(); //返回rect的高度 100
rect.contains(Point(x, y)); //返回布尔变量,判断rect是否包含Point(x, y)点
寻找包裹轮廓的最小正矩形。矩形的边界与图像边界平行。 唯一一个参数是输入的二维点集,可以是 vector 或 Mat 类型。只需要 #include "opencv2/opencv.hpp"
1 |
|

寻找包裹轮廓的最小斜矩形。唯一一个参数是输入的二维点集,可以是 vector 或 Mat 类型。只需要 #include "opencv2/opencv.hpp"
与 boundingRect 返回结果的区别是:矩形的边界不必与图像边界平行
RotatedRect旋转矩形结构体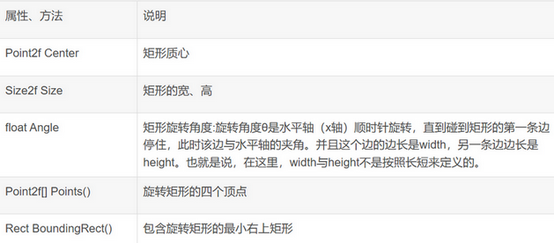
1 | Mat gray, bin_img; |

计算点与轮廓的距离及位置关系,只需要 #include "opencv2/opencv.hpp"
contour: 所需检测的轮廓对象
pt: Point2f 类型的pt, 待判定位置的点
measureDist: 是否计算距离的标志, 当其为true时, 计算点到轮廓的最短距离, 当其为false时, 只判定轮廓与点的位置关系, 具体关系如下:
① 返回值为-1, 表示点在轮廓外部
② 返回值为0, 表示点在轮廓上
③ 返回值为1, 表示点在轮廓内部
如果不需要知道具体的距离,建议将第三个参数设为false,这样速度会提高2到3倍。1
2
3
4
5
6
7
8
9
10
11
12
13
14
15
16
17
18
19
20
21
22//计算点到轮廓的距离与位置关系
Mat srcImg = imread("1.png");
imshow("src", srcImg);
Mat dstImg = srcImg.clone();
cvtColor(srcImg, srcImg, CV_BGR2GRAY);
threshold(srcImg, srcImg, 100, 255, CV_THRESH_BINARY);
imshow("threshold", srcImg);
vector<vector<Point>> contours;
vector<Vec4i> hierarcy;
findContours(srcImg, contours, hierarcy, CV_RETR_TREE, CV_CHAIN_APPROX_NONE);//TREE:提取所有轮廓 NONE:画出轮廓所有点
cout << "contours.size()=" << contours.size() << endl;
for (int i = 0; i < contours.size(); i++)//遍历每个轮廓
{
for (int j = 0; j < contours[i].size(); j++)//遍历轮廓每个点
{
cout << "(" << contours[i][j].x << "," << contours[i][j].y << ")" << endl;
}
}
double a0 = pointPolygonTest(contours[0], Point(3, 3), true);//点到轮廓的最短距离
double b0 = pointPolygonTest(contours[0], Point(212, 184), false);//点与轮廓的位置关系:-1表示外部;0表示在轮廓上;1表示轮廓内部
double contourArea( InputArray contour, bool oriented = false );
contour,输入的向量,二维点(轮廓顶点),可以为std::vector或Mat类型。oriented,面向区域标识符。若其为true,会返回一个带符号的面积值,正负取决于轮廓的方向。1 |
|
第一个圆的面积并不是9π,而是20。面积值是按照轮廓的内部面积进行计算的,会损失一些。
参考: cv::contourArea
虚函数表是通过一块内存来存储虚函数的地址,它实际是一个函数指针数组,每一个元素都是虚函数的指针,虚函数表的最后一个元素是一个空指针。假如虚函数类型为int,函数指针就是int*类型.虚函数表将被该类的所有对象共享,每个对象内部包含了一个虚表指针,指向虚函数表
有虚函数的类的最开始部分就是虚指针,它指向虚函数表起始地址,类型为int**(如果虚函数类型int),表中存放虚函数的地址。通过这个指针可以获取到该类对象的所有虚函数,包括父类的。
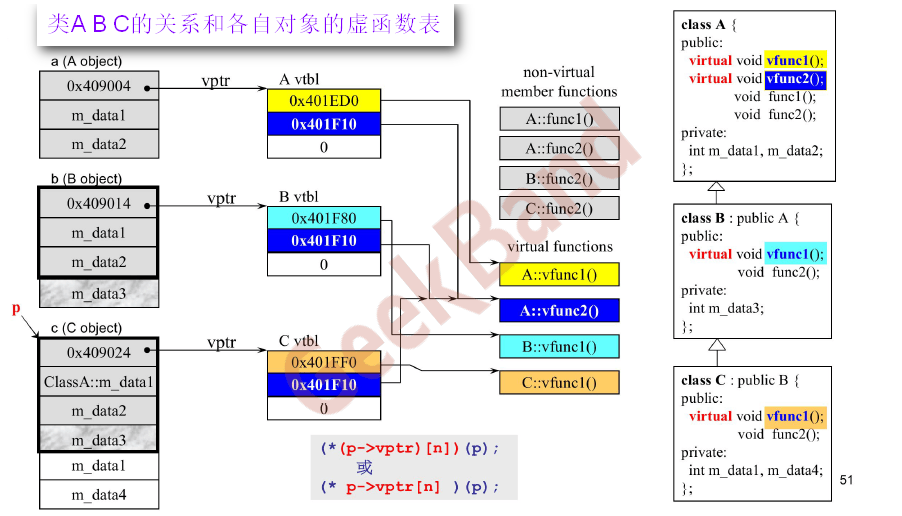
因为派生类会继承基类的虚函数表,所以通过虚函数表,我们就可以知道该类对象的父类,在转换的时候就可以用来判断对象有无继承关系。派生类中增加的虚函数,如果覆盖了基类的虚函数,虚函数表中会替换相应的基类虚函数,地址换成派生类的;如果没有覆盖基类的虚函数,就添加到原虚函数表后面,以空指针结尾. 所以说派生类的虚函数表中的函数地址不是连续的,基类的是连续的。
类Base的虚表如下图: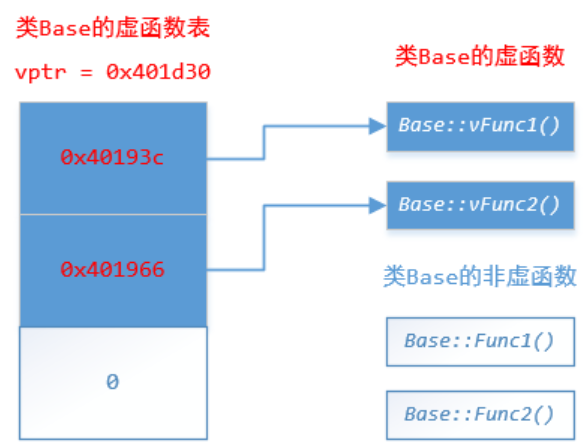
如果派生类Derived没有覆盖基类的虚函数,它的虚函数表如下图: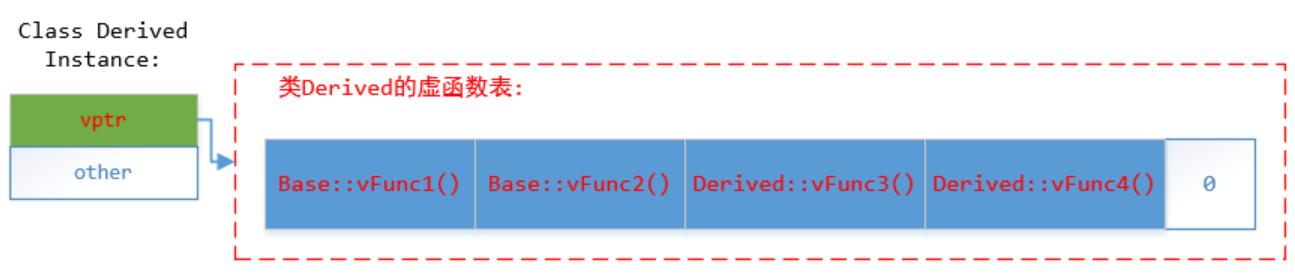
如果覆盖vFunc1,则替换Base的vFunc1;如果还定义了一个虚函数vFunc3,那么继续往虚函数表之后填,最后一个数组成员还是空指针
当类有虚函数时候,类的第一个成员变量是一个虚函数指针,而this指针的值和第一个成员变量的地址相同(this指针指向第一个成员变量)。因此当有虚函数时,this指针的值等于虚函数指针的地址 this==&_vptr;
std::begin()和std::end()是STL中的函数模板,用于获取容器(数组、std::initializer_list、STL标准容器、std::string_view、std::array等)的起始和结束迭代器。它们提供了一种通用的方式来访问这些序列的边界,而不依赖于具体的容器类型。一般结合STL的算法一起使用
1 | int a[] = { 1, 3, 5, 2, 9, 6, 8 }; |
感觉和现有的begin,end迭代器有些冗余
find() 函数是一个泛型算法,可以用于操作所有STL容器。它用于在数组或标准库容器(如vector, map)中查找指定元素,查找成功则返回一个指向指定元素的迭代器,查找失败则返回end迭代器。注意: 不是返回 true or false
时间复杂度是O(n)1
2
3
4
5
6
7
8
9
10vector<int> num_list = { 2,4,6,8,10,12 };
int find_num = 8; //要查找的元素,类型要与vector中的元素类型一致
std::vector<int>::iterator num = std::find(num_list.begin(), num_list.end(), find_num); //返回一个迭代器指针
if (num != num_list.end()) //查找成功
{
cout << "其索引为 " << distance(num_list.begin(), num) << endl;
}
else
cout<< "元素 " << find_num << " 不在num_list中" << endl;
注意区分map::find 和 set::find,由于map和set内部是红黑树实现的。因此map和set内部的find函数查找时间复杂度是 O(logn)
std::copy(start, end, container.begin());
copy只负责复制,不负责申请空间,所以复制前必须有足够的空间。如果container的大小小于输入序列的长度N的话,这段代码会导致崩溃(crash)。所以此时引入了back_inserter1
std::copy(src.begin(), src.end(), std::back_inserter(dest));
标准库提供的back_inserter模板函数很方便,因为它为container返回一个back_insert_iterator迭代器,这样,复制的元素都被追加到container的末尾了。(就算container为空也没事)。
1 | vector<int> vec; |
std::fill 是C++标准库中的一个函数,和copy相对。定义在
1 | std::vector<int> vec = {1, 2, 3, 4, 5}; |
使用之前,必须对vector分配内存,比如调用resize函数。
std::fill有很多重载形式,但最常用的是根据容器迭代器赋值的形式。
用于计算两个迭代器之间的距离。它提供了一种方便的方法处理迭代器范围时进行遍历和计算。它在头文件<iterator>中定义,函数原型如下:1
2
3template< class InputIt >
typename std::iterator_traits<InputIt>::difference_type
distance( InputIt first, InputIt last );
1 | std::vector<int> v{3, 1, 4, 1, 5, 9}; |
std::distance()函数计算的是迭代器之间的距离,而不是元素的个数。因此,在使用时需要确保迭代器范围有效,否则可能导致未定义行为。
对于顺序容器(如向量、列表等),std::distance的时间复杂度为O(N),其中N是迭代器范围内的元素数量。对于随机访问迭代器(如指针、数组等),时间复杂度为O(1)
1 |
|
cmp 函数的特点:
1 | // 从小到大排列 |
用来计算特定范围内(包括连续的部分和初始值)所有元素的和,除此之外,还可以用指定的二进制操作来计算特定范围内的元素结果,需要 #include <numeric>。 三个形参:头两个形参指定要累加的元素范围,第三个形参则是累加的初值。
1 | vector<int> vec; |
我们期待的结果是num为30,但是这样会报错 candidate: main()::<lambda(int)> int num = std::accumulate(vec.begin(), vec.end(), 0, [](int input){return 2*input; } );
^ candidate expects 1 argument, 2 provided
最后一句应该改为 int num = std::accumulate(vec.begin(), vec.end(), 0, [](int n, int input){return n + 2*input; } );,得到num为30
sort使用快速排序的递归形式,时间复杂度是O(nlog(n) )
Sort函数有三个参数:(第三个参数可不写)
1 | int b = 3, c = 12; |
1 | int a[]={3,4,1,12,0,8,4}; |
使用Lambda表达式作为排序标准1
2
3
4
5
6
7
8
9
10
11
12
13
14
15
16
17
18
19
20
21vector<int> vec;
vec.push_back(1);
vec.push_back(2);
vec.push_back(3);
vec.push_back(4);
vec.push_back(5);
for(const auto &it: vec)
{
cout << it << " ";
}
cout << endl;
std::sort(vec.begin(), vec.end(),
[](int a, int b){
return (a%2) < (b%2);
}
);
for(auto it : vec)
{
cout << it << " ";
}
运行结果:1
21 2 3 4 5
2 4 1 3 5
针对自定义的数据类型,需要自定义排序的方式1
2
3
4
5
6
7
8
9
10
11
12
13
14
15
16
17
18
19
20
21
22
23
24
25
26
27
28
29
30
31
32struct Frontier
{
Frontier(double c):
cost(c){}
double cost;
};
bool compareFrontier(Frontier f1, Frontier f2)
{
return (f1.cost < f2.cost);
}
void showFrontiers(const vector<Frontier>& v)
{
for(auto f: v)
cout << f.cost << " ";
cout << endl;
}
vector<Frontier> frontiers;
frontiers.push_back(Frontier(1.2) );
frontiers.push_back(Frontier(4.9) );
frontiers.push_back(Frontier(12.7) );
frontiers.push_back(Frontier(0.3) );
frontiers.push_back(Frontier(3.6) );
showFrontiers(frontiers);
std::sort(frontiers.begin(), frontiers.end(),
[](const Frontier& f1, const Frontier& f2) { return f1.cost < f2.cost; });
// std::sort(frontiers.begin(), frontiers.end(), compareFrontier);
showFrontiers(frontiers);frontiers一般用vector或数组,不能是list, dequeue, queue
运行结果:1
21.2 4.9 12.7 0.3 3.6
0.3 1.2 3.6 4.9 12.7
ros2.0是一个跨平台的机器人开发框架,它在ros1.0的基础上进行了重构和改进,以适应更多的应用场景和需求。ros2.0的架构可以分为以下几个层次:
OS层: ros2.0支持多种操作系统,包括Linux、Windows、macOS、RTOS等,也支持没有操作系统的裸机.。
中间层: ros2.0采用基于RTSP协议的DDS (Data-Distribution Service) 作为中间层,DDS是一种用于实时和嵌入式系统发布-订阅式通信的工业标准,它提供了点对点的通信模式,不需要像ros1.0那样借由master节点来完成两个节点间通信,这使得系统更加容错和灵活。
接口层: ros2.0提供了两个主要的接口层,分别是rmw (ros middleware interface) 和rd (ros dient libraries) 。rmw是相对底层的接口层,直接和DDS交互,C语言实现:rc是对mw相对高层的抽象,C/C++实现。此外,还有一个ros to dds组件,主要为用户直接访问DDS层提供接口。
应用层: ros2.0支持用C++或者Python来编写应用程序,也支持其他语言的绑定。应用程序可以通过r或者ros to dds来调用中间层的功能。
如果项目需要实时性和分布通信支持,ROS 2.0提供了更好的解决方案
参考 fishros的安装教程
1 | 运行sudo pip install rosdep |
在ROS环境下会出现这个报错,改为 sudo apt-get install python3-xyz
ROS2安装指定包,和ROS1一样,例如 sudo apt-get install ros-humble-irobot-create-msgs
确保能对正确的ROS 2发行版运行rosdep: `rosdep install -y -r -q —from-paths src —ignore-src —rosdistro
刚开始安装./cuda_12.1.1_530.30.02_linux.run时, /所在的/dev/sdb7所剩空间越来越小,最终安装失败,提示 Ensure there is enough space in /tmp and that the installation package is not corrupt。 所以必须先扩展/所在的硬盘容量
按这个步骤安装,一般不会出问题: ubuntu18.04上cuda及cudnn安装
在x86架构的Ubuntu22.04交叉编译PCL源码,以能在ARM aarch64系统上运行,也就是全志MR527的TinaLinux 5.15.123 aarch64
先看完成的状态,也就是ARM平台的PCL库文件链接关系:
libpcl_kdtree.so1
2
3
4
5
6
7
8
9
10
11
12
13
14
15ldd /usr/lib/aarch64-linux-gnu/libpcl_kdtree.so
linux-vdso.so.1 (0x0000ffff8d240000)
libpcl_common.so.1.10 => /lib/aarch64-linux-gnu/libpcl_common.so.1.10 (0x0000ffff8cfb7000)
liblz4.so.1 => /lib/aarch64-linux-gnu/liblz4.so.1 (0x0000ffff8cf89000)
libstdc++.so.6 => /lib/aarch64-linux-gnu/libstdc++.so.6 (0x0000ffff8cda4000)
libgomp.so.1 => /lib/aarch64-linux-gnu/libgomp.so.1 (0x0000ffff8cd56000)
libgcc_s.so.1 => /lib/aarch64-linux-gnu/libgcc_s.so.1 (0x0000ffff8cd32000)
libc.so.6 => /lib/aarch64-linux-gnu/libc.so.6 (0x0000ffff8cbbf000)
/lib/ld-linux-aarch64.so.1 (0x0000ffff8d210000)
libm.so.6 => /lib/aarch64-linux-gnu/libm.so.6 (0x0000ffff8cb14000)
libpthread.so.0 => /lib/aarch64-linux-gnu/libpthread.so.0 (0x0000ffff8cae3000)
libdl.so.2 => /lib/aarch64-linux-gnu/libdl.so.2 (0x0000ffff8cacf000)
libpcl_common.so1
2
3
4
5
6
7
8
9
10ldd /usr/lib/aarch64-linux-gnu/libpcl_common.so
linux-vdso.so.1 (0x0000ffff975e8000)
libstdc++.so.6 => /lib/aarch64-linux-gnu/libstdc++.so.6 (0x0000ffff972d0000)
libm.so.6 => /lib/aarch64-linux-gnu/libm.so.6 (0x0000ffff97225000)
libgomp.so.1 => /lib/aarch64-linux-gnu/libgomp.so.1 (0x0000ffff971d7000)
libgcc_s.so.1 => /lib/aarch64-linux-gnu/libgcc_s.so.1 (0x0000ffff971b3000)
libpthread.so.0 => /lib/aarch64-linux-gnu/libpthread.so.0 (0x0000ffff97182000)
libc.so.6 => /lib/aarch64-linux-gnu/libc.so.6 (0x0000ffff9700f000)
/lib/ld-linux-aarch64.so.1 (0x0000ffff975b8000)
libdl.so.2 => /lib/aarch64-linux-gnu/libdl.so.2
在终端找到/opt/cmake/bin,启动cmake-gui,这里是新安装的cmake 3.27. 选择PCL的源码目录和build目录,选择交叉编译平台。没有显示需求,所以cmake-gui不需要选择 OpenGL和VTK
既然是交叉编译,那就得用跨平台的编译器,注意在启动cmake-gui的终端要提前设置环境变量:1
2
3
4
5export ARCH=arm64
export TOOLCHAIN_PATH=/home/user/toolschain/gcc-ubuntu-9.3.0-2020.03-x86_64-aarch64-linux-gnu
export LD_LIBRARY_PATH=/home/user/toolschain/gcc-ubuntu-9.3.0-2020.03-x86_64-aarch64-linux-gnu/lib/x86_64-linux-gnu:$LD_LIBRARY_PATH
export CROSS_COMPILE=/home/user/toolschain/gcc-ubuntu-9.3.0-2020.03-x86_64-aarch64-linux-gnu/bin/aarch64-linux-gnu-
configure PCL时出现的部分信息,可以无视1
2
3
4Could NOT find PkgConfig (missing: PKG_CONFIG_EXECUTABLE) # OMIT
Could NOT find LIBUSB_1 (missing: LIBUSB_1_LIBRARY LIBUSB_1_INCLUDE_DIR) # OMIT
Could NOT find ZLIB (missing: ZLIB_LIBRARY ZLIB_INCLUDE_DIR)
Could NOT find PNG (missing: PNG_LIBRARY PNG_PNG_INCLUDE_DIR)
编译的过程中,发现需要处理Boost, Flann, lz4, hdf5等库,它们也需要交叉编译。
PCL需要Boost,cmake时会提示无法找到Boost的错误,不是本机的x86 Boost,是aarch64的Boost,也就是说需要交叉编译Boost。
下载Boost1.74源码,找到bootstrap.sh,然后执行1
./bootstrap.sh --with-libraries=system,filesystem,thread,date_time,iostreams --with-toolset=gcc
修改project-config.jam文件,把using gcc部分修改为using gcc : arm : /home/user/toolschain/gcc-ubuntu-9.3.0-2020.03-x86_64-aarch64-linux-gnu/bin/aarch64-linux-gnu-gcc ;
找到gcc.jam文件,在430行左右,增加一行1
2
3
4
5
6# On Windows, fPIC is the default, and specifying -fPIC explicitly leads
# to a warning.
local non-windows = [ set.difference $(all-os) : cygwin windows ] ;
compile-link-flags <link>shared/<target-os>$(non-windows) : -fPIC ;
# 增加下面这行
compile-link-flags <link>static/<target-os>$(non-windows) : -fPIC ;
此步骤的主要目的是打开-fPIC,避免PCL在编译时找不到boost库的.a文件
进行编译并安装boost:1
sudo ./b2 cxxflags=-fPIC cflags=-fPIC -a install
编译时可能会报错: error while loading shared libraries: libisl.so.22: cannot open shared object file: No such file
将交叉编译的toolschain地址的这几个库文件都复制到/usr/lib/x86_64-linux-gnu: libctf-arm64.so.0, libopcodes-2.34-arm64.so, libbfd-2.34-arm64.so, libisl.so.22。 如果没报错就不用了。
编译结束,我把生成的Boost库的文件都放到了/usr/local/lib。也就是/usr/lib/x86_64-linux-gnu中的libboost开头的库文件仍是x86的,/usr/local/lib中的libboost开头的库文件是AArch64架构。对于ARM的so库文件,在x86上用ldd命令查看会出现 not a dynamic executable
修改PCL中的pcl_find_boost.cmake文件1
2
3
4set(Boost_DIR "/usr/lib/x86_64-linux-gnu/cmake")
# Required boost modules
set(BOOST_REQUIRED_MODULES filesystem date_time iostreams system)
find_package(Boost 1.74.0 REQUIRED COMPONENTS ${BOOST_REQUIRED_MODULES})
下载源码后执行1
2
3make CC=/home/user/toolschain/gcc-ubuntu-9.3.0-2020.03-x86_64-aarch64-linux-gnu/bin/aarch64-linux-gnu-gcc
mkdir lz4_arm
make install PREFIX=$(pwd)/lz4_arm
运行ldconfig, 出现 /sbin/ldconfig.real: /lib/x86_64-linux-gnu/liblz4.so.1 is not a symbolic link
运行file /lib/liblz4.so,出现liblz4.so: broken symbolic link to liblz4.s
目前解决: 把地平线x3M的 /lib/liblz4.so 和 /lib/liblz4.so.1 复制到我的本机的 /lib目录, /usr/lib/x86_64-linux-gnu的几个 liblz4.so 仍然是 x86 平台。
编译flann时,链接hdf5出错1
2
3/home/user/toolschain/gcc-ubuntu-9.3.0-2020.03-x86_64-aarch64-linux-gnu/bin/../lib/gcc-cross/aarch64-linux-gnu/9/../../../../aarch64-linux-gnu/bin/ld: /usr/lib/x86_64-linux-gnu/hdf5/serial/libhdf5.so: error adding symbols: file in wrong format
collect2: error: ld returned 1 exit status
显然需要的是ARM的hdf5,这个库的交叉编译特别麻烦,最后解决方法是从一台ARM平台的主机上找到 hdf5文件夹,放到了 /usr/lib/x86_64-linux-gnu
如果交叉编译hdf5,参考:
在一台ARM平台的设备上,flann库文件是这样的1
2
3
4
5
6
7
8
9/usr/lib/aarch64-linux-gnu/libflann.so
/usr/lib/aarch64-linux-gnu/libflann.so.1.9
/usr/lib/aarch64-linux-gnu/libflann.so.1.9.1
/usr/lib/aarch64-linux-gnu/libflann_cpp.so
/usr/lib/aarch64-linux-gnu/libflann_cpp.so.1.9
/usr/lib/aarch64-linux-gnu/libflann_cpp.so.1.9.1
/usr/lib/aarch64-linux-gnu/libflann_cpp_s.a
/usr/lib/aarch64-linux-gnu/libflann_s.a
链接关系:
libflann.so1
2
3
4
5
6
7
8
9
10
11
12
13
14
15
16
17
18
19
20
21
22
23
24
25
26ldd /usr/lib/aarch64-linux-gnu/libflann.so
linux-vdso.so.1 (0x0000ffff85887000)
libstdc++.so.6 => /lib/aarch64-linux-gnu/libstdc++.so.6 (0x0000ffff8511b000)
libm.so.6 => /lib/aarch64-linux-gnu/libm.so.6 (0x0000ffff85070000)
# 缺
libgomp.so.1 => /lib/aarch64-linux-gnu/libgomp.so.1 (0x0000ffff85022000)
libgcc_s.so.1 => /lib/aarch64-linux-gnu/libgcc_s.so.1 (0x0000ffff84ffe000)
libc.so.6 => /lib/aarch64-linux-gnu/libc.so.6 (0x0000ffff84e8b000)
/lib/ld-linux-aarch64.so.1 (0x0000ffff85857000)
# 目前缺这两个
libdl.so.2 => /lib/aarch64-linux-gnu/libdl.so.2 (0x0000ffff84e77000)
libpthread.so.0 => /lib/aarch64-linux-gnu/libpthread.so.0 (0x0000ffff84e46000)
ldd /usr/lib/aarch64-linux-gnu/libflann_cpp.so
linux-vdso.so.1 (0x0000ffff9fb1f000)
# 目前需要交叉编译
liblz4.so.1 => /lib/aarch64-linux-gnu/liblz4.so.1 (0x0000ffff9fa68000)
libstdc++.so.6 => /lib/aarch64-linux-gnu/libstdc++.so.6 (0x0000ffff9f883000)
# 目前缺
libpthread.so.0 => /lib/aarch64-linux-gnu/libpthread.so.0 (0x0000ffff9f852000)
libc.so.6 => /lib/aarch64-linux-gnu/libc.so.6 (0x0000ffff9f6df000)
/lib/ld-linux-aarch64.so.1 (0x0000ffff9faef000)
libm.so.6 => /lib/aarch64-linux-gnu/libm.so.6 (0x0000ffff9f634000)
libgcc_s.so.1 => /lib/aarch64-linux-gnu/libgcc_s.so.1
如果之前缺hdf5,编译会报警 hdf5 library not found, not compiling flann_example.cpp
解决方法: 把ARM平台的的flann库文件复制到了 /usr/lib/x86_64-linux-gnu,原来的x86的flann库文件复制到了新文件夹 /usr/lib/x86_64-linux-gnu/x86_flann
如果要交叉编译,需要修改CMakeLists:1
2
3
4
5pkg_check_modules(LZ4 REQUIRED liblz4)
#include_directories(${LZ4_INCLUDE_DIRS})
include_directories(/home/user/Downloads/lz4-1.9.1/lz4_arm/include)
link_directories(/home/user/Downloads/lz4-1.9.1/lz4_arm/lib)
现在继续使用cmake-gui交叉编译PCL,在界面中没有选择所有模块,执行Configure和Generate后,会有日志:1
2
3
4
5
6
7
8
9
10
11
12
13
14
15
16
17
18编译的模块:
common kdtree octree search
sample_consensus filters 2d
geometry io features ml
segmentation surface keypoints
tracking stereo tools
不会编译的模块:
visualization: VTK was not found.
registration: Disabled manually.
recognition: Requires registration.
apps: Disabled: registration missing.
outofcore: Requires visualization.
examples: Code examples are disabled by default.
people: Requires visualization.
simulation: Disabled: visualization missing.
global_tests: No reason
tools: Disabled: registration missing.
然后去build文件夹找每个模块的Makefile,比如pcl-pcl-1.10.0/build/kdtree,然后执行make即可。
PCL交叉编译得到的so文件特别大,有的到了800M。使用strip瘦身,结果报错 strip: Unable to recognise the format of the input file ,因为so文件是aarch64的,应当使用gcc-ubuntu-9.3.0-2020.03-x86_64-aarch64-linux-gnu/aarch64-linux-gnu/bin/strip,结果让libpcl_features.so.1.10.0从797M 下降到 39M。
所有编译生成的库文件在pcl-pcl-1.10.0/build/lib,把这些库文件放到开发板上,比如路径/pcl_libs,所有Boost的库文件也放过去,比如/boost_libs。
在本机上写一个PCL的测试程序,CMake部分:1
2
3
4
5
6
7
8
9
10
11
12
13
14
15
16
17
18
19
20
21
22
23
24
25
26
27
28cmake_minimum_required(VERSION 3.5)
project(test_cross_pcl LANGUAGES CXX)
set(CMAKE_CXX_STANDARD 14)
set(CMAKE_CXX_STANDARD_REQUIRED ON)
find_package(Boost COMPONENTS system filesystem thread REQUIRED)
include_directories(
include
/usr/include/eigen3
/home/user/Downloads/pcl-pcl-1.10.0/common/include
/home/user/Downloads/pcl-pcl-1.10.0/build/include
/home/user/Downloads/pcl-pcl-1.10.0/io/include
/home/user/Downloads/pcl-pcl-1.10.0/filters/include
)
LINK_DIRECTORIES(/home/user/Downloads/pcl-pcl-1.10.0/build/lib)
LINK_DIRECTORIES(/home/user/toolschain/gcc-ubuntu-9.3.0-2020.03-x86_64-aarch64-linux-gnu/aarch64-linux-gnu/lib)
add_executable(test_cross_pcl main.cpp)
target_link_libraries(test_cross_pcl
-lpcl_common
-lpcl_io
-lpcl_filters
-lpthread
)
不能使用本机上的编译器,还用cmake-gui进行交叉编译: configure, generate, 然后到对应的build文件夹里执行make,把生成的可执行文件放到开发板。
执行export LD_LIBRARY_PATH=/pcl_libs:/boost_libs:$LD_LIBRARY_PATH,也就是指定链接库的地址,再执行就成功了。
参考:Windows 10上源码编译PCL 1.8.1支持VTK和QT,可视化三维点云
交叉编译Boost