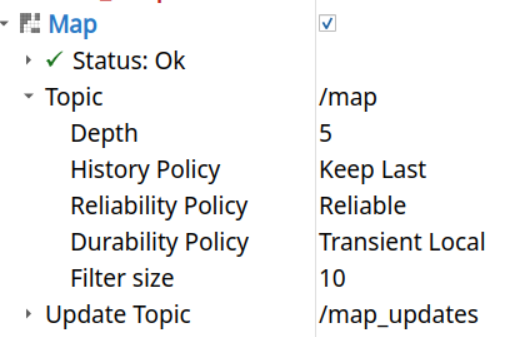
代价地图是在 planner_server 和 controller_server中初始化的。
清除代价地图
1 | <Action ID="ClearEntireCostmap"> |
行为树节点部分在clear_costmap_service.cpp,三个类都继承了BtServiceNode
服务端在 clear_costmap_service.cpp, 这里创建了service,编译为 libnav2_costmap_2d_core.so. 构造函数部分可以看到三个service的创建及其名称1
2
3
4
5
6
7
8
9
10
11
12
13
14
15
16
17
18
19
20
21
22
23
24
25
26
27ClearCostmapService::ClearCostmapService(
const nav2_util::LifecycleNode::WeakPtr & parent,
Costmap2DROS & costmap)
: costmap_(costmap)
{
auto node = parent.lock();
logger_ = node->get_logger();
reset_value_ = costmap_.getCostmap()->getDefaultValue();
clear_except_service_ = node->create_service<ClearExceptRegion>(
"clear_except_" + costmap_.getName(),
std::bind(
&ClearCostmapService::clearExceptRegionCallback, this,
std::placeholders::_1, std::placeholders::_2, std::placeholders::_3));
clear_around_service_ = node->create_service<ClearAroundRobot>(
"clear_around_" + costmap.getName(),
std::bind(
&ClearCostmapService::clearAroundRobotCallback, this,
std::placeholders::_1, std::placeholders::_2, std::placeholders::_3));
clear_entire_service_ = node->create_service<ClearEntirely>(
"clear_entirely_" + costmap_.getName(),
std::bind(
&ClearCostmapService::clearEntireCallback, this,
std::placeholders::_1, std::placeholders::_2, std::placeholders::_3));
}
比如名称可以是 clear_around_local_costmap
对应3个service1
2
3/local_costmap/clear_around_local_costmap
/local_costmap/clear_entirely_local_costmap
/local_costmap/clear_except_local_costmap
问题
编译nav2_costmap_2d后,直接运行ros2 run nav2_costmap_2d nav2_costmap,结果报错1
[pluginlib.ClassLoader]: Skipped loading plugin with error: XML Document '/home/user/project/install/nav2_costmap_2d/share/nav2_costmap_2d/costmap_plugins.xml' has no Root Element. This likely means the XML is malformed or missing..
如果行为树有节点是Nav2的客户端,在服务端没启动时,服务不可用,行为树运行时会直接报错,不会运行任何节点。
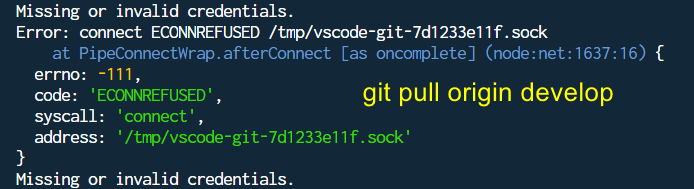
如果没启动服务端,客户端发起请求时会报错1
2
3[ERROR] [1754535646.216247848] [nav2_node]: "global_costmap/clear_entirely_global_costmap" service server not available after waiting for 1.00s
[nav2_node-1] terminate called after throwing an instance of 'std::length_error'
[nav2_node-1] what(): basic_string::_M_create
可以把 BtServiceNode构造函数的throw一行删掉,这样即使没有服务端,也不会报错

Action和service_name不符合,加载行为树会报错1
what(): could not create client: create_client() called for existing request topic name rq/global_costmap/clear_entirely_global_costmapRequest with incompatible type navit_msgs::srv::dds_::ClearEntireCostmap_Request_, at ./src/rmw_client.cpp:165, at ./src/rcl/client.c:146